| | My 70 Bus!! |  |
|
+16west coast ghia euphgirl Breck Jeff67Sqbk mikeinch dsimas Submarine Driver sactownbug Davids74Super Smogman72 Mateo type 4 60herbie53 916pat silvertonguedevil justcruzin 20 posters |
|
| Author | Message |
|---|
justcruzin

Posts : 810
Join date : 2011-07-29
Location : Sacramento CA
| | Subject: Re: My 70 Bus!! Sat Jun 23, 2012 5:51 pm | |
| Thanks to a friend on "earlybay.com" this week I was able to make me some shelves for my bus! Sarah made her a set and I liked them so I asked if she would send me a pattern. She did!  I made mine a bit different though! So here is what I started out with. 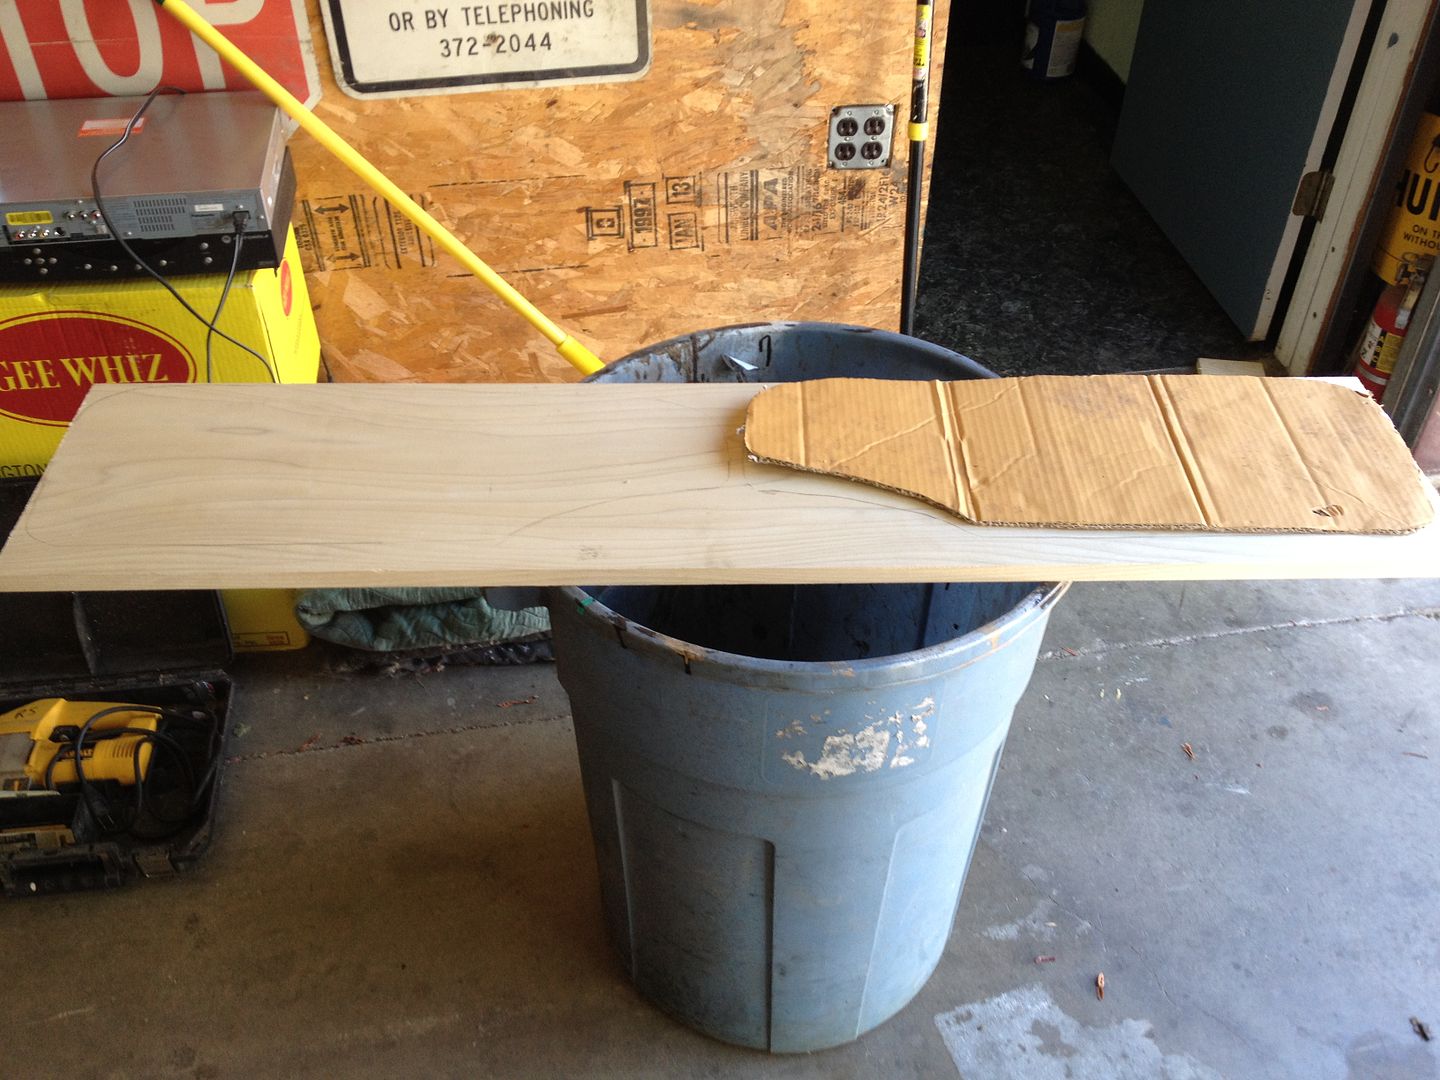 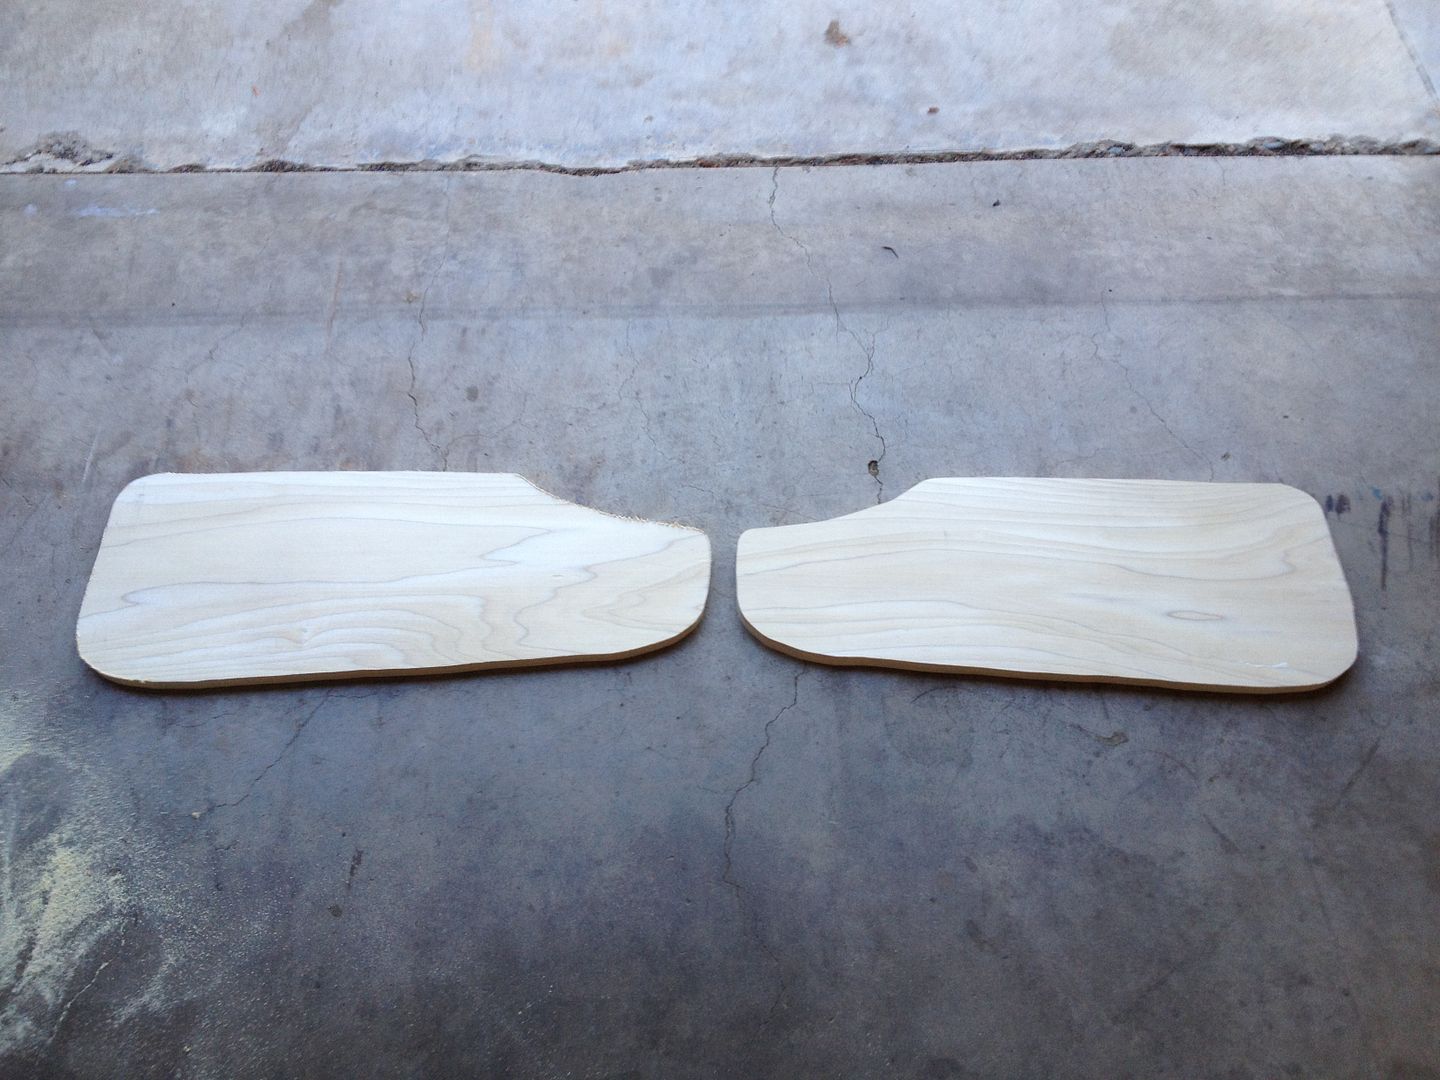 I made me a jig to make an outline of where I wanted my ledge. 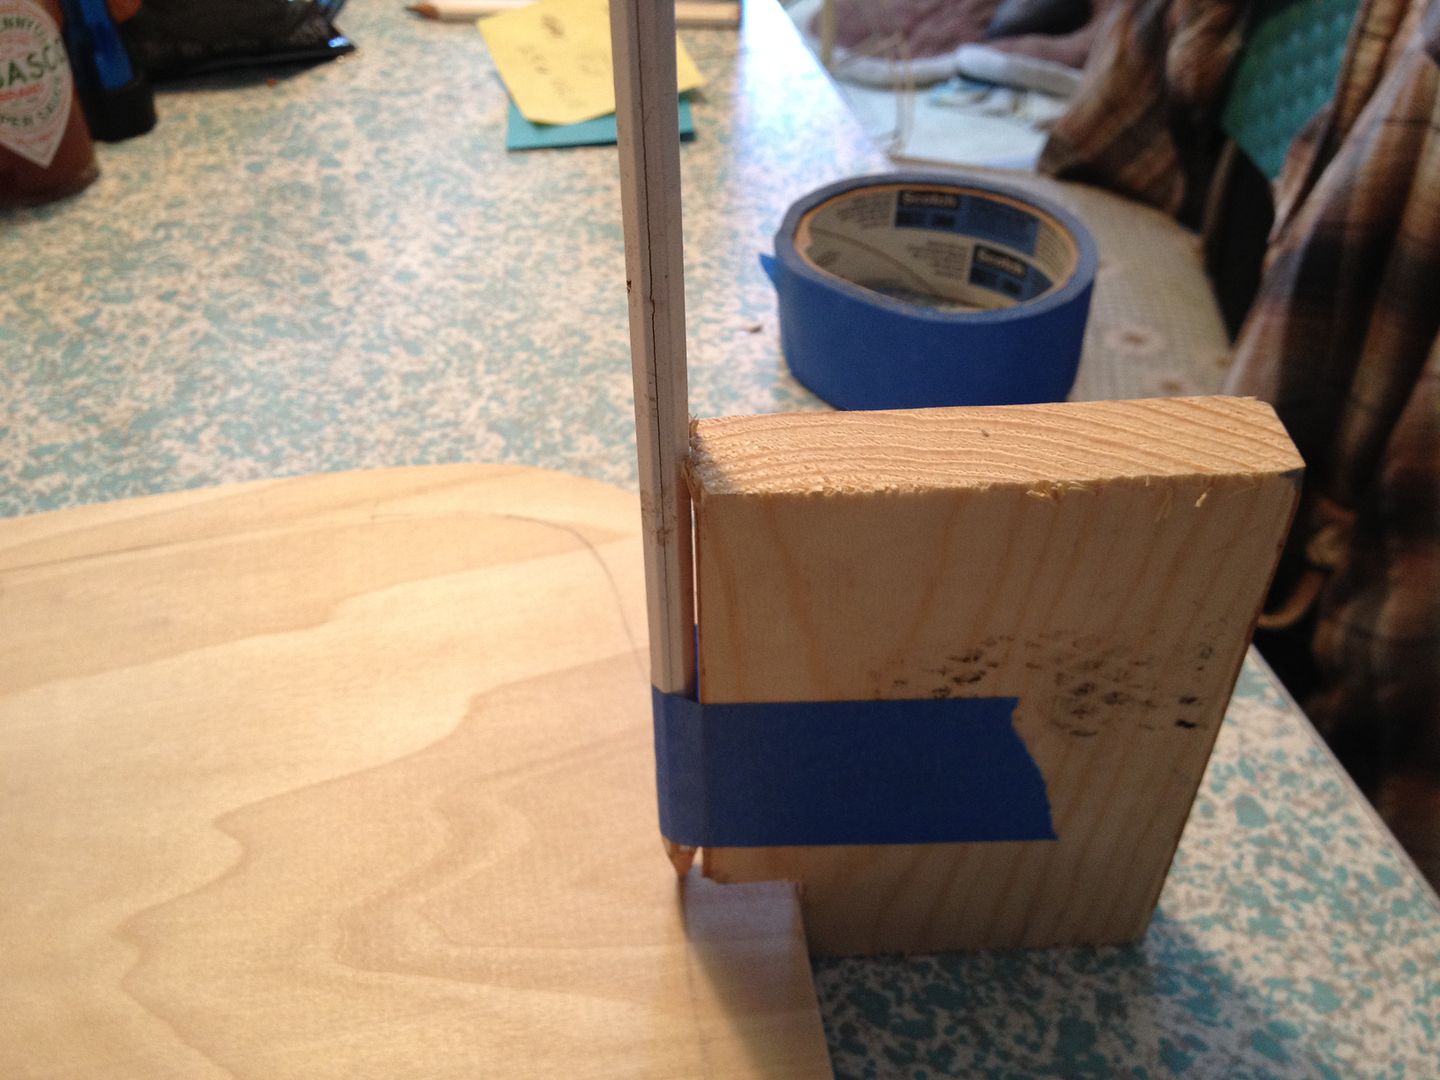 Here's the passenger side.  Driver side. I took a broken VW rearview mirror to make a outline for one of me cubby's!  All cut out and stained. 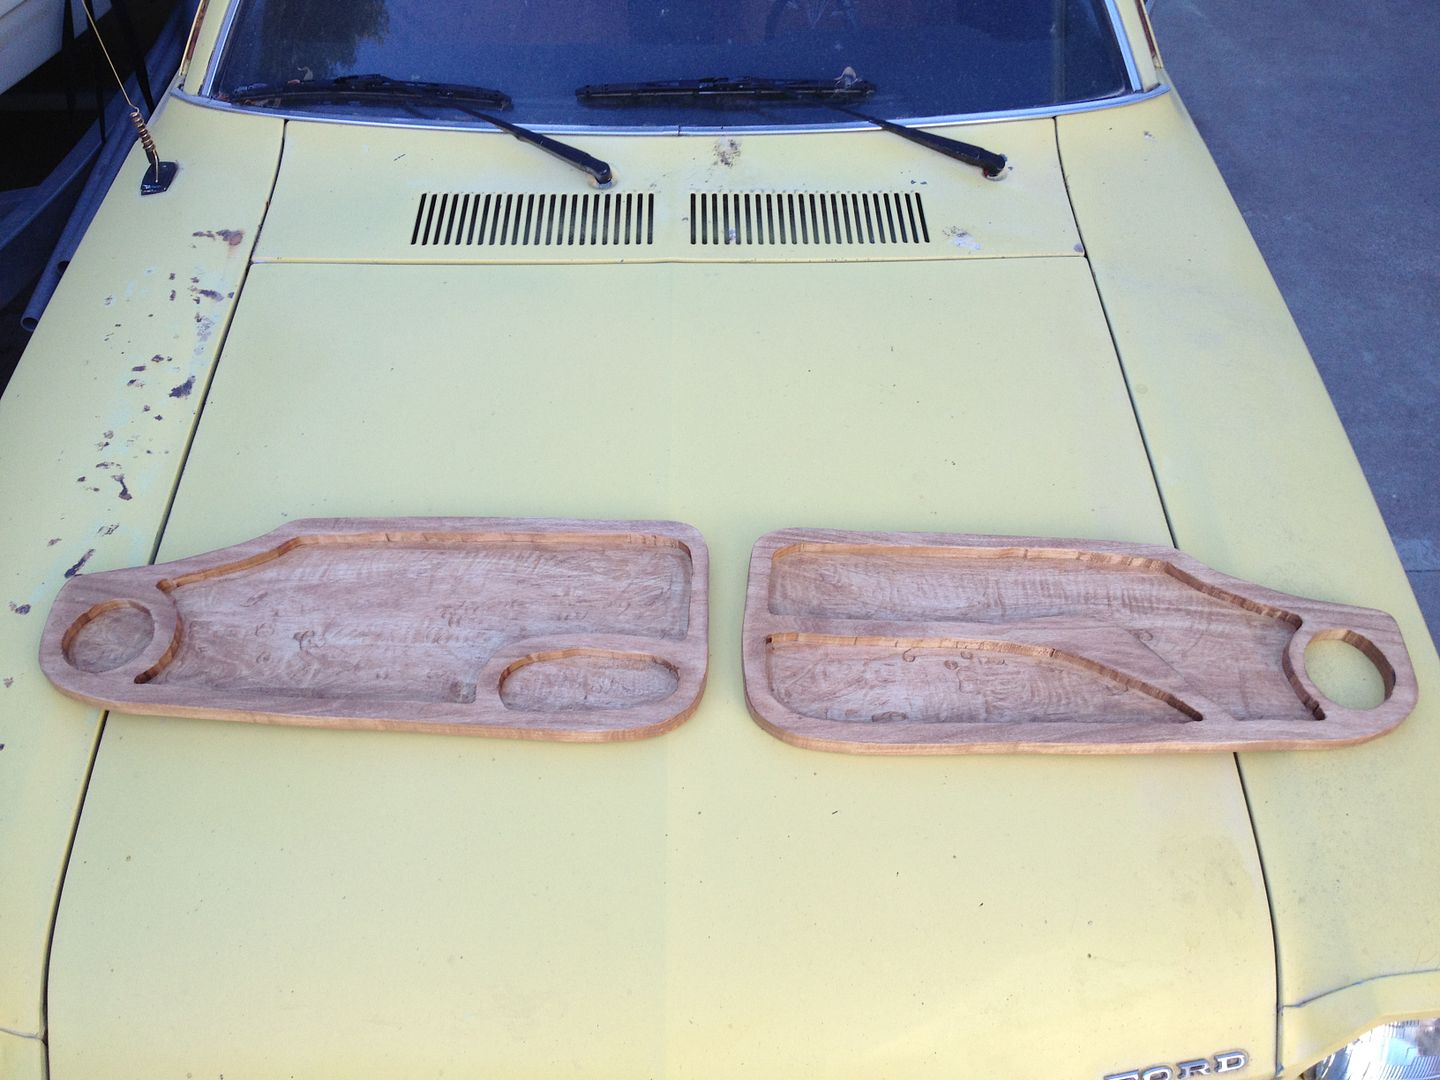 Before I could install them I had to do some rearranging in the bus.  I raised my fuse panel up and then relocated the fire extinguisher. This is just temporary till I find a better place for it. I want it to be easy to get too, but durring the winter months I need that spot for my Buddy Heater so eventually it will be moved again. 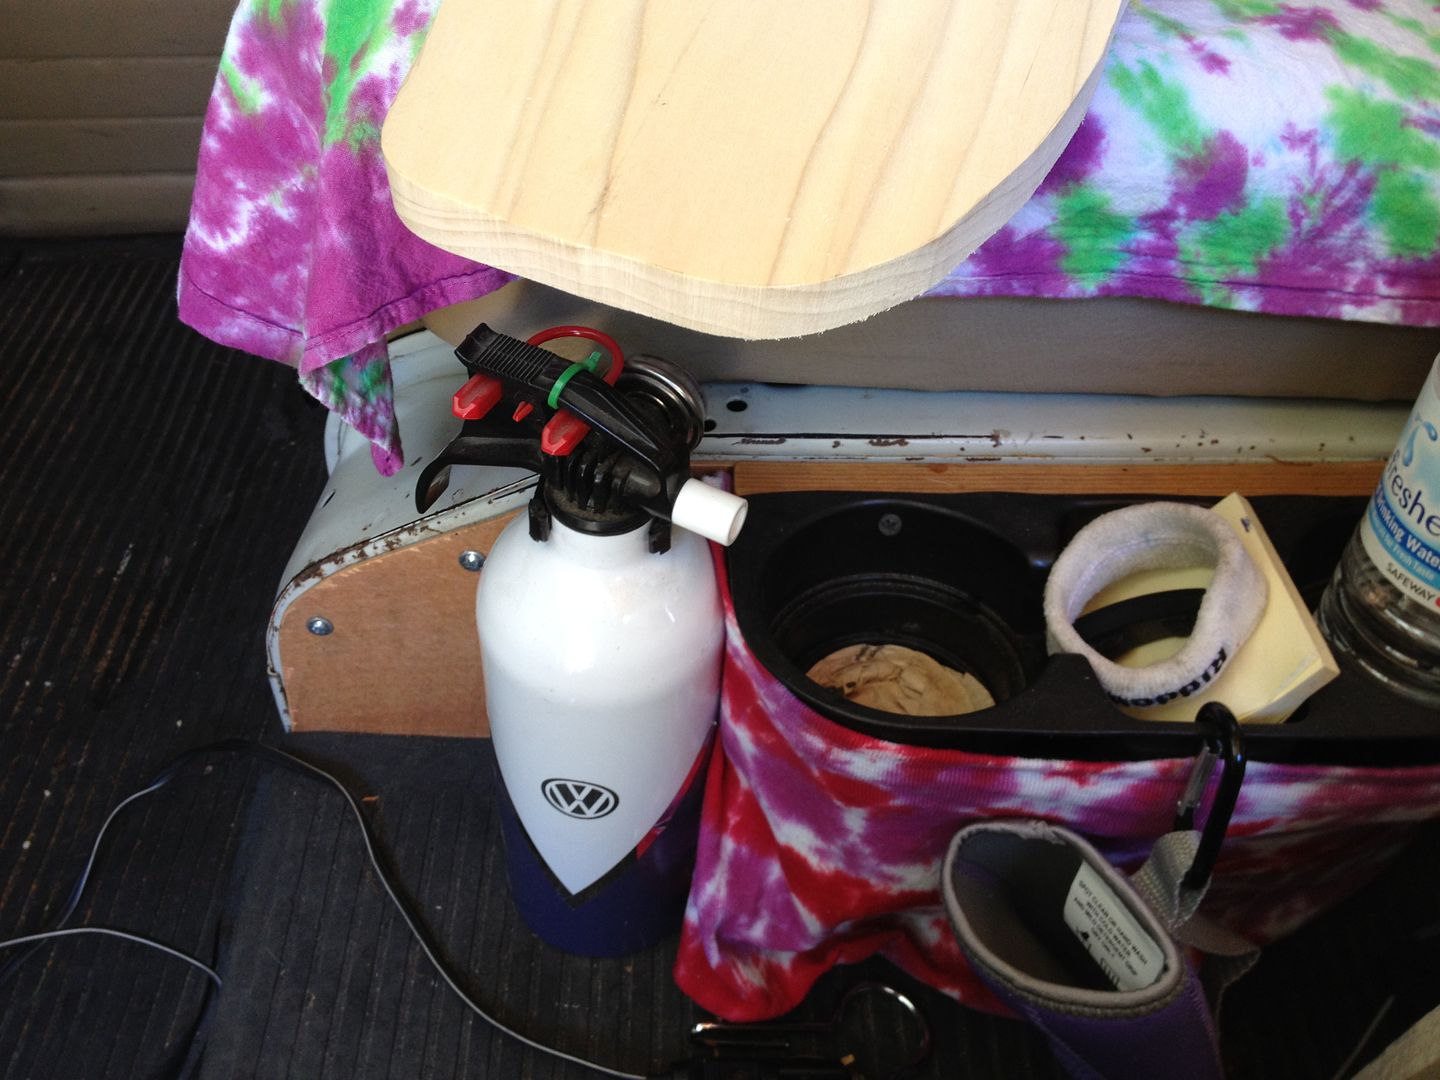 I installed a bar to clamp my fan too under the shelf. 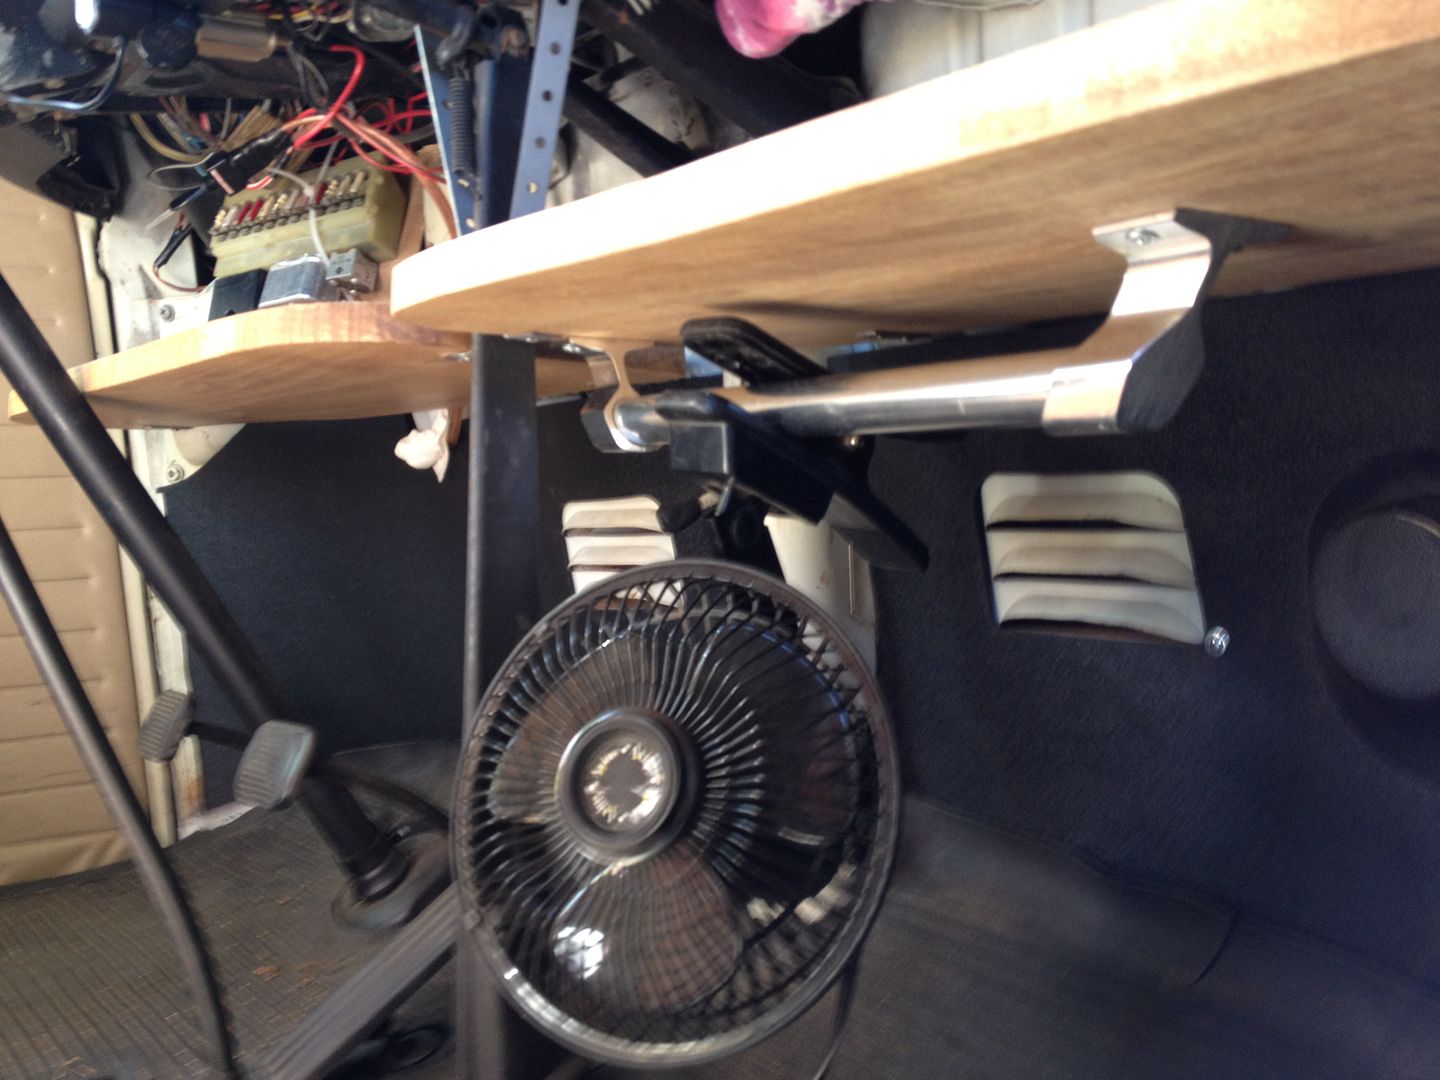 Passenger side has a cup holder. I will eventually try to find something to put under the hole so one can put a can in there too. For now it is only for cups that have a bigger top then bottom! LOL  Driver side has an option for a cup holder but I left it as a cubby for now. I like the cup holder I have in between the seats better but figured I would at least make a spot for one, that and it makes it match the passenger side a bit better.  I also installed a 3 way power adaptor. I liked it because of the on off switches and also the lights. I did mess up one light durring the install though.  The power part of it still works though. Only thing I didn't like about it was I had thought I could leave it's power point plugged in and just use the switches, but the power point has a light also. So I still have to pull it out a bit. I may try to remove the light later though. 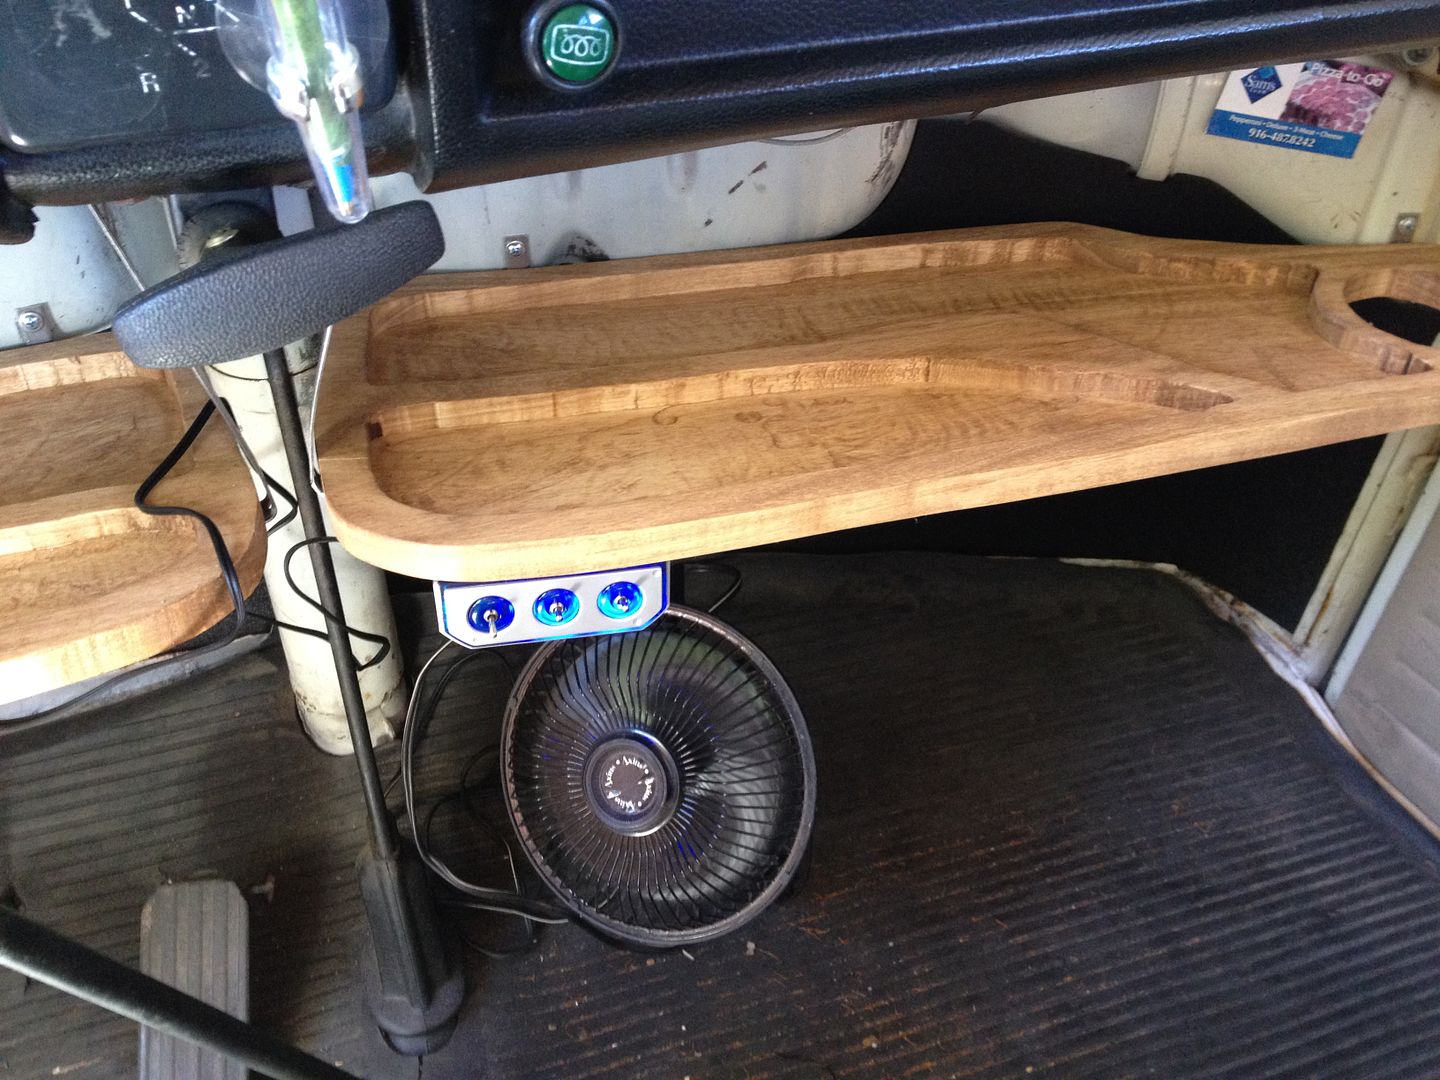 The finished product. All ready in use!! 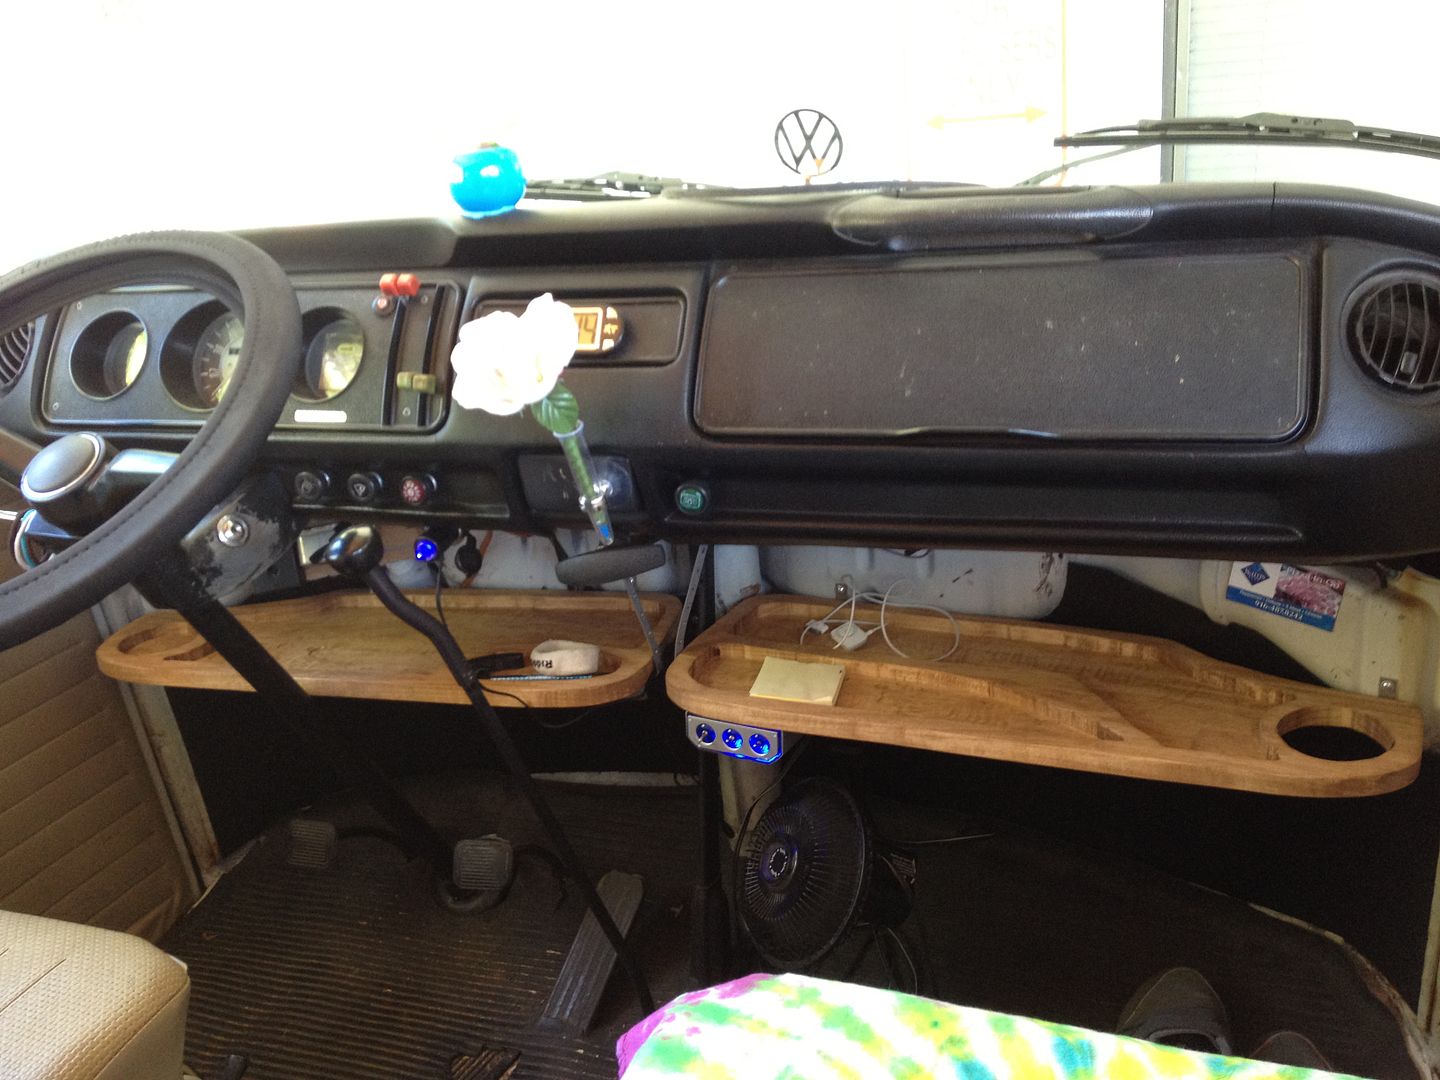 | |
|
| | |
Breck

Posts : 814
Join date : 2012-01-12
Age : 111
Location : Citrus Heights
| | Subject: Re: My 70 Bus!! Sun Jun 24, 2012 12:16 am | |
| | |
|
| | |
justcruzin
Posts : 810
Join date : 2011-07-29
Location : Sacramento CA
| | Subject: Re: My 70 Bus!! Sun Jun 24, 2012 12:40 am | |
| - Breck wrote:
- Very Nice Kim..me likey
Thanks Breck! I had fun making them. | |
|
| | |
justcruzin
Posts : 810
Join date : 2011-07-29
Location : Sacramento CA
| | Subject: Re: My 70 Bus!! Mon Jul 02, 2012 12:27 am | |
| Well, for the last week I have been working on a fix to my pop top. Here is before, 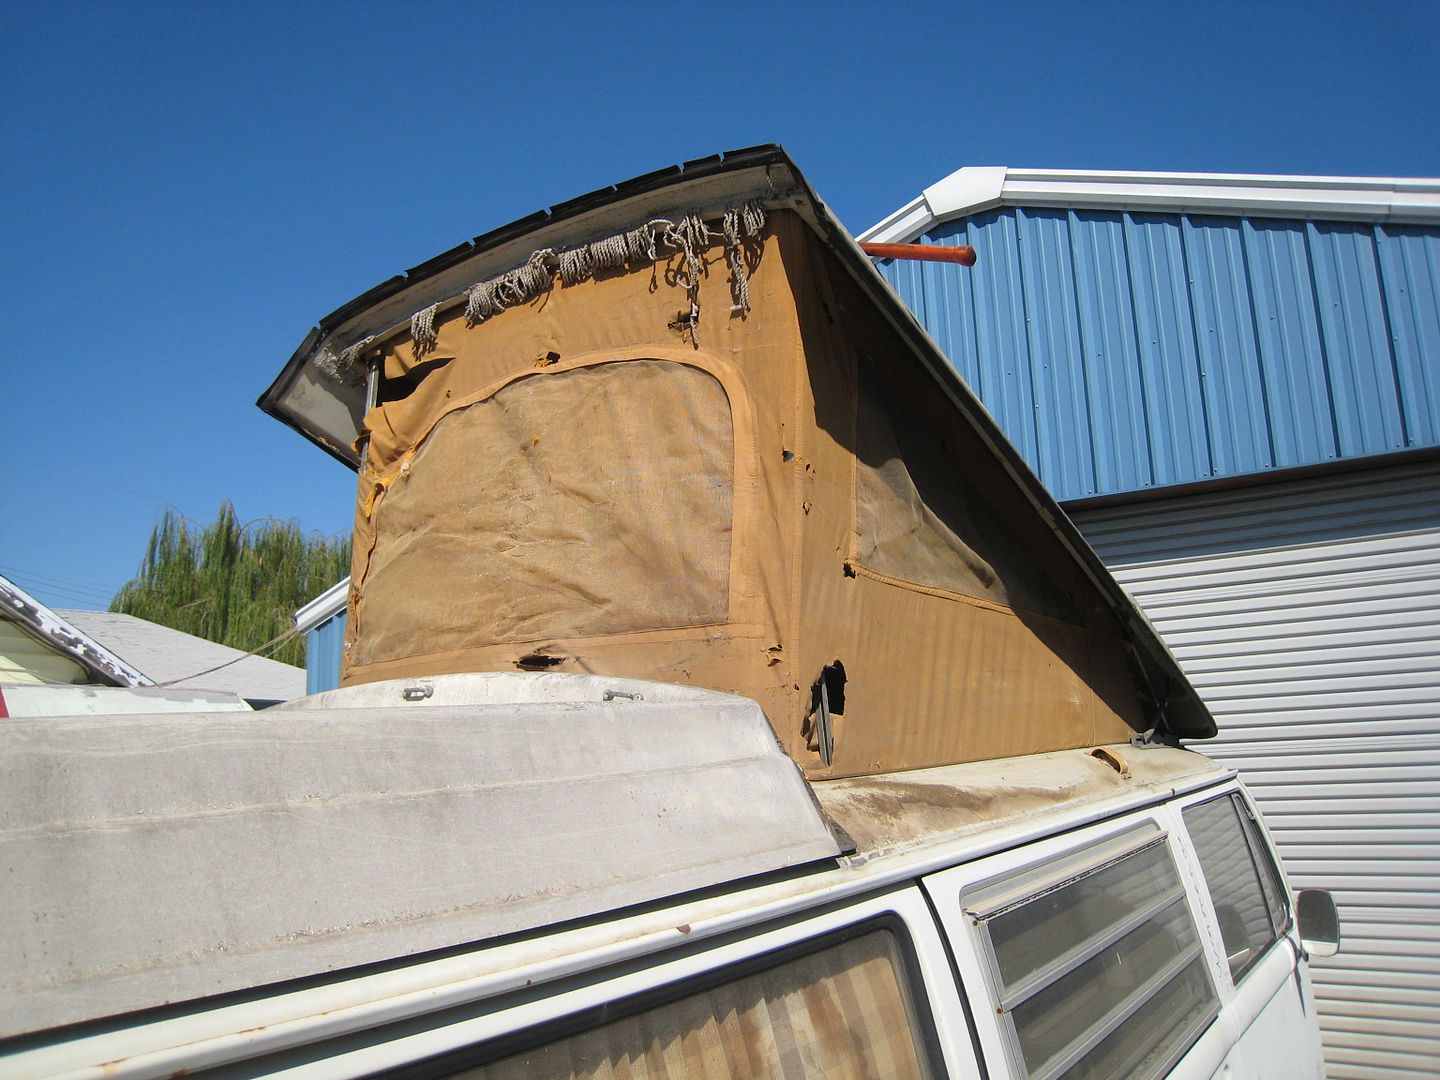 That was a pic from when I first got the bus. I actually got a bit to excited to try on my home made fix, that I forgot to take more current pics of it. It now has areas that I have tried to sew up to keep it from completely falling apart. Here is what I started with for the fix. Two white sheets sewn together. Drew half the VW emblem on. 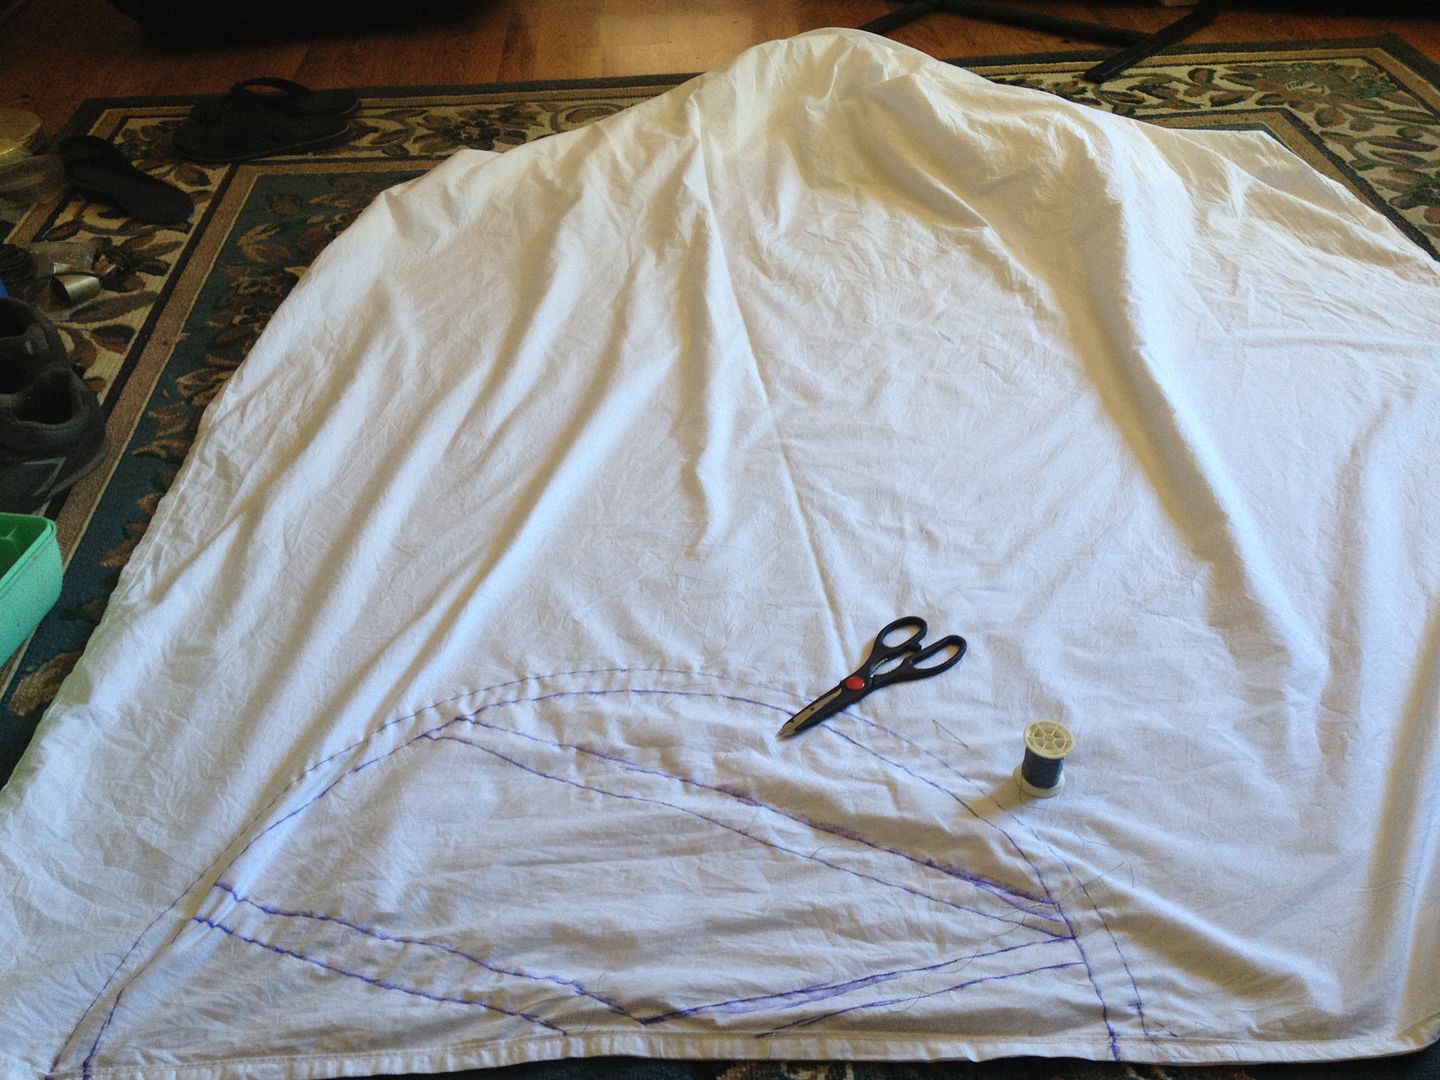 Then tied it up,  Then I did this, 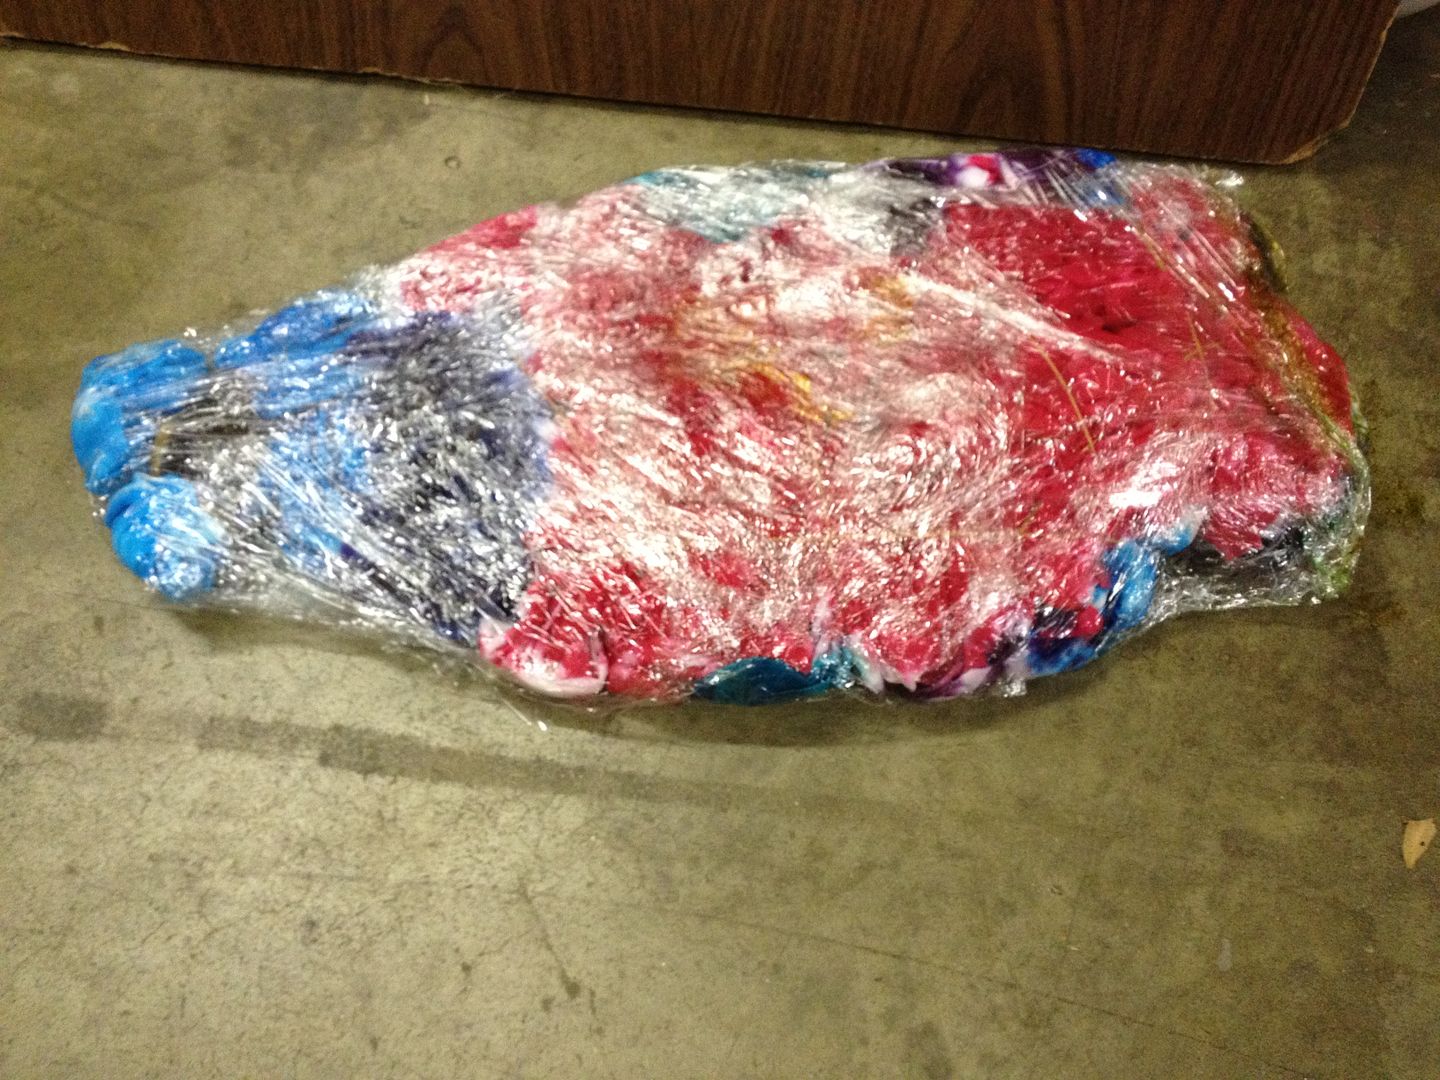 And the final product was this, 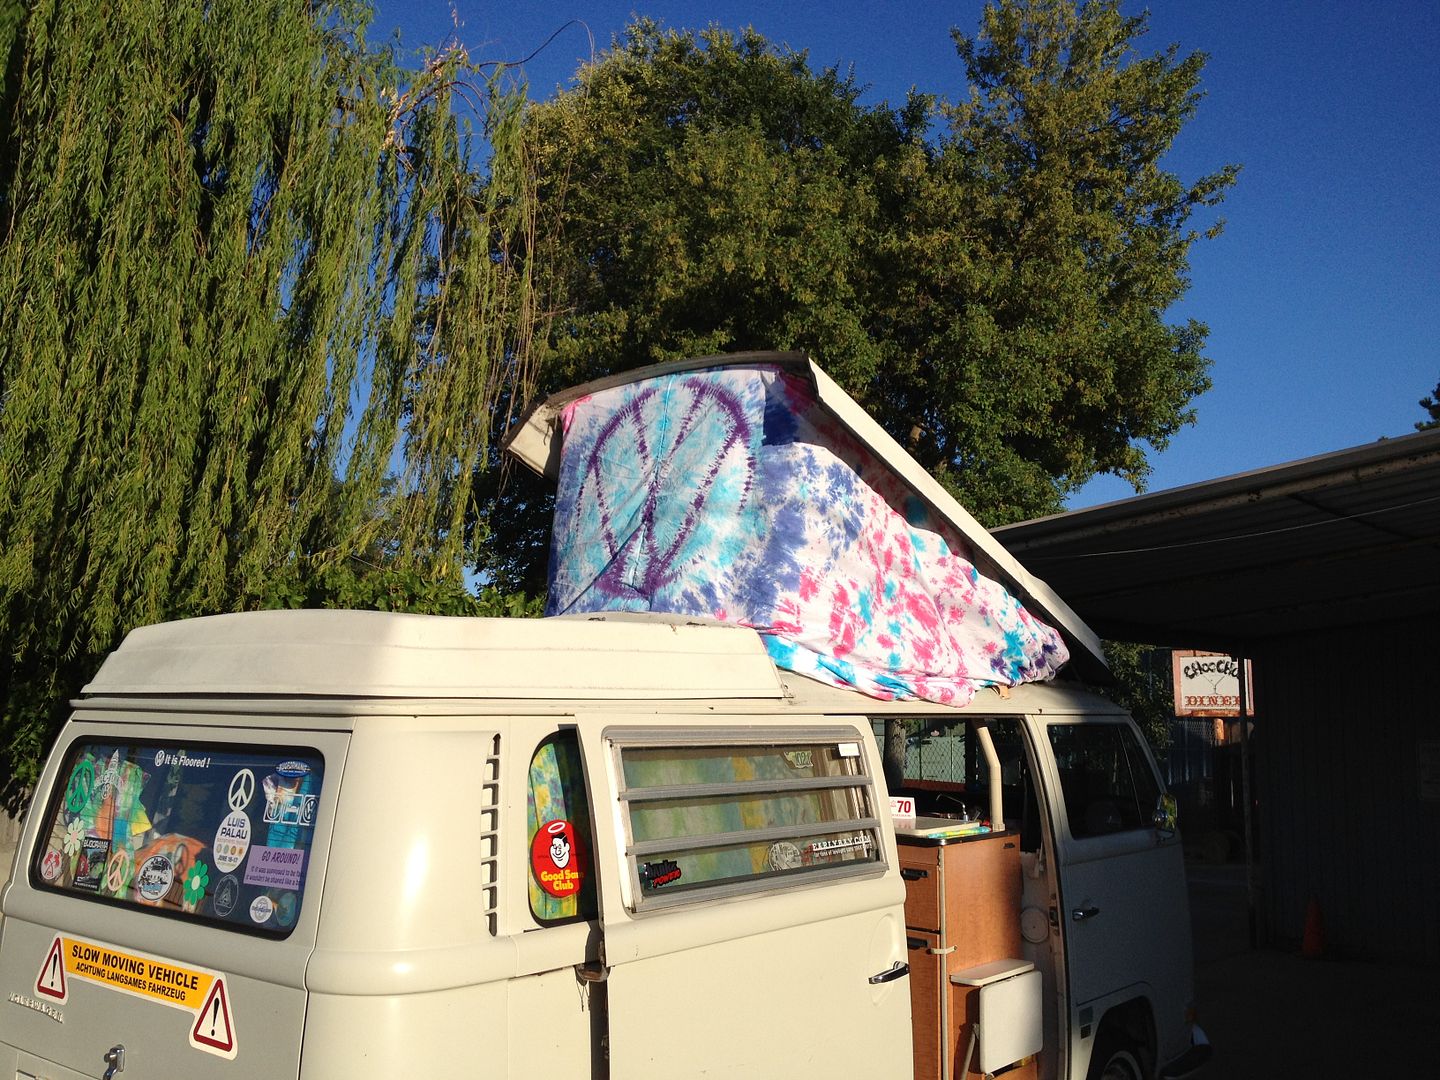  It's not a permanent fix, but it is something that I can use till I can afford the correct canvas! At least now I can pop the top and not be embarrassed about my ugly canvas! | |
|
| | |
west coast ghia
SacTown

Posts : 972
Join date : 2010-08-03
Age : 56
Location : antelope
| | Subject: Re: My 70 Bus!! Mon Jul 02, 2012 1:13 am | |
| | |
|
| | |
justcruzin
Posts : 810
Join date : 2011-07-29
Location : Sacramento CA
| | Subject: Re: My 70 Bus!! Tue Jul 17, 2012 3:00 pm | |
| Today I tackled the thousand ( little exaggerated) screws that hold the canvas to the top of the bus, so I could attach my sheet the correct way. Here is a before. 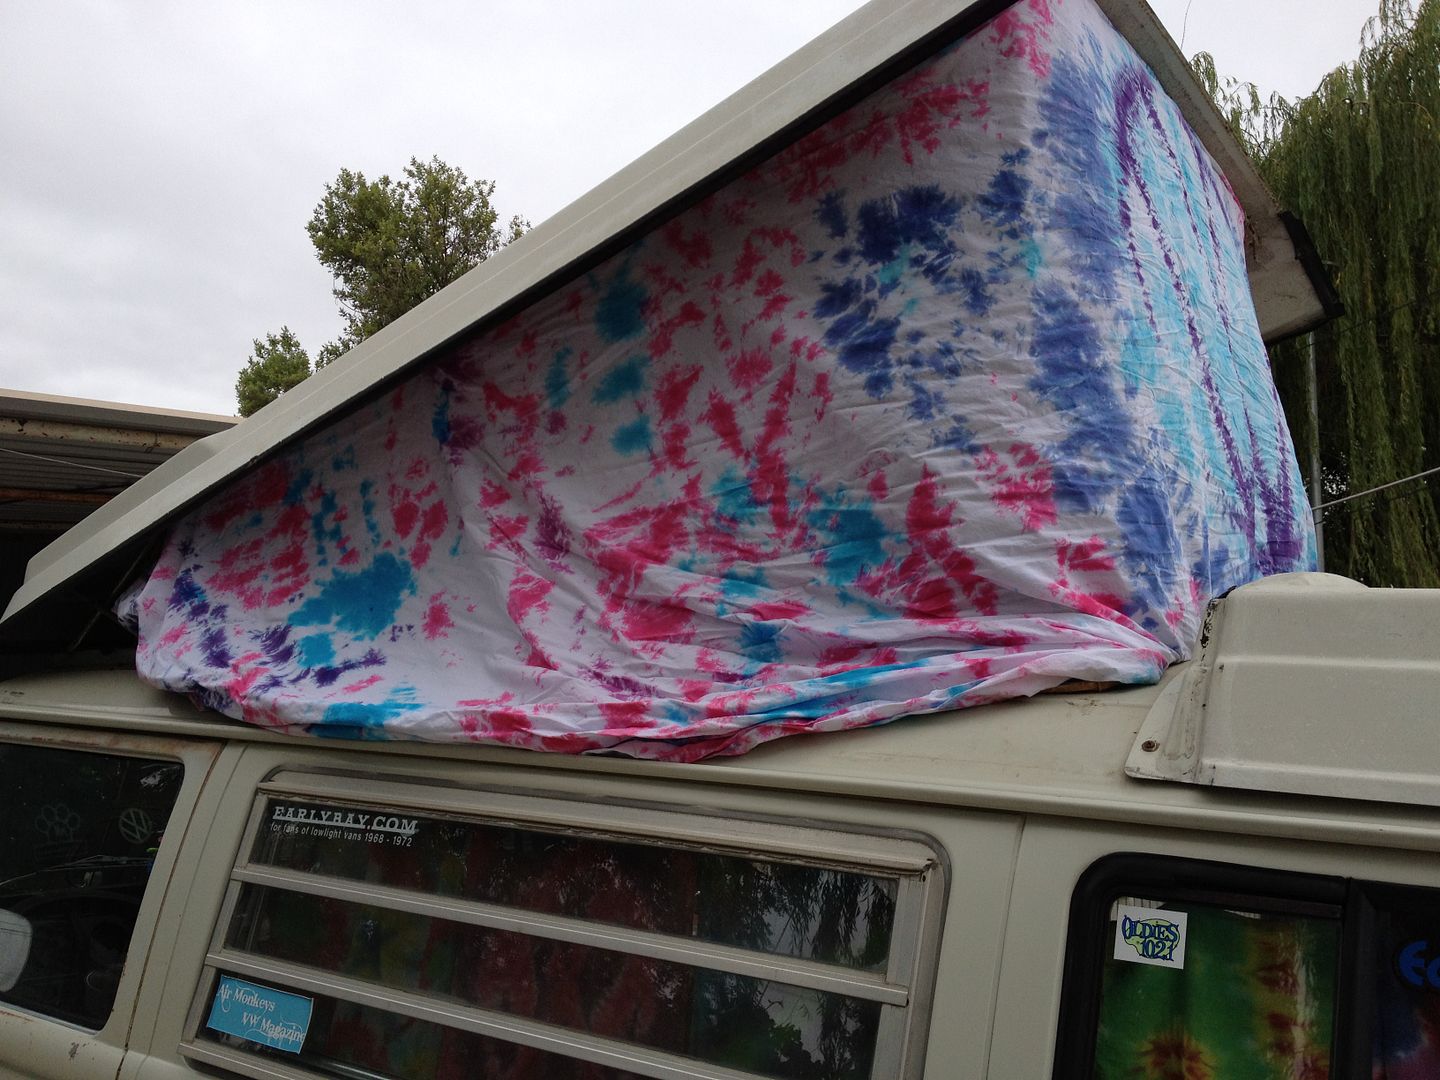 After, 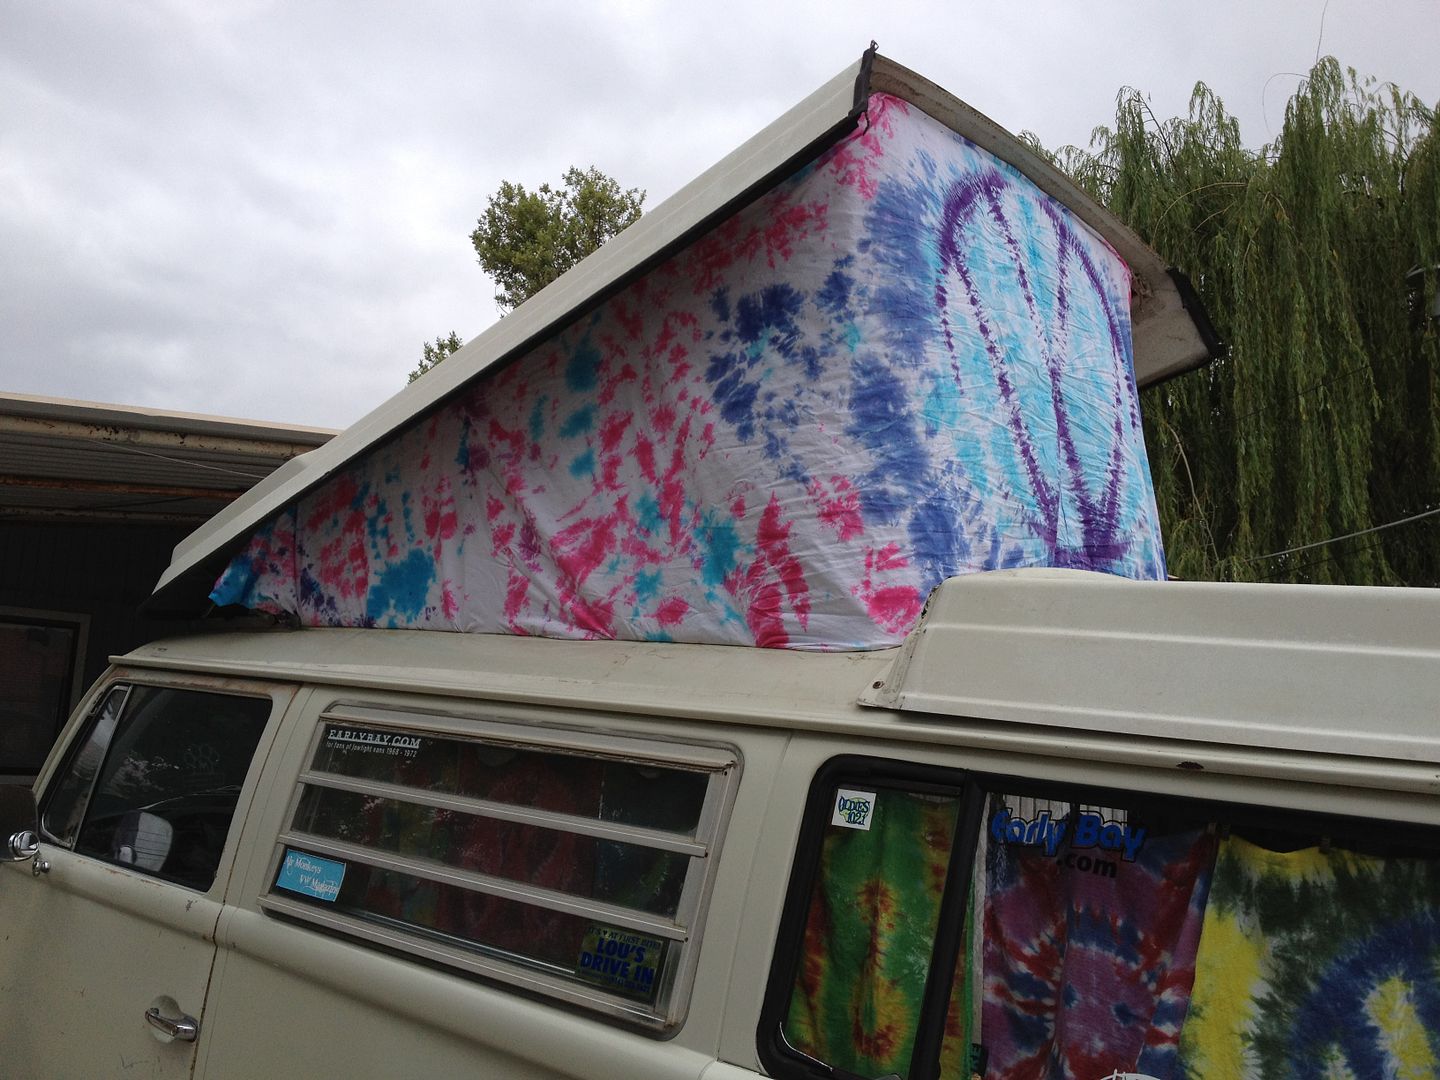  It wasn't as hard as I thought it would be. I may just be able to replace the real canvas when the time comes! Course I didn't go all the way around with the sheet, so I may think differently when I get a canvas. LOL | |
|
| | |
justcruzin
Posts : 810
Join date : 2011-07-29
Location : Sacramento CA
| | Subject: Re: My 70 Bus!! Mon Jul 30, 2012 7:04 pm | |
| Today I snagged a Yakima roof rack off of a Toyota at Bob's work. I brought it home and got all the locks off ( no key) and did a test fit. Still not sure where I want it to actually sit. I will do some research over at the Samba to see what looks and works best before I make the final installation. I still need to make some of the add on side gutter pieces to mount on the side of the pop top, then I can use the hardware that came with the rack. That and find some new tumblers and keys! May break down and spend the 55 bucks to get a set of 4 from Yakima.com?? 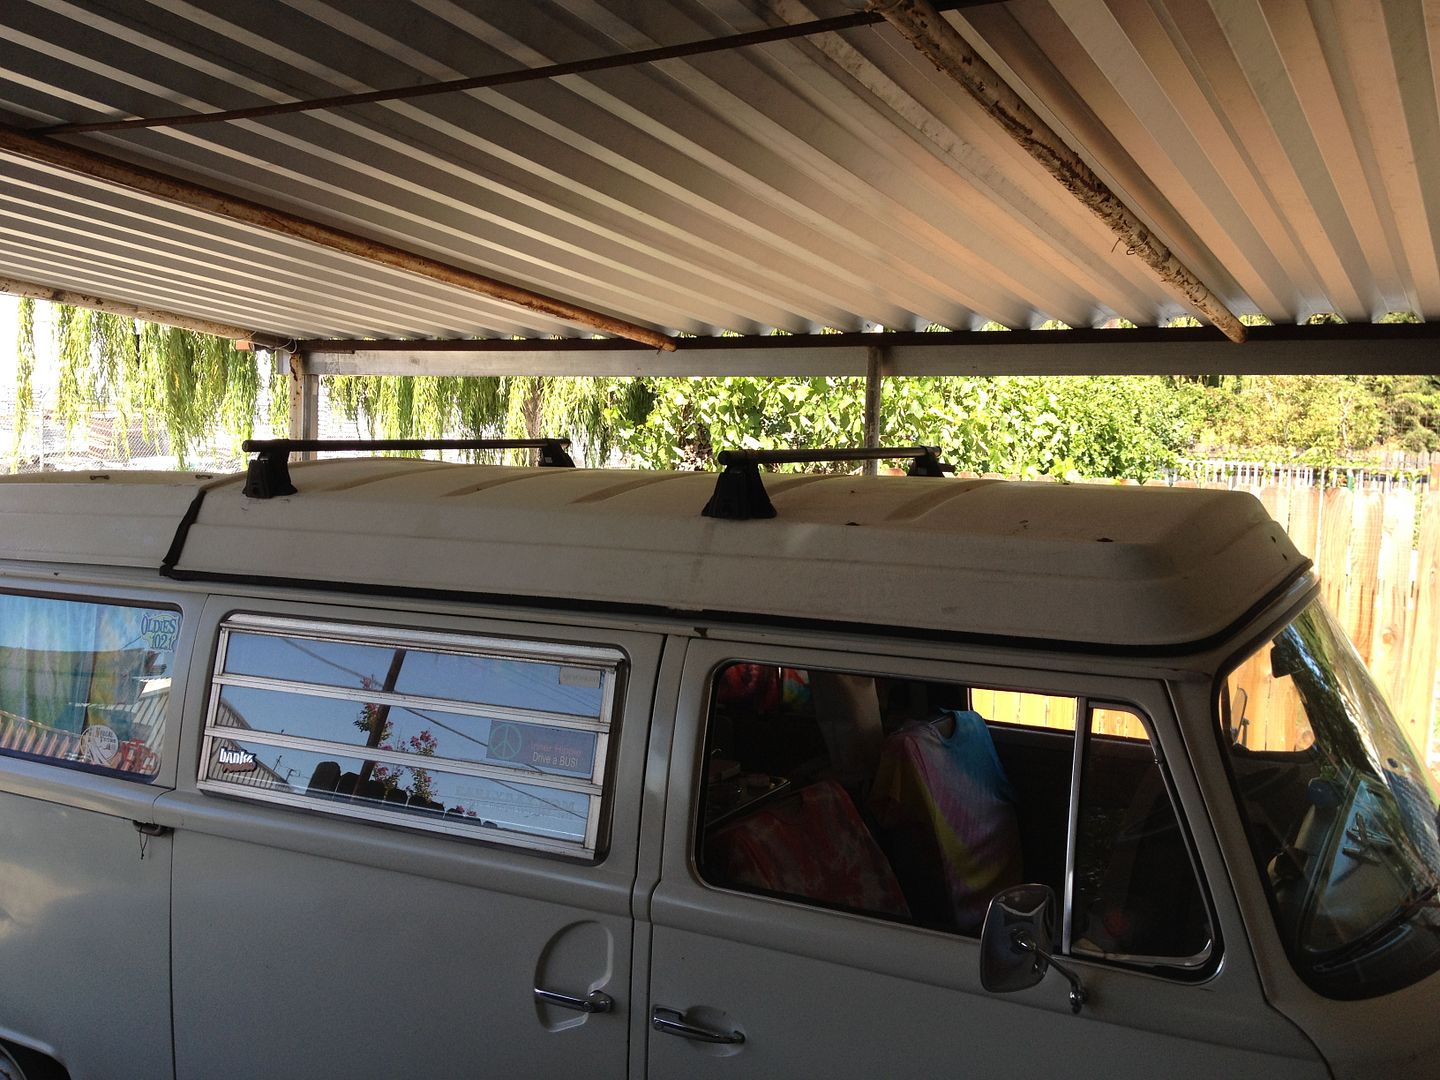 Won't be long and I will be able to haul my surf board!! | |
|
| | |
MoonMullins

Posts : 95
Join date : 2012-03-14
Location : Sacramento
| | Subject: Re: My 70 Bus!! Mon Jul 30, 2012 9:08 pm | |
| | |
|
| | |
justcruzin
Posts : 810
Join date : 2011-07-29
Location : Sacramento CA
| | Subject: Re: My 70 Bus!! Sun Aug 19, 2012 11:24 pm | |
| A little update! After only about 2 months of replacing my old (still good) cable, my new one looks like this. 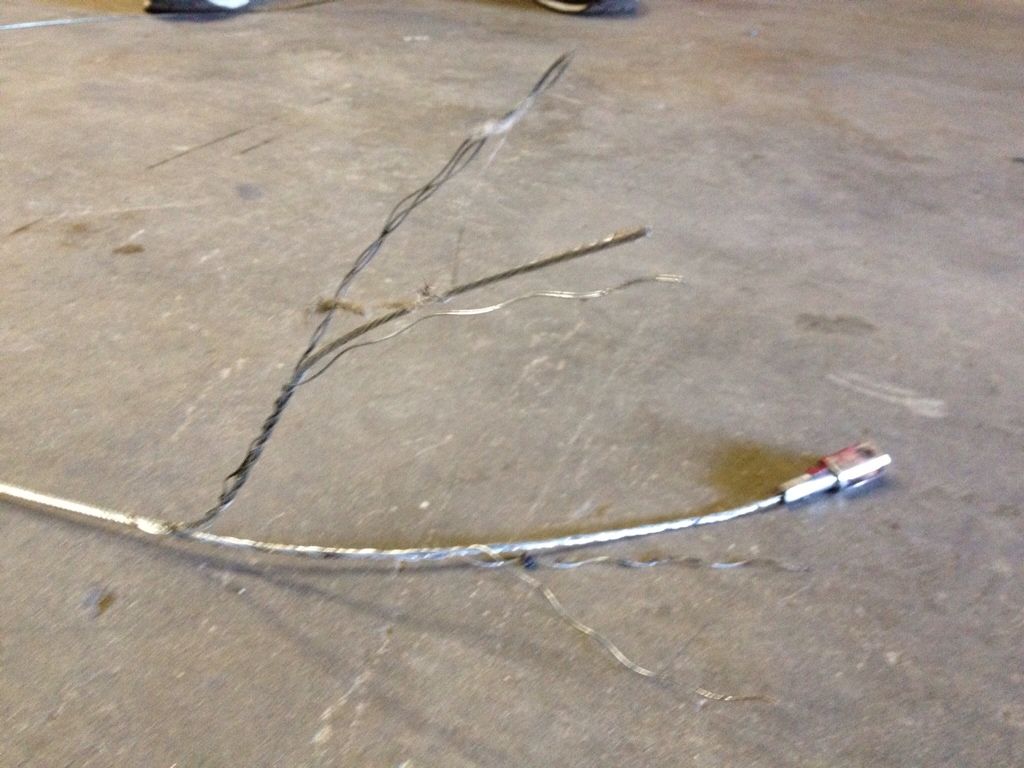 Needless to say I replaced it on Friday. I got a new one for free and they are sending the old one to the place they get them from. Faulty cable. This weekend we also worked on my roof rack. Bob played with that Yakima rack and he just wasn't happy. He decided to build his own. So here is what we started with. 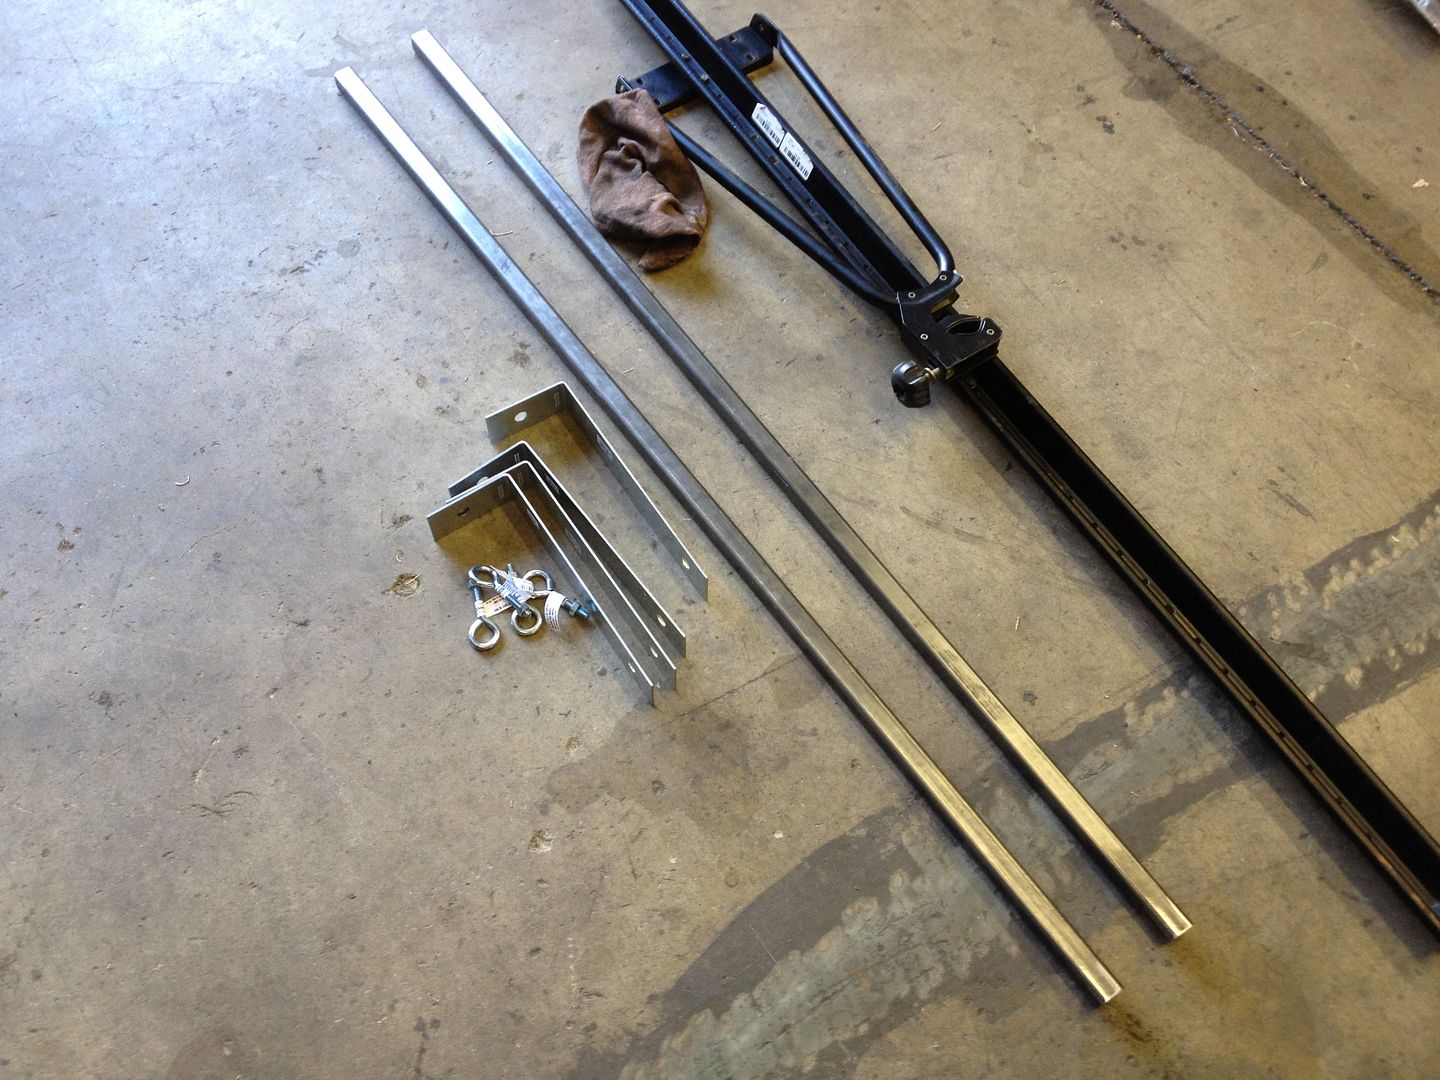 The bike rack I got from Rack and Road. I went in to buy a new one and the guy helping me told me about this one. 20 bucks isn't bad for what I will be using it for. Doing some measuring.  Starting to look like something, 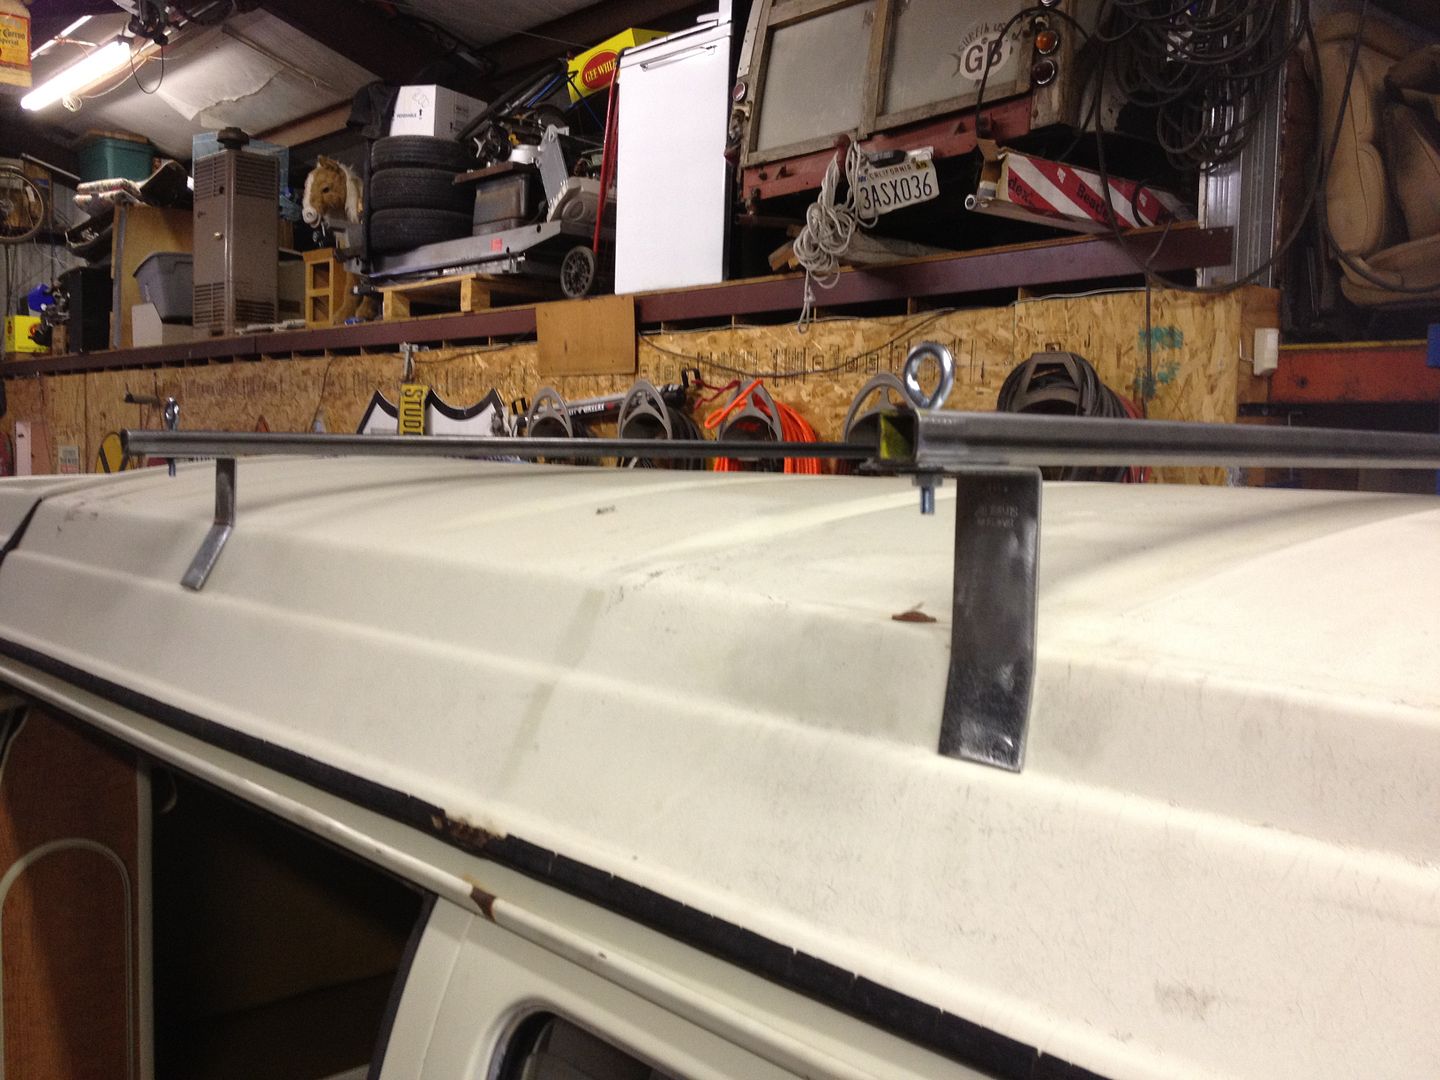 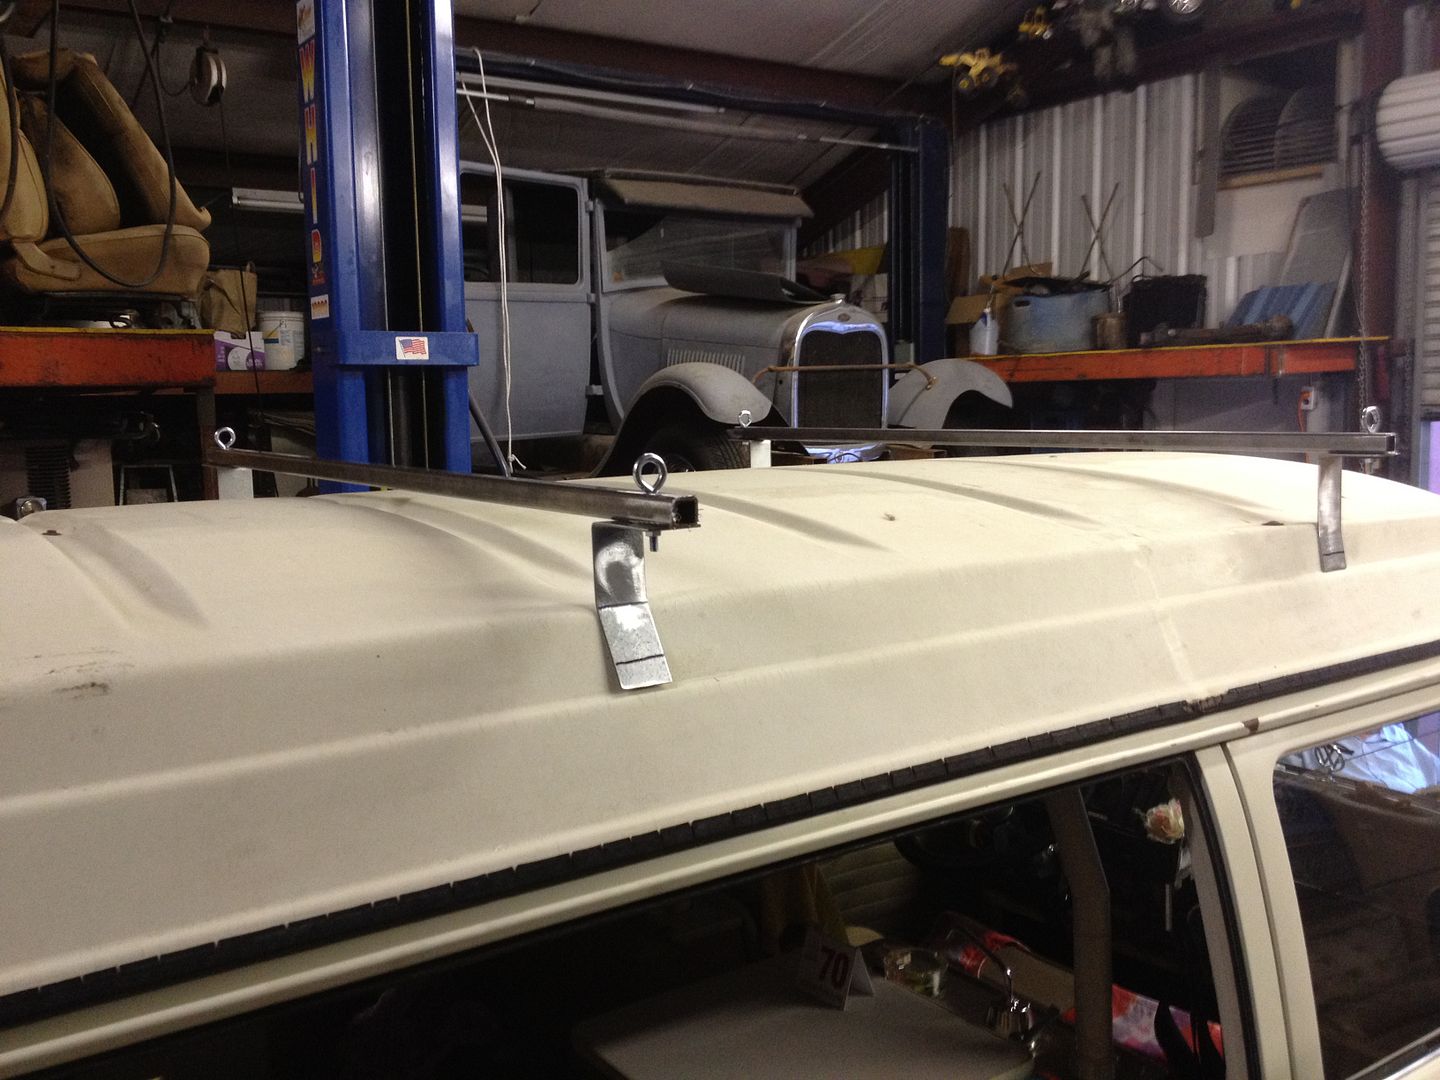 All painted. Yes, I tried tie dyeing with paint. LOL 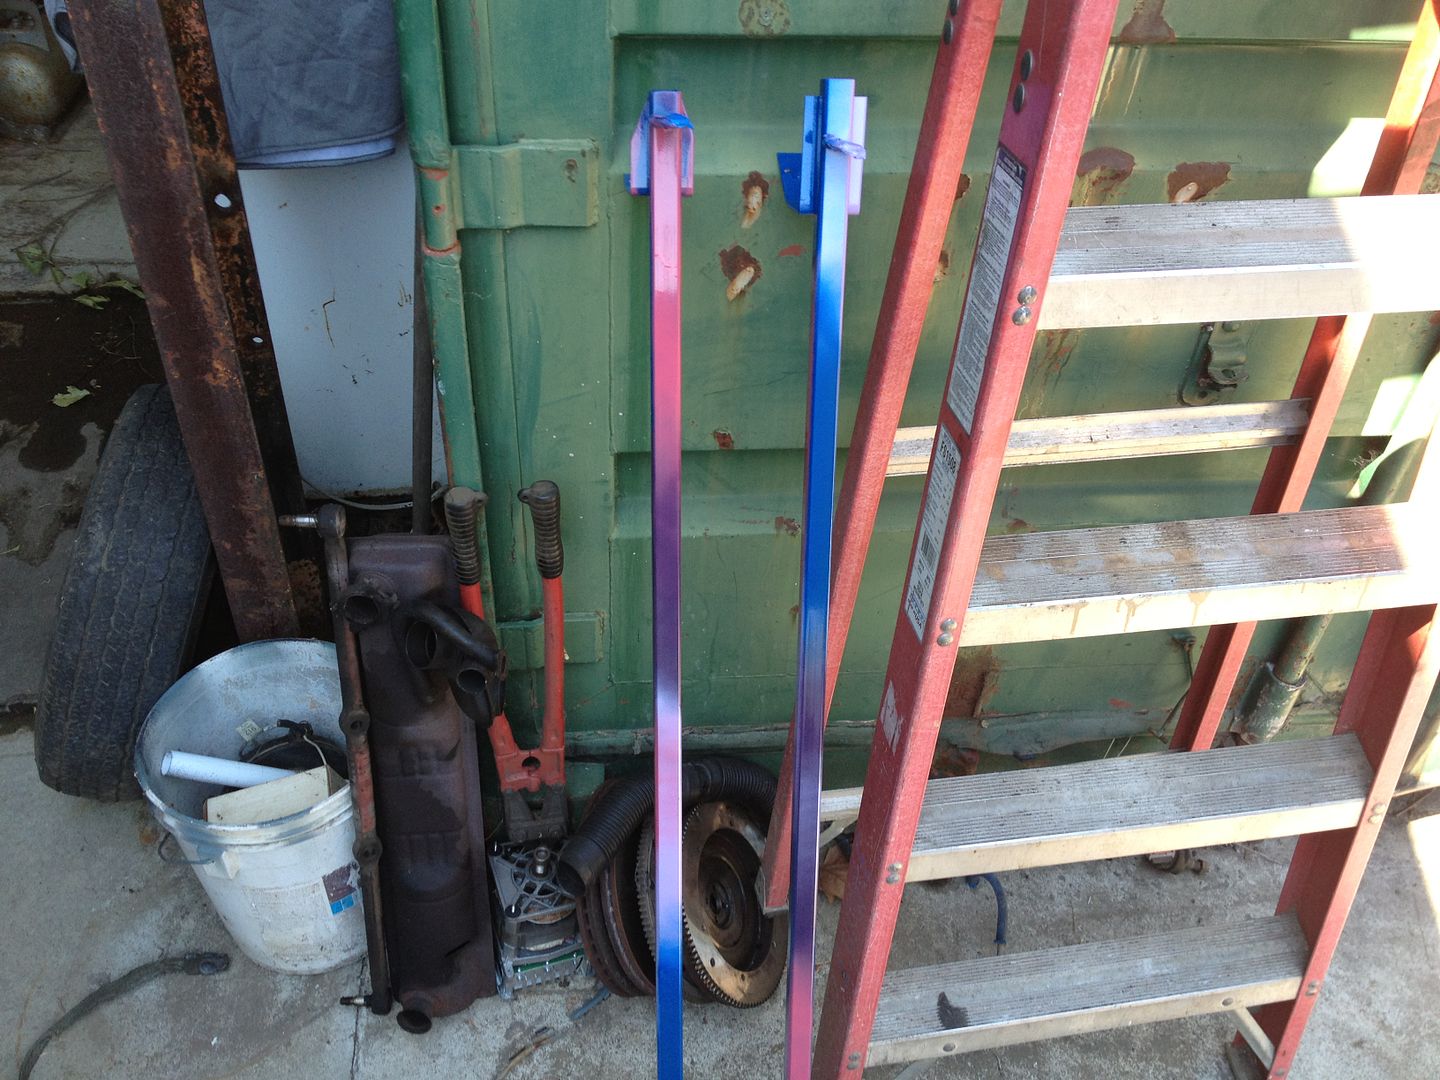 Drilling the holes, 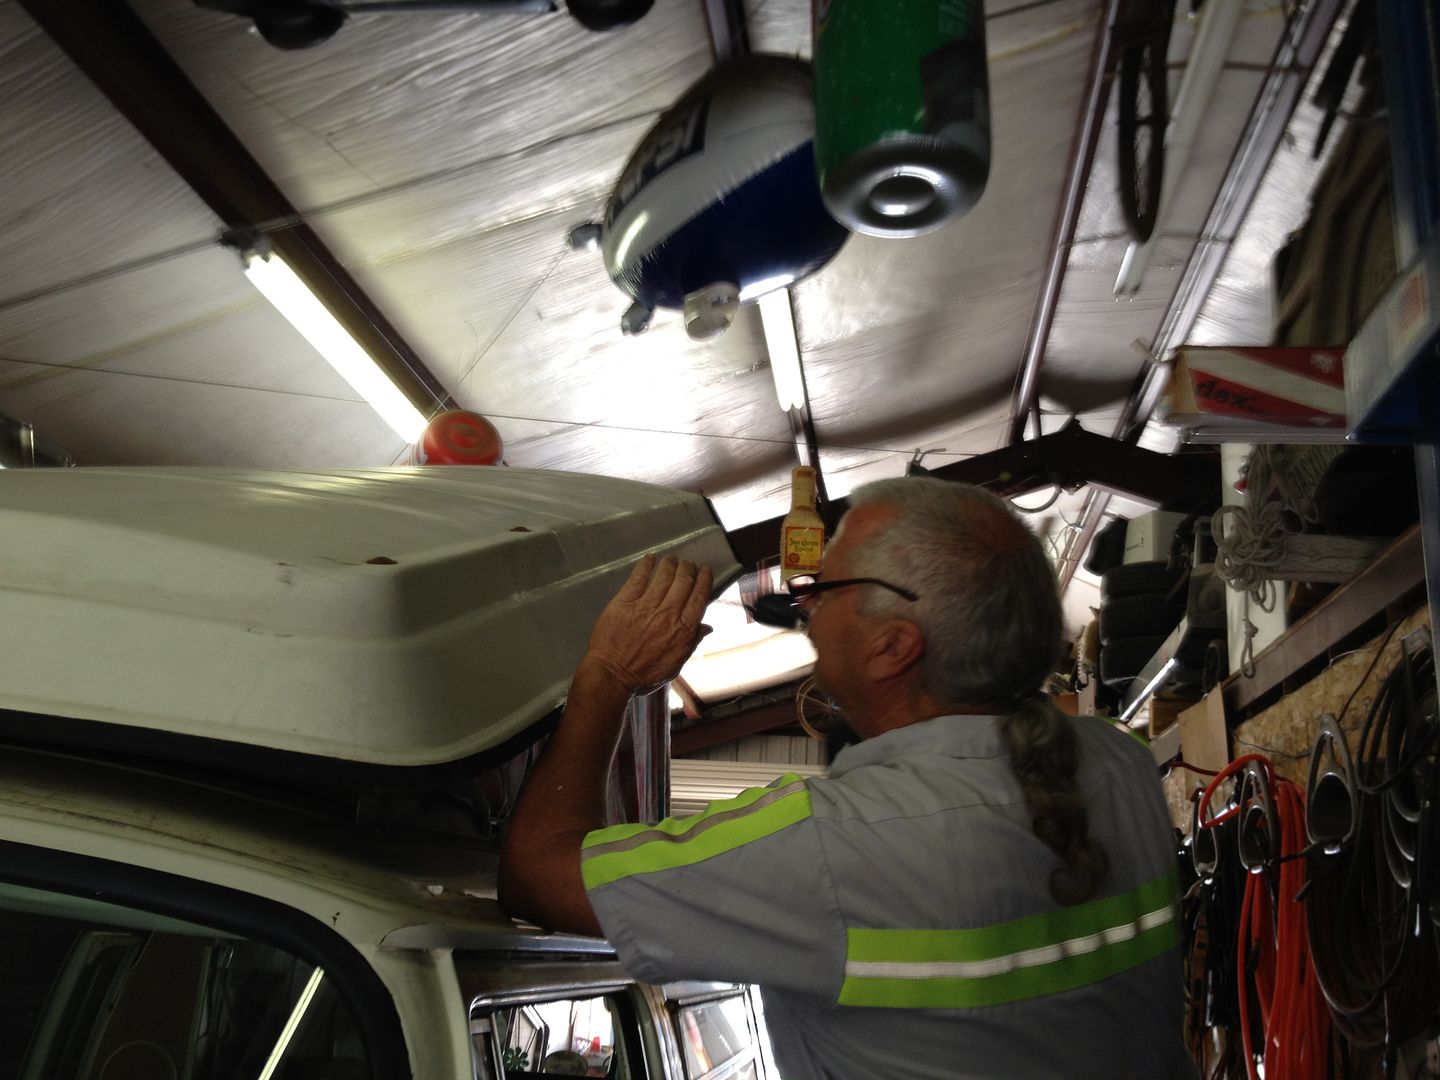 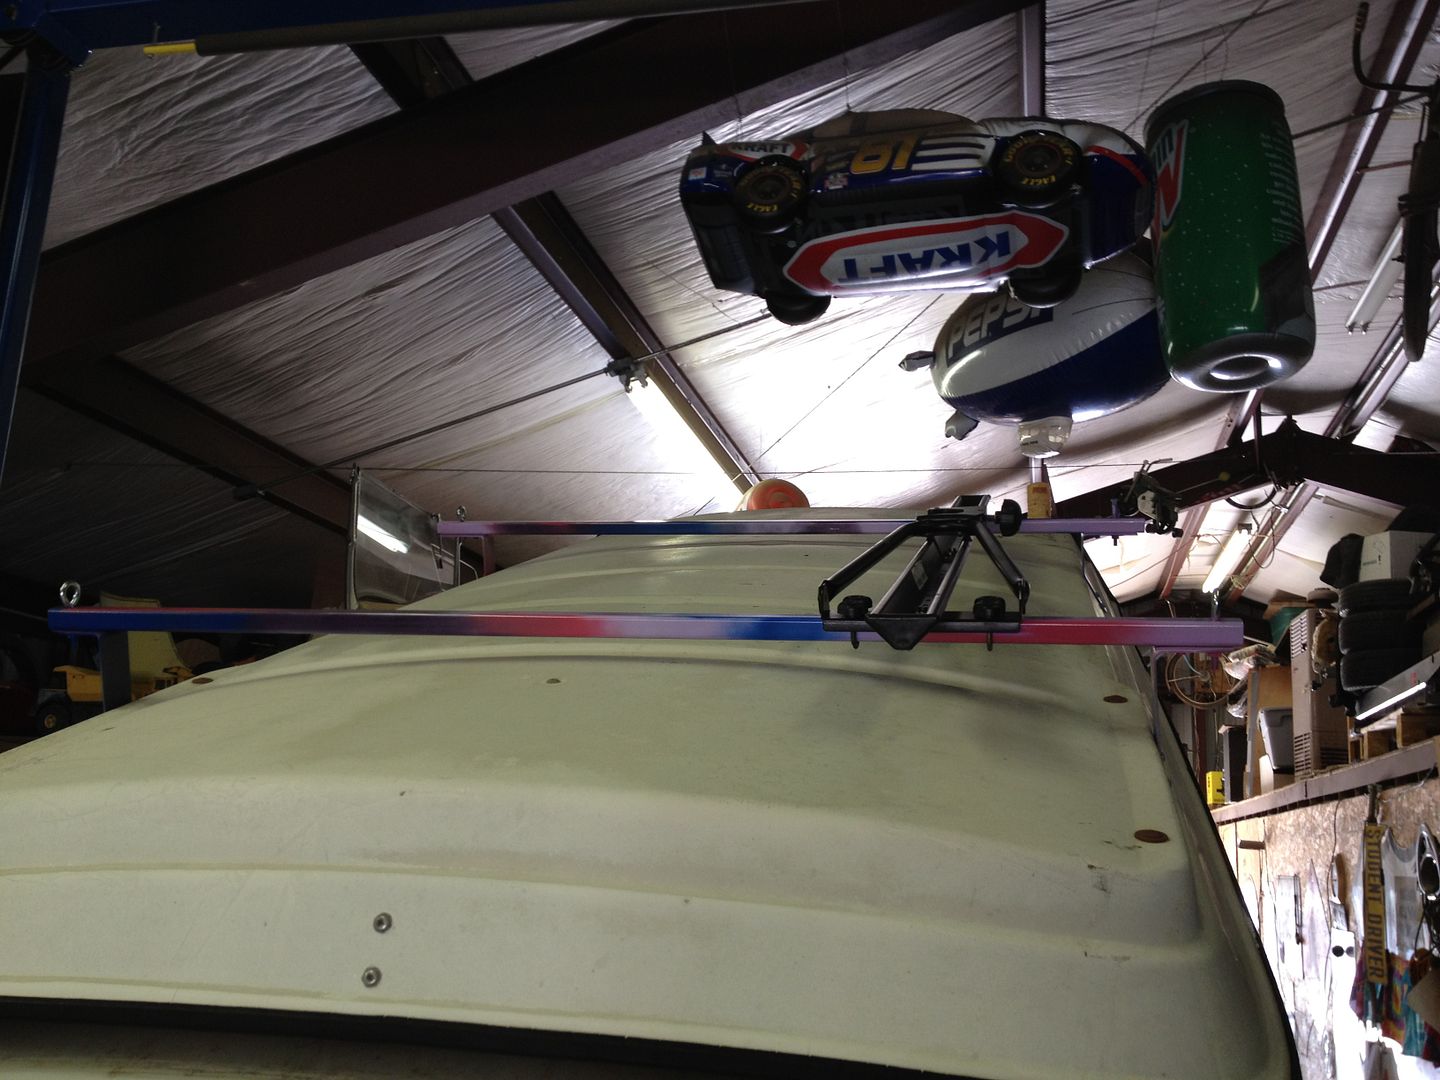 Finally, have a bike up there.  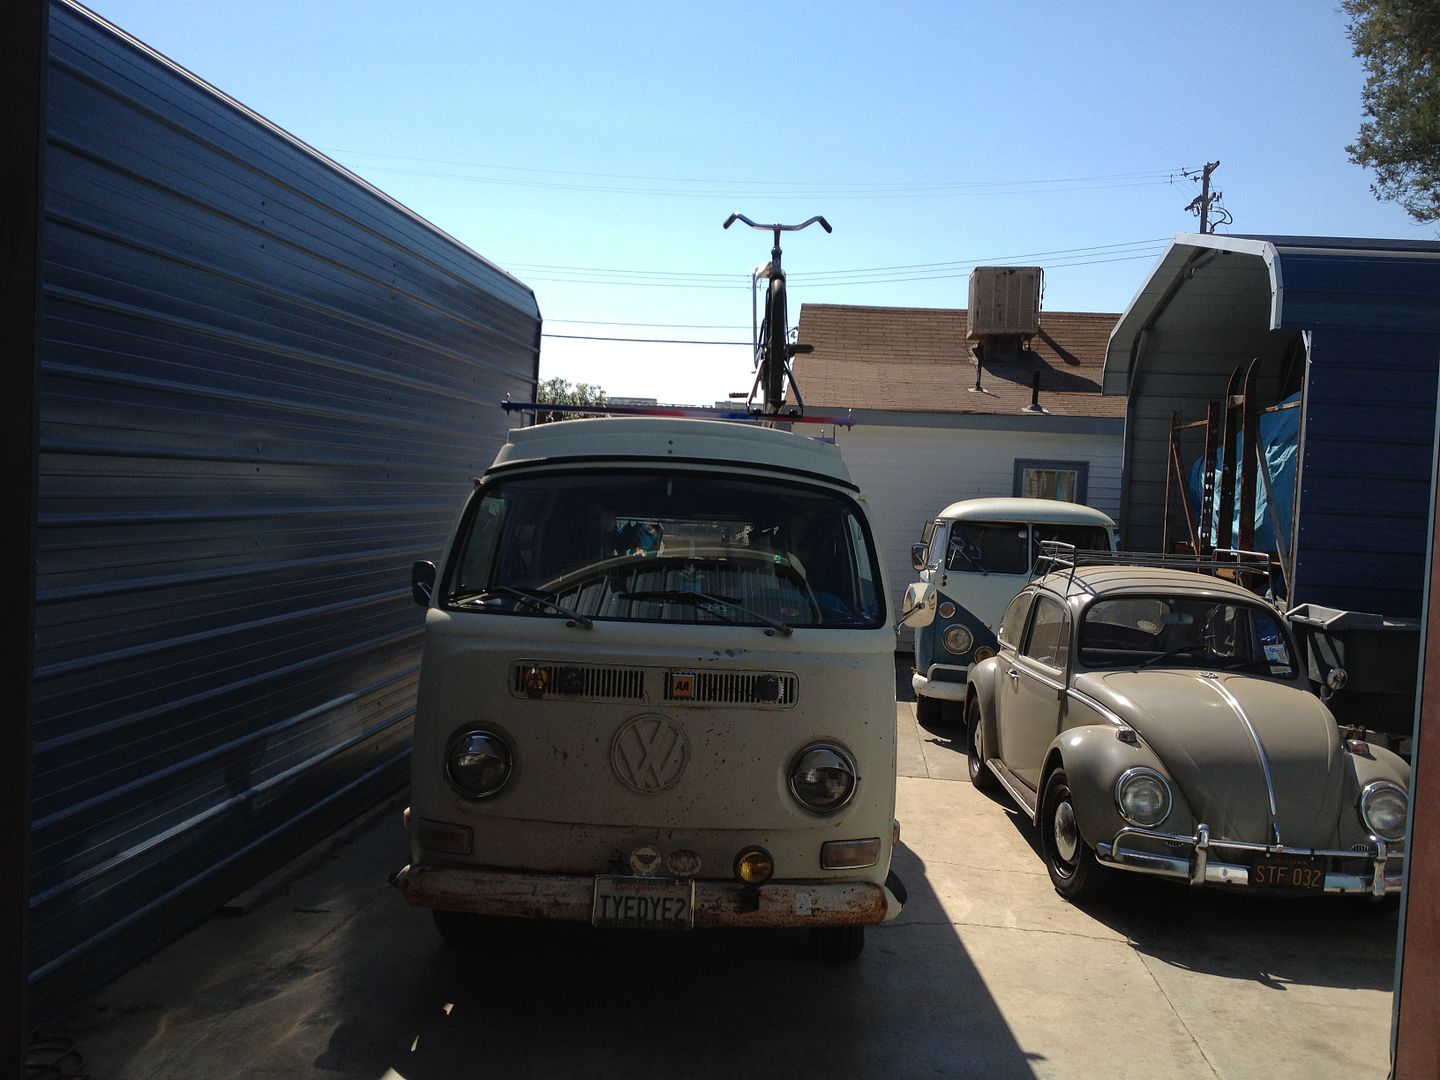 I learned that with just one bike up there, I'm not able to lift the top by myself. Yah, that is my thumb up in the corner. LOL Still haven't learned to move it out of the way.  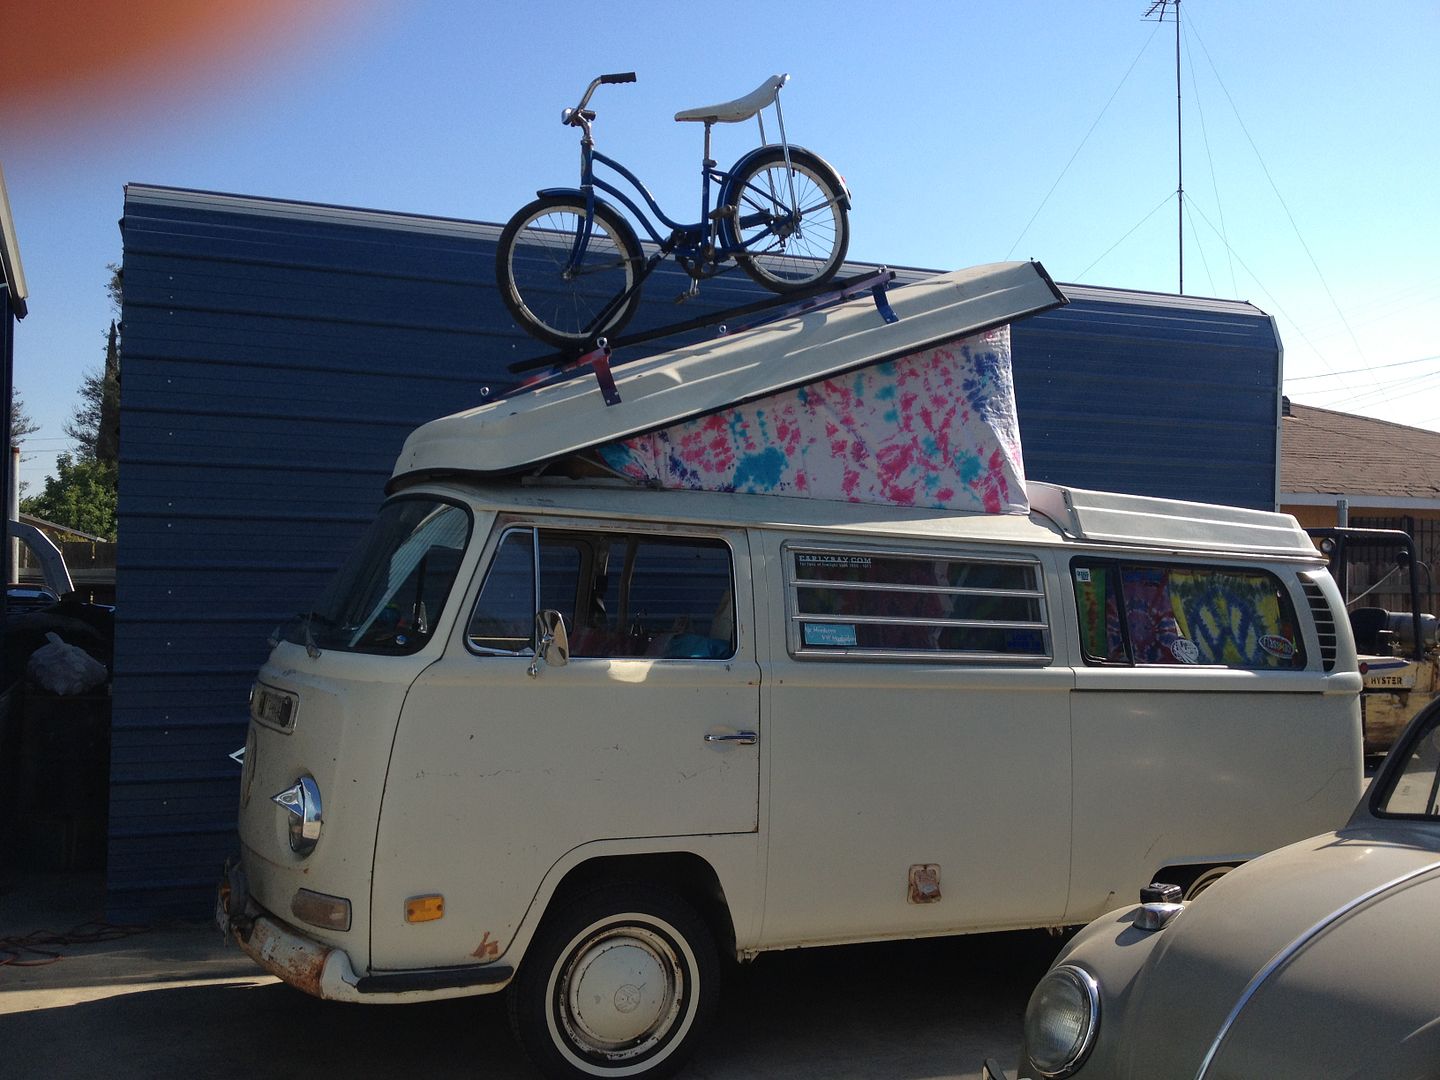 My original plan was to have 2 small Schwinns and a surfboard on there. Just for shows though. At the show I wanted to raise the top up with all of that on there. I think the top would be ok, but I will definitely need some help pushing it up. I still need to find another bike rack for the other side, then I can put the center eye hooks in. Also need to figure out how to attach the surfboard in the middle of it all. LOL I still haven't driven it with the bike up there, so I can't say if I will like it or not. I may end up with just the surfboard. Oh, I also found out I will need to figure out a way to put the bikes up there by myself. May have to invest in a hoist for the garage. LOL | |
|
| | |
Davids74Super
SacTown

Posts : 948
Join date : 2010-07-08
Age : 35
Location : Wilton, CA
| | Subject: Re: My 70 Bus!! Mon Aug 20, 2012 1:09 am | |
| | |
|
| | |
euphgirl
SacTown

Posts : 372
Join date : 2012-01-19
Location : Sacramento
| | Subject: Re: My 70 Bus!! Mon Aug 20, 2012 10:39 am | |
| That looks great! I got to see the work in progress...hehe.
Tell Bob thanks again! | |
|
| | |
justcruzin
Posts : 810
Join date : 2011-07-29
Location : Sacramento CA
| | Subject: Re: My 70 Bus!! Mon Aug 20, 2012 2:40 pm | |
| | |
|
| | |
justcruzin
Posts : 810
Join date : 2011-07-29
Location : Sacramento CA
| | Subject: Re: My 70 Bus!! Sat Sep 29, 2012 10:33 pm | |
| Just a little update. Today I decided to putter on my bus a bit. I had bought a bottle opener and was trying to figure out where to mount it. Just for fun, I put it here. LOL 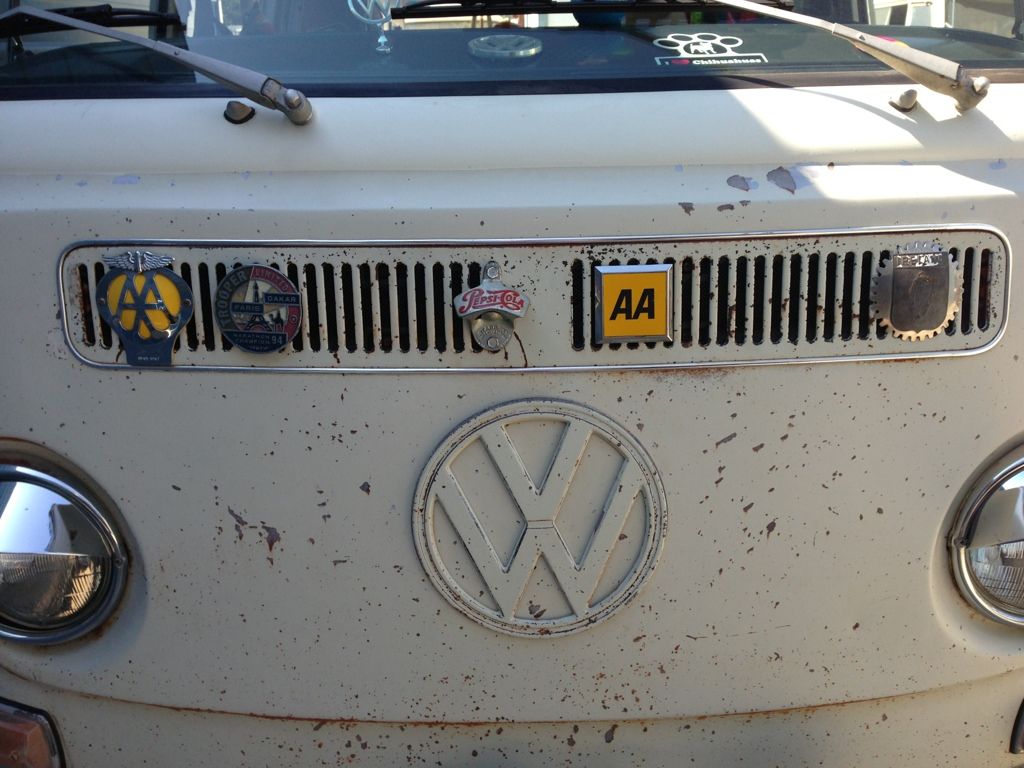 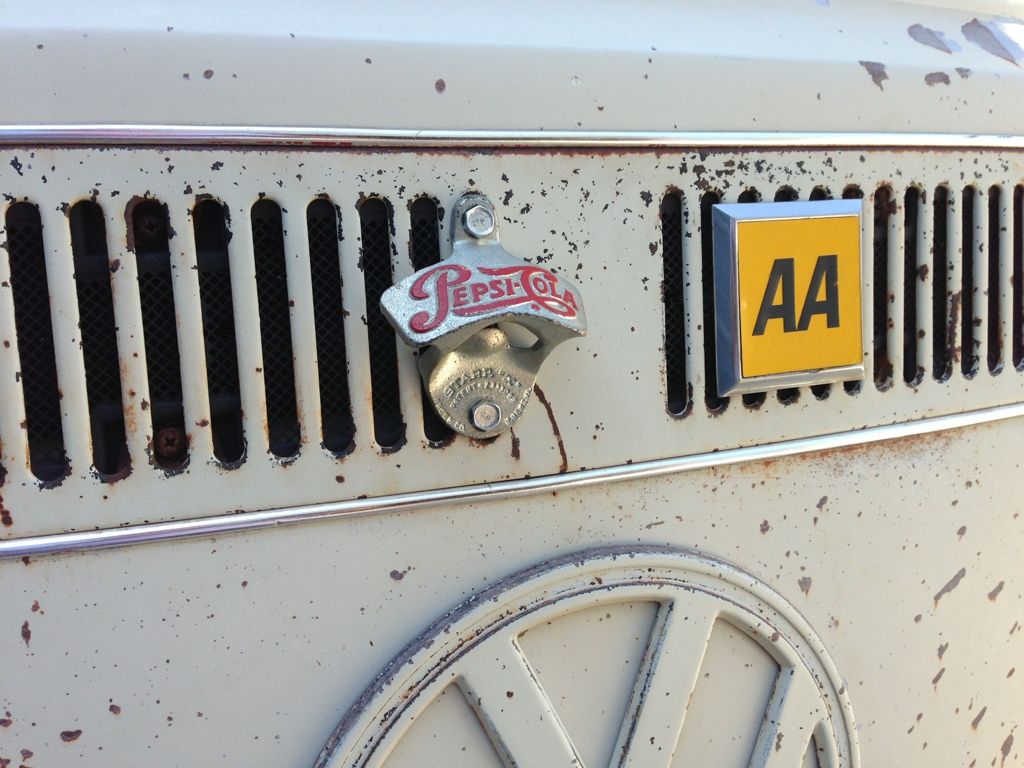 Bob thinks it's a bad idea to mount it there. Say's he thinks people will use it and bend my grille. I don't think that many people will be using it. It's not like we party with a bunch of people and I don't drink anything that has a cap like that. LOL I just like the openers. When I washed the bus I would see rust particles coming out of the passenger headlight bucket. So today I took it all out to see what the damage was. Here is what it looked like before paint. 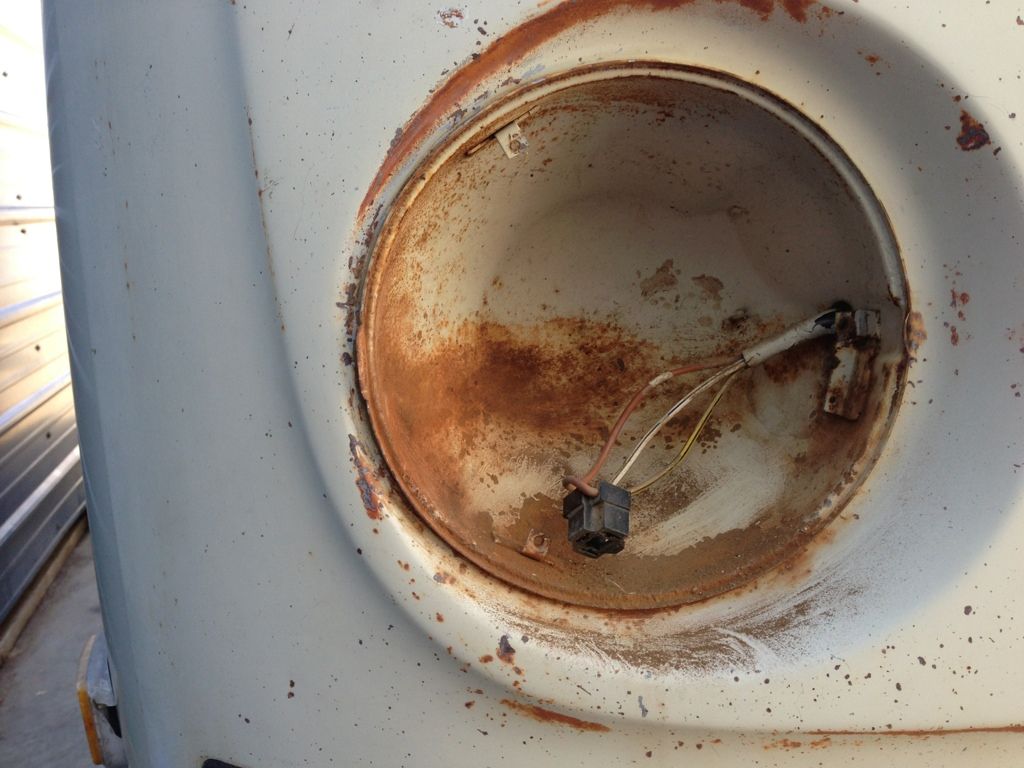 Cleaned it all up and gave it a bit of paint. 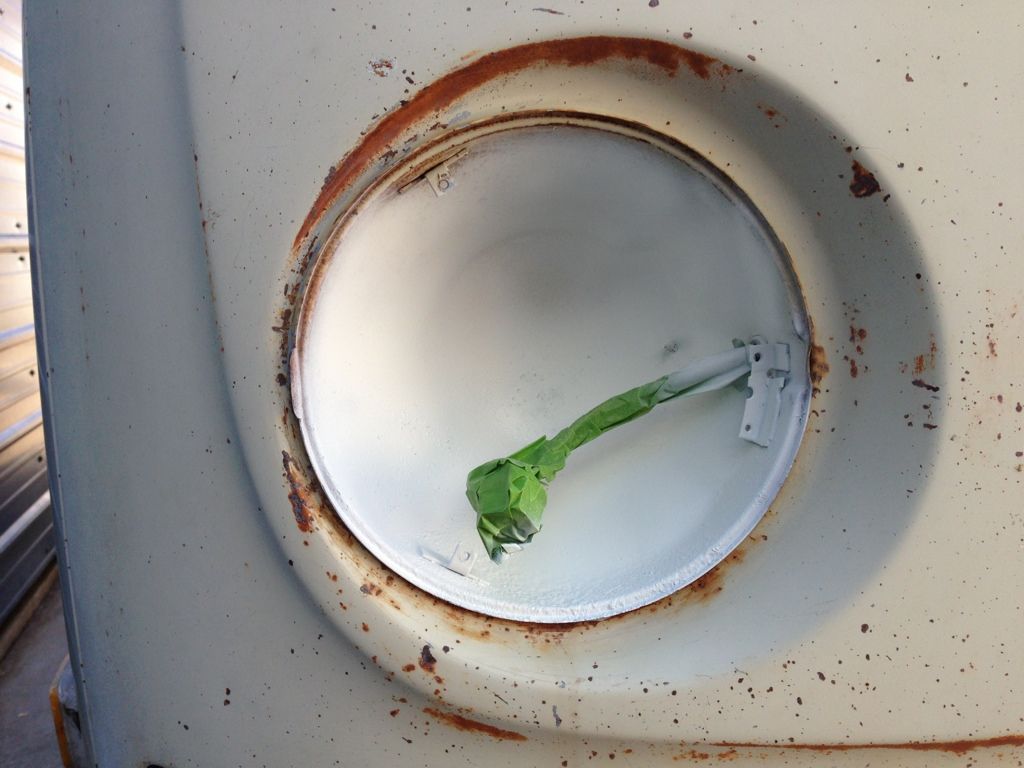 This is some of the gunk that was in the headlight bucket.  The passenger side also had a gap between the beauty ring and the headlight. 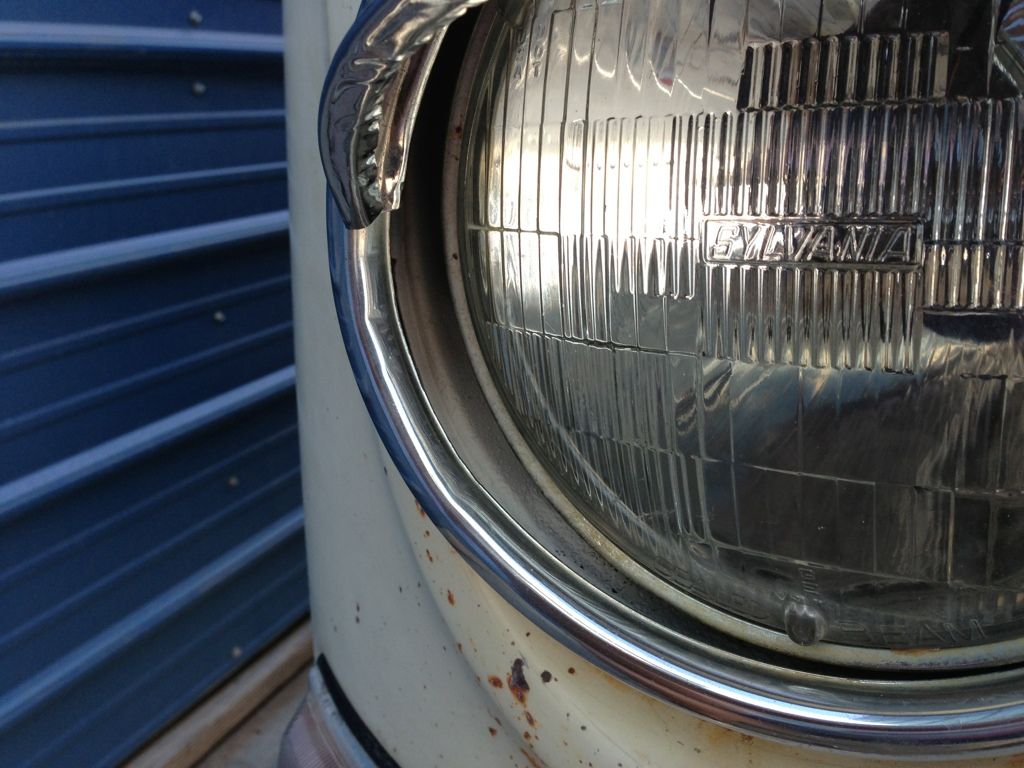 I thought it was caused by the beauty ring possibly being from a bug, but after I found one of my spare bus rings, I realized that wasn't the problem. I ended up having to swap the main bucket that holds the light bulb. All better!  I also did some interior decorating, consisting of a throw blanket and a rolled up blanket that can act as a pillow. Forgot to take pics of that though. LOL I also ordered a door seal, but it hasn't arrived yet. That will be my next update. I know, boring. LOL I just like to keep a running progression thread going on my bus. Even for the small stuff. Oh, almost forgot. I rode in the back of my bus for the first time the other day. I had a ticking noise and Bob said it sounded like it was coming from the front. When I drive, it sounds like it is coming from the back. So he drove so I could here it. In the back it does sound like it is coming from the front. LOL We figured it has something to do with my surfboard mounting. I need to take it back off and re do it to see if I can get it to stop. While I was back there though, I decided to make a video. https://www.youtube.com/watch?v=Ufia_SLlnfo&feature=share&list=UUAmdES1XDqkwmgsckP9Id5wI can tell you that it was really weird to be in the back. I am so used to driving it! | |
|
| | |
NorCalCO

Posts : 90
Join date : 2012-09-20
Age : 48
Location : *NorCal* VW Scene
| | Subject: Re: My 70 Bus!! Sun Sep 30, 2012 12:13 am | |
| Cool idea with the bottle opener and nice work on the headlights. | |
|
| | |
justcruzin
Posts : 810
Join date : 2011-07-29
Location : Sacramento CA
| | Subject: Re: My 70 Bus!! Sat Oct 13, 2012 11:47 pm | |
| Ok, just a small update. First I found a Schwinn at a yard sale and managed to fit it in the bus to bring it home! LOL 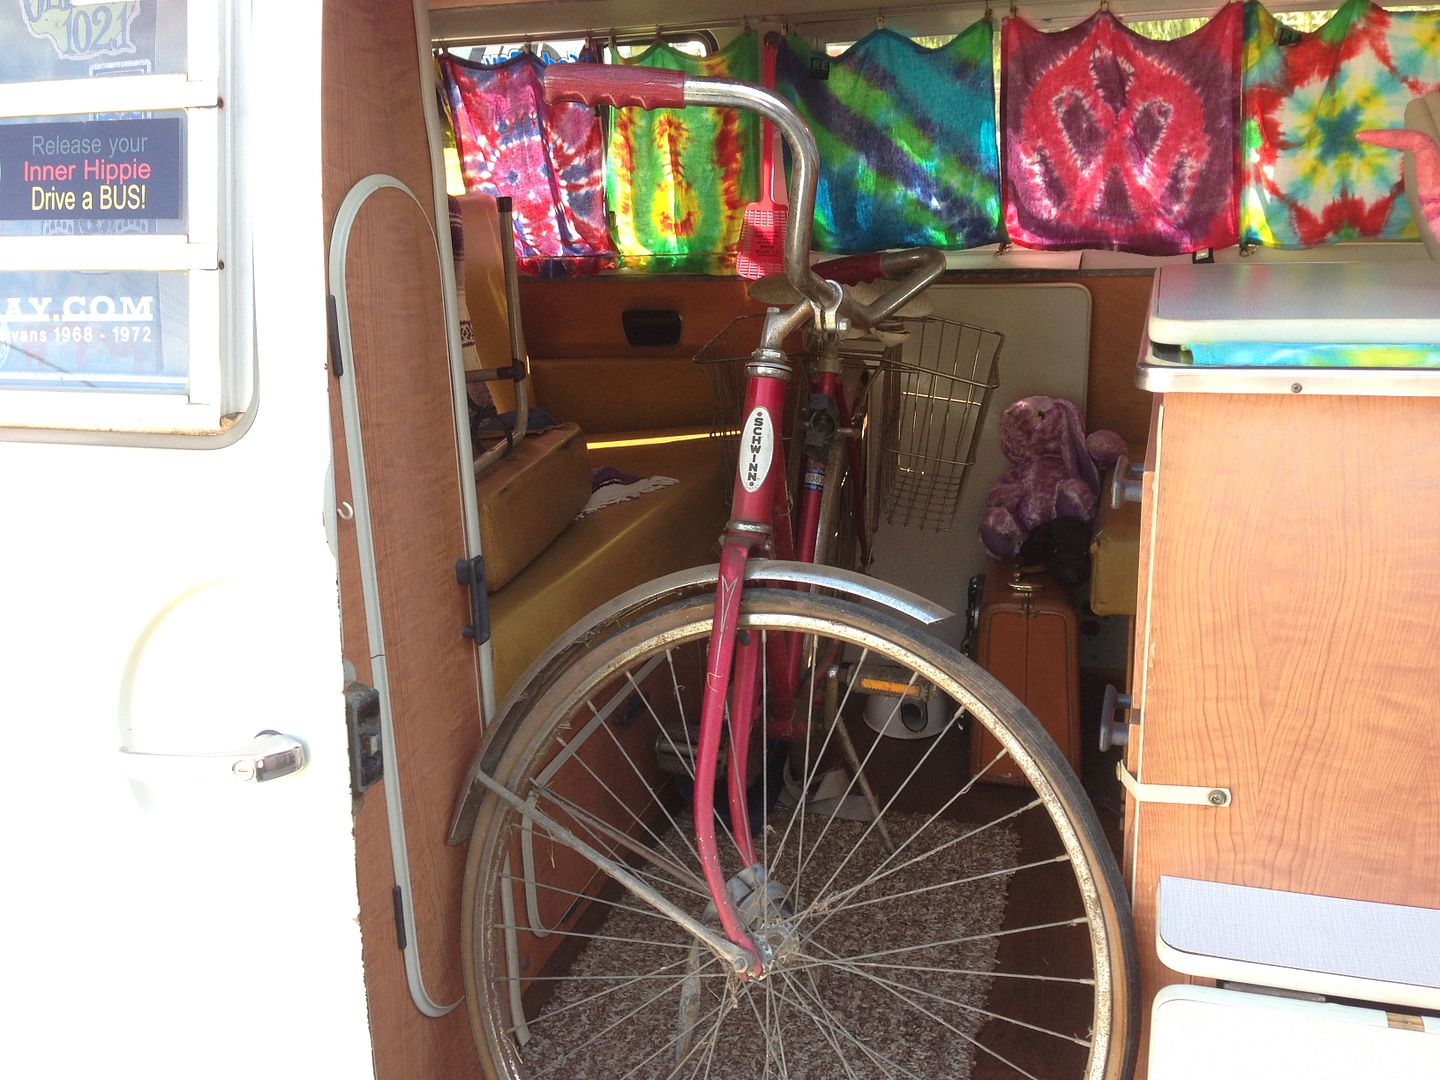 Today I installed my new door seal! The old, 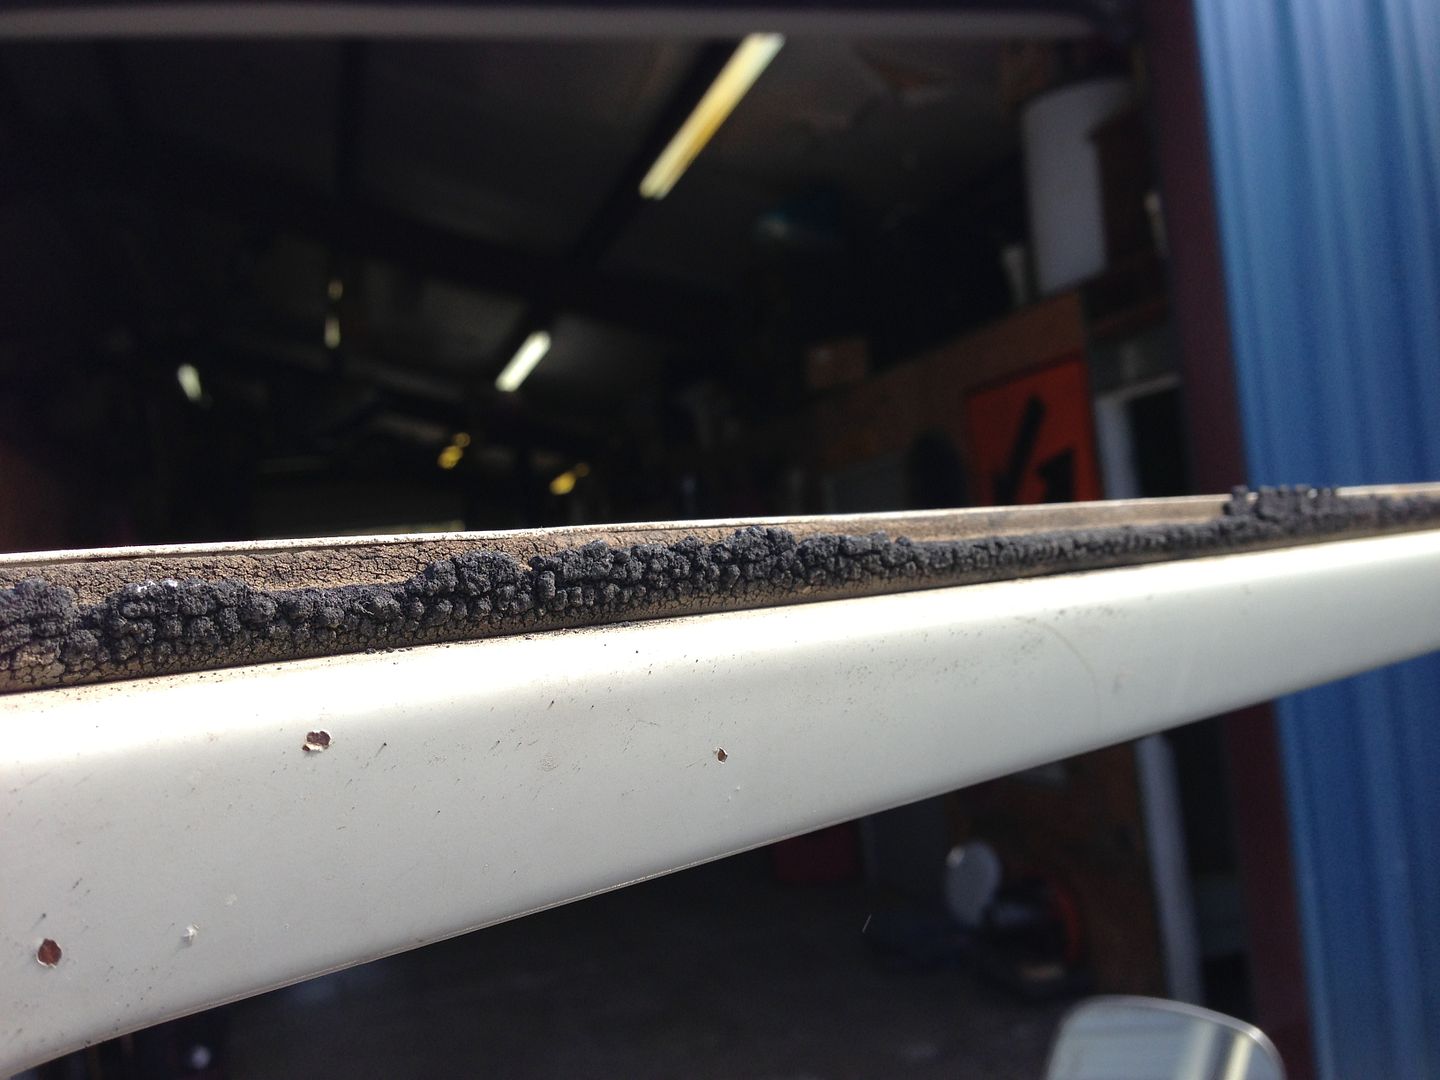 The installation. Had to figure out a way to hold the bottom corner to the glue.   I tried using tape, but I couldn't get a good enough bite to pull it tight enough. Figured the screwdriver and ladder method would work best. LOL The ladder was used to hold just the right pressure on the screwdriver. The new.  Now the door doesn't shut flush with the body, but I'm sure in time it will. 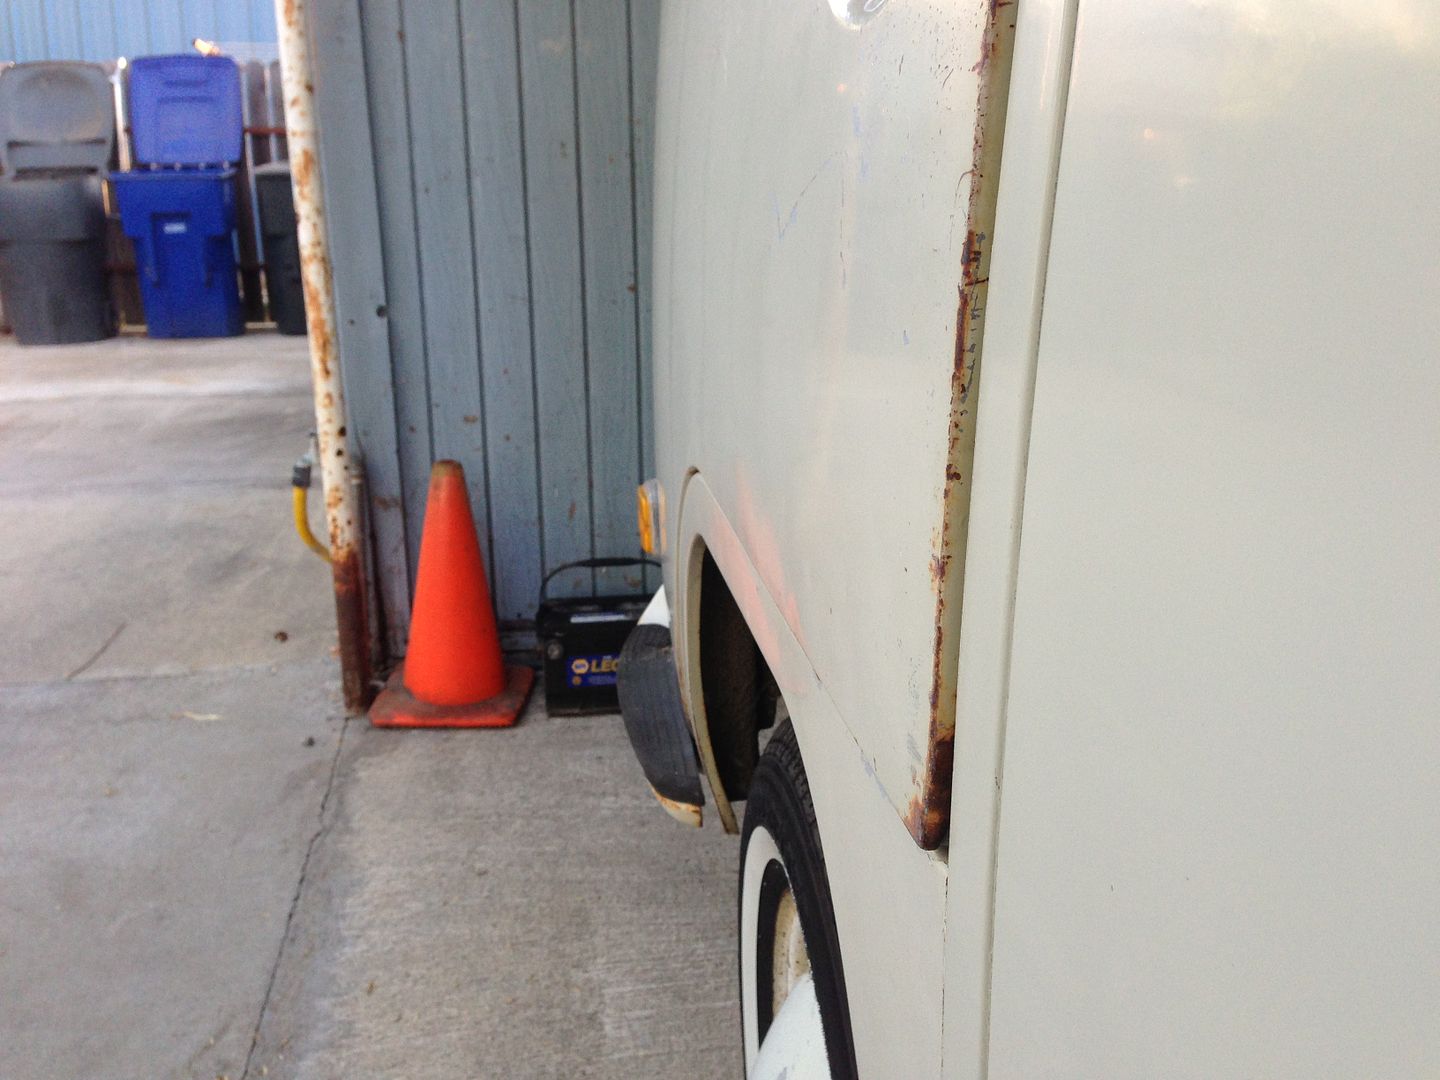 Now I just need to save for the passenger side seal. Kind of weird to look up at the door and see no light coming in though for the driver side! | |
|
| | |
justcruzin
Posts : 810
Join date : 2011-07-29
Location : Sacramento CA
| | Subject: Re: My 70 Bus!! Fri Nov 16, 2012 8:10 pm | |
| Just a little update. I bought a passenger door seal and installed it. So I am down to just one more main seal. I need to buy a slider door seal and then I should have a pretty good draft free bus. My rear door seal probably needs to be replaced eventually but it is still pretty soft and pliable so I'm not to worried about it yet. That and eventually I will probably replace the main seals for the jalousie (sp) windows. So the seal part of the job is almost done! Today my fridge door bar came in the mail. Thanks to the Samba Classifieds I was able to find one and now my fridge is complete and I can keep my ice block in the door now. 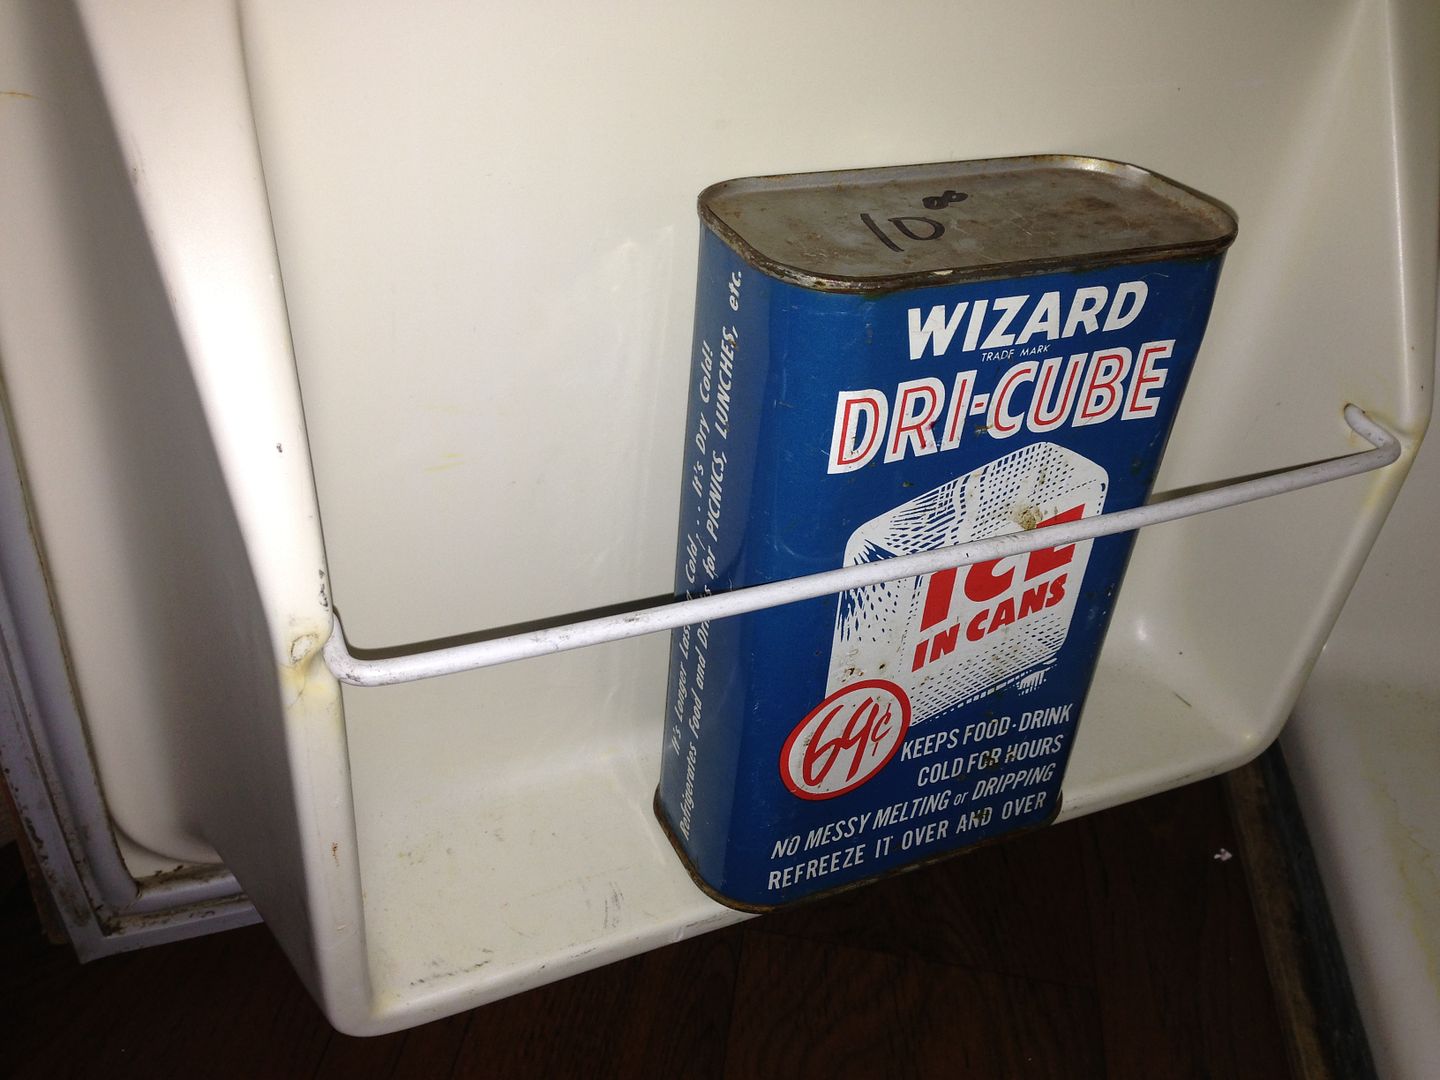 So slowly but surely it is coming along. I sure do enjoy driving it. | |
|
| | |
west coast ghia
SacTown
Posts : 972
Join date : 2010-08-03
Age : 56
Location : antelope
| | Subject: Re: My 70 Bus!! Sun Nov 18, 2012 8:36 pm | |
| | |
|
| | |
justcruzin
Posts : 810
Join date : 2011-07-29
Location : Sacramento CA
| | Subject: Re: My 70 Bus!! Sat Nov 24, 2012 11:33 pm | |
| Today I set off to find a way to make an extension for the heater distribution lever. This one, 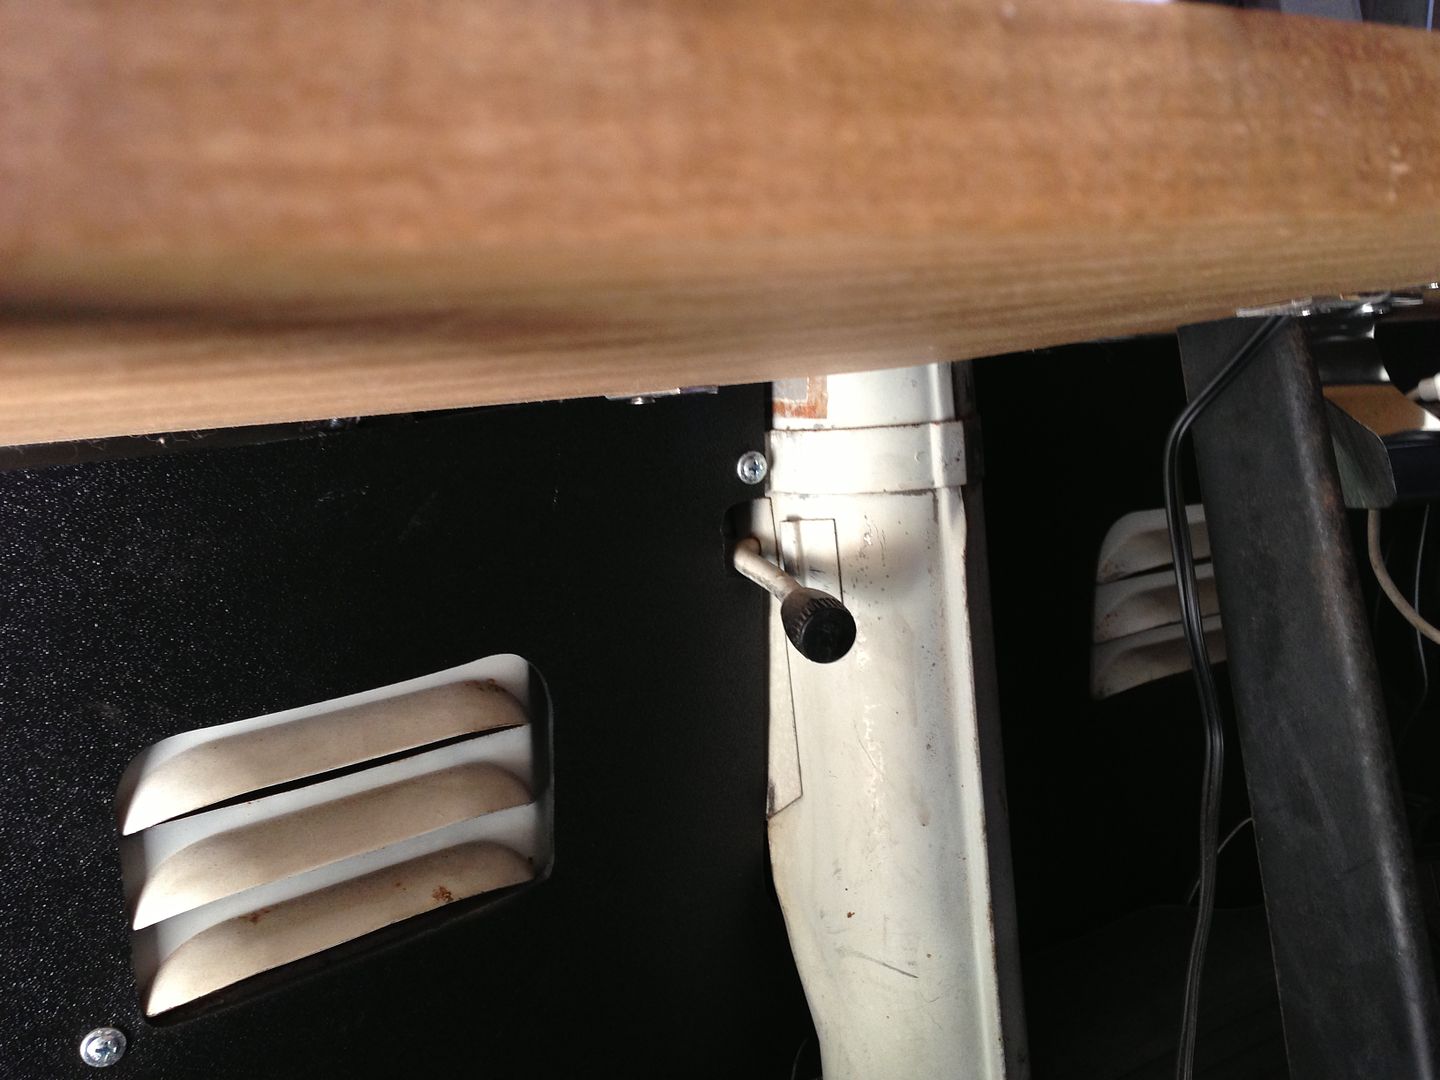 It was hard to find driving down the road in the dark, and also since I added my shelf, I can't see it at all anymore. 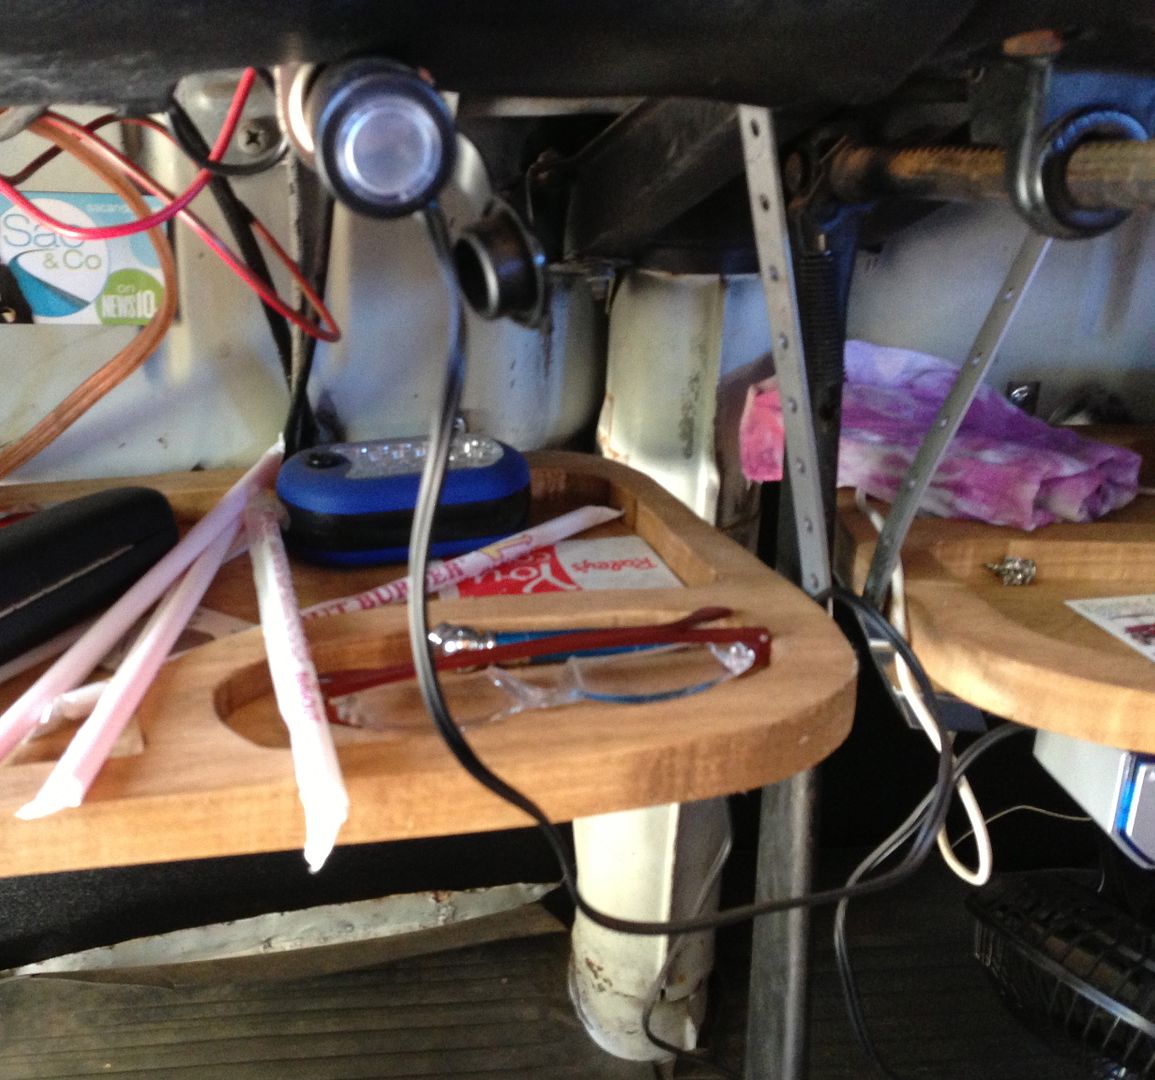 I had an idea of what I wanted, but wasn't sure how to go about doing it. This is a rough drawing of what I wanted. I wanted a rod to come up through the shelf. 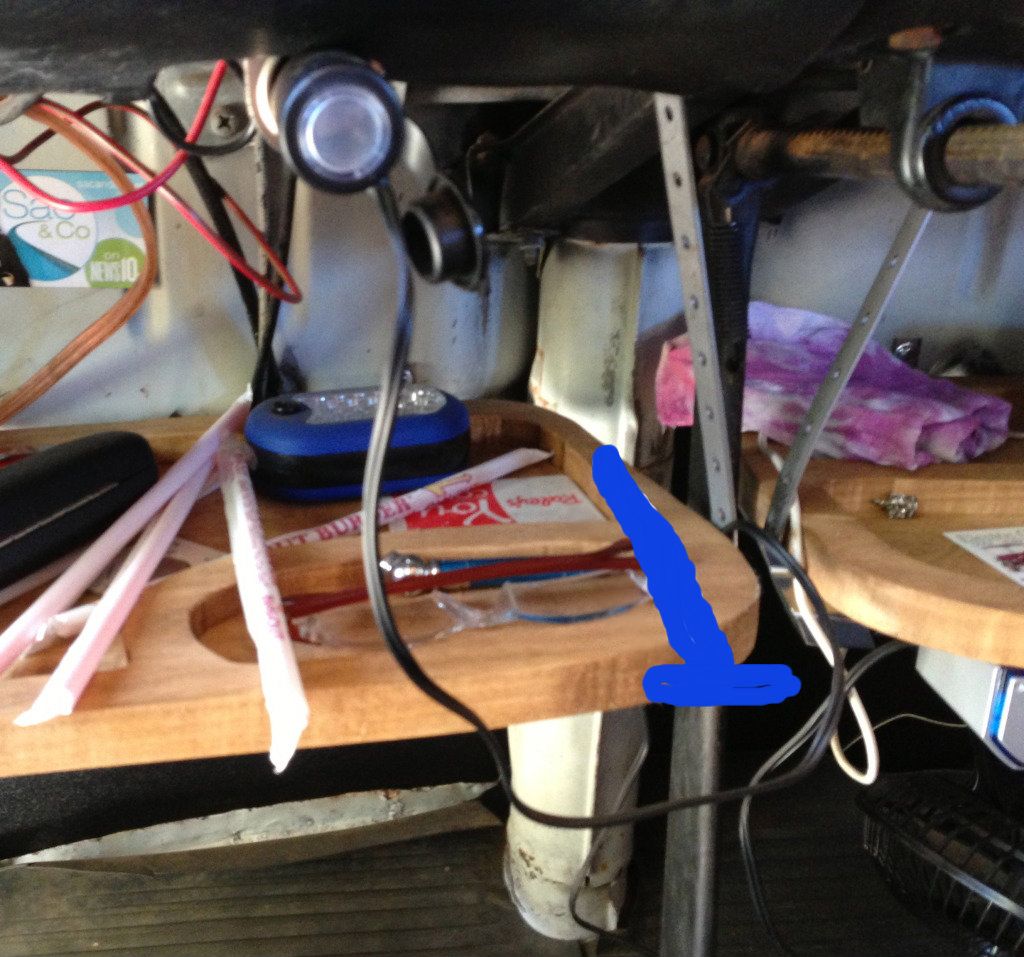 Someone suggested to just put a tube over the lever. So I tried that on for size, after removing the knob that is.  That didn't look like it would work to well, even if I cut it shorter. So hubby got involved and came up with a new idea. He used a smaller size copper tube and bent it in a way to move it away from the gas pedal.  After a test fit, to make sure it would be out of the way of my foot, 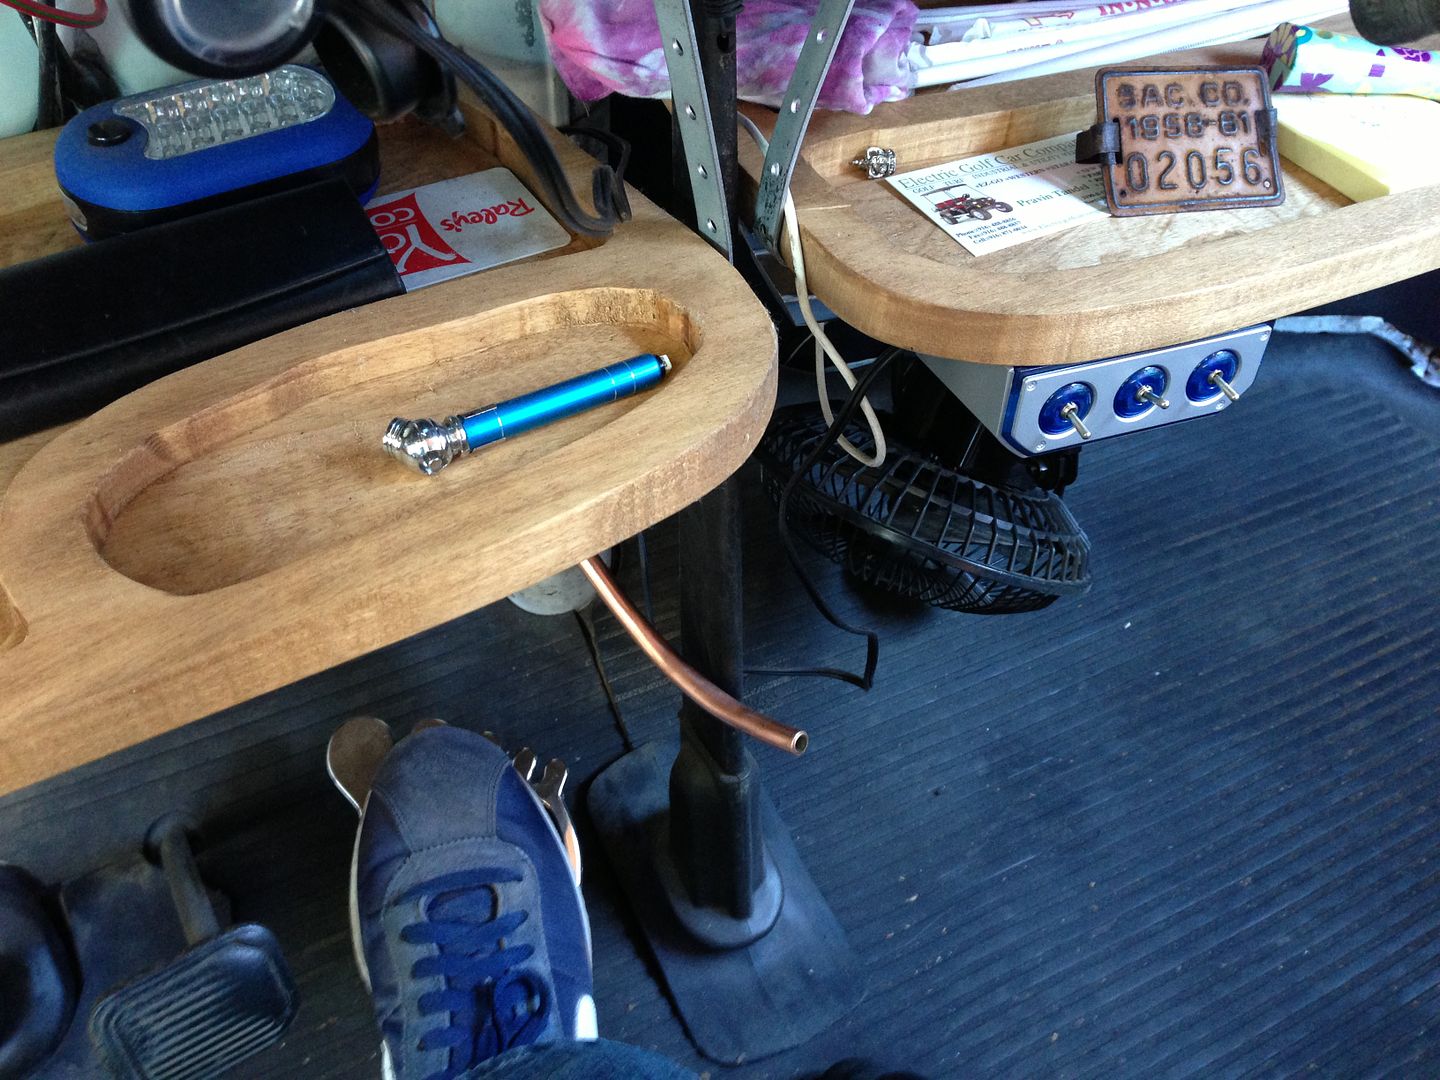 I clamped it on the lever. 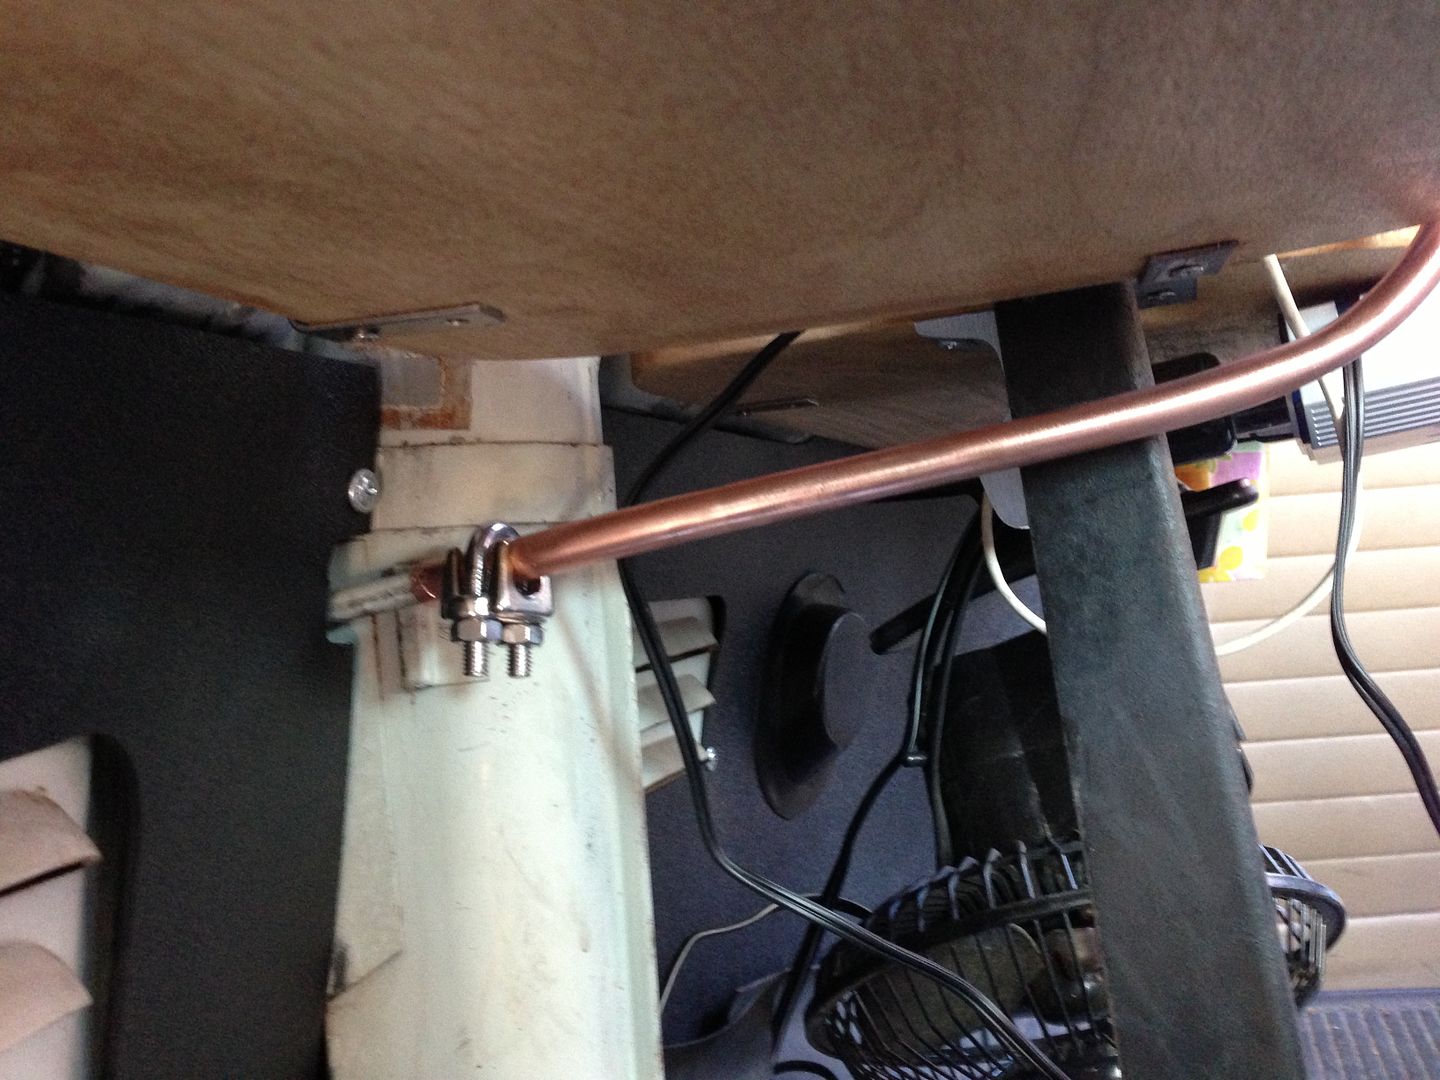 Then I added my personal touch! 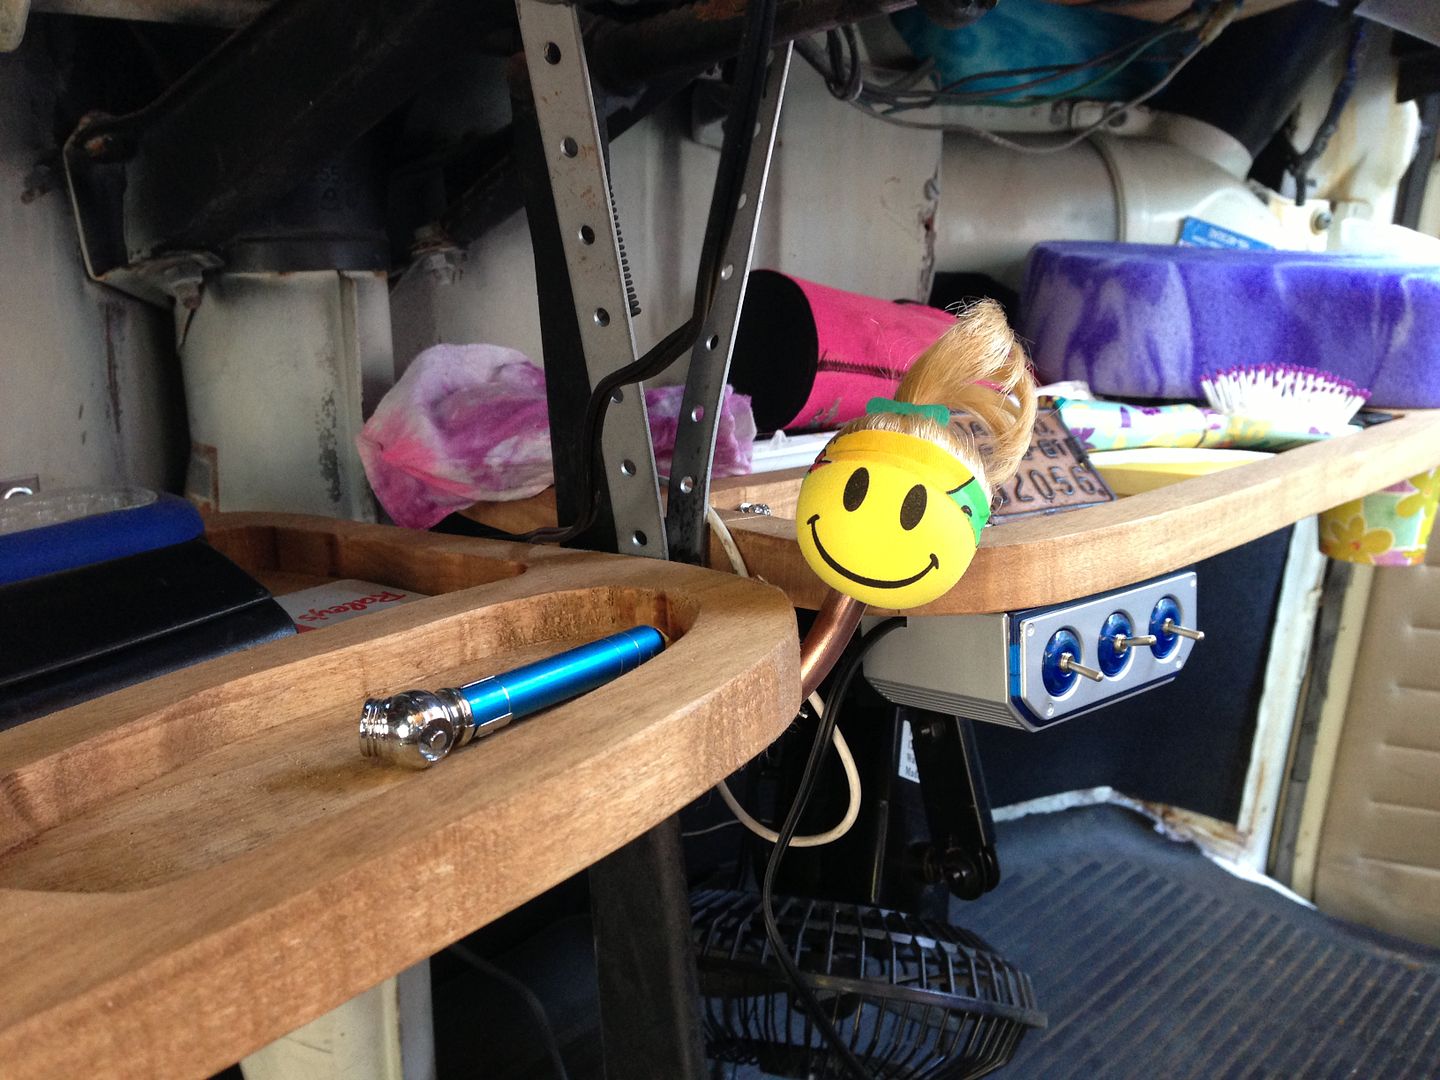 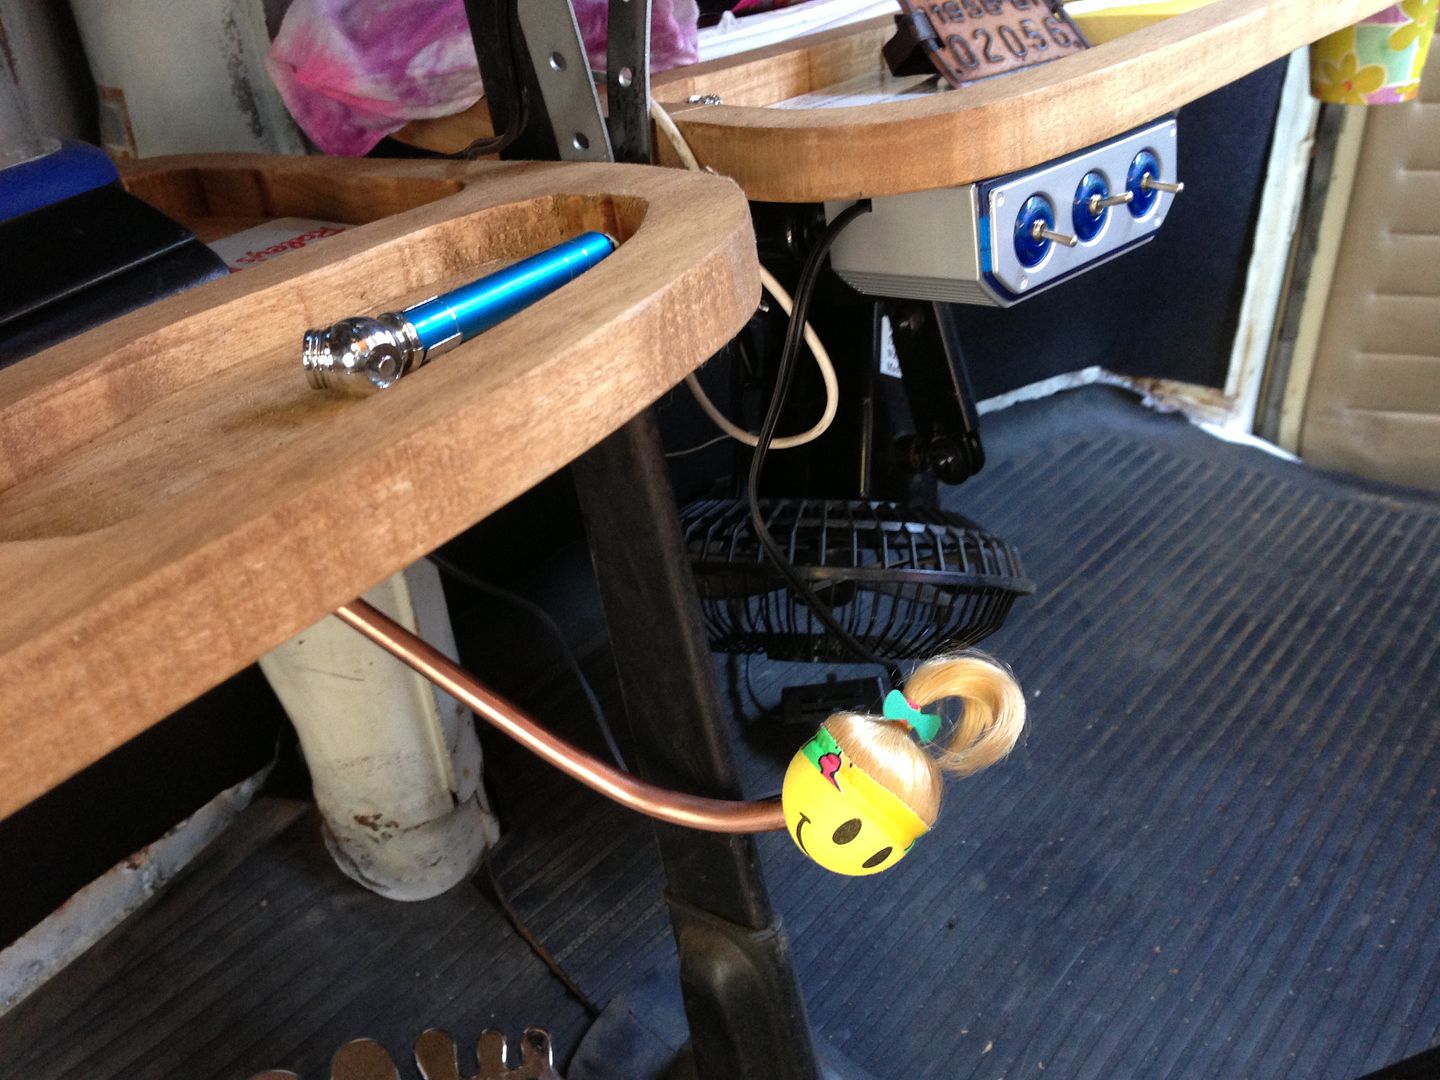 Now I can reach it with my hand, even with my seat belt on! | |
|
| | |
Breck
Posts : 814
Join date : 2012-01-12
Age : 111
Location : Citrus Heights
| | Subject: Re: My 70 Bus!! Tue Nov 27, 2012 6:54 pm | |
| | |
|
| | |
justcruzin
Posts : 810
Join date : 2011-07-29
Location : Sacramento CA
| | Subject: Re: My 70 Bus!! Sun Dec 30, 2012 12:34 am | |
| Got a few more things done today. Bugformance was having a sale so I got some much needed pads for the brake and clutch pedals. I tried to find the kind without the vw emblem but they were out of those. 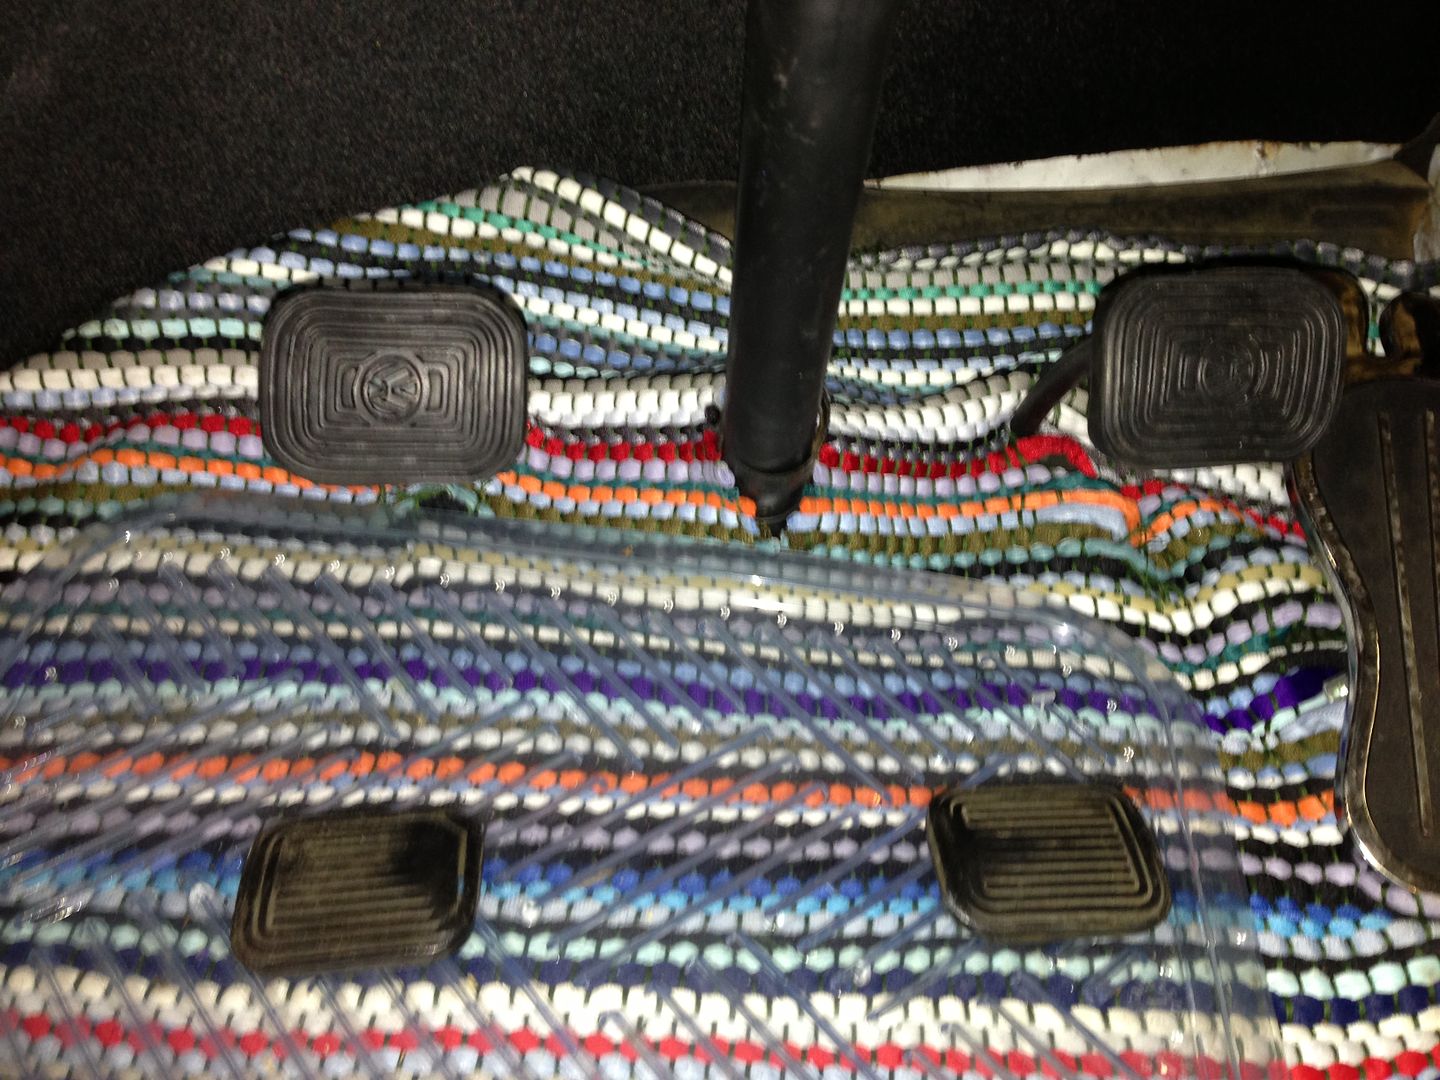 Now maybe my foot won't slip off the clutch when it's wet. I also got my slider door seal in. It was easy to put in, but hard to get the old one out. The old, 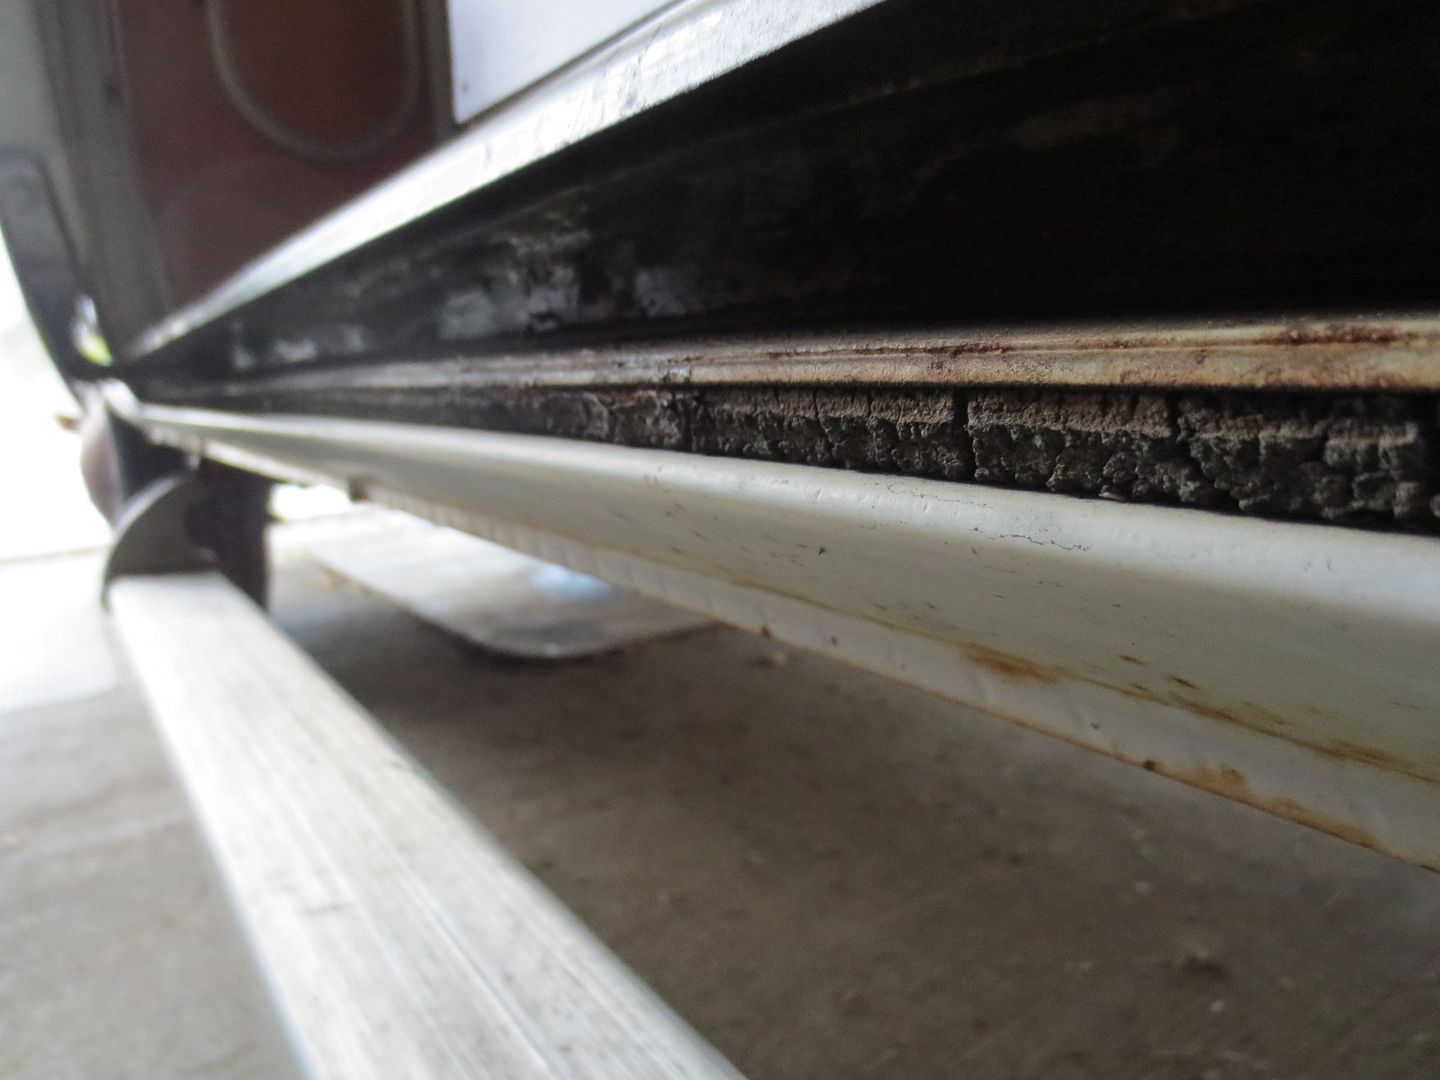  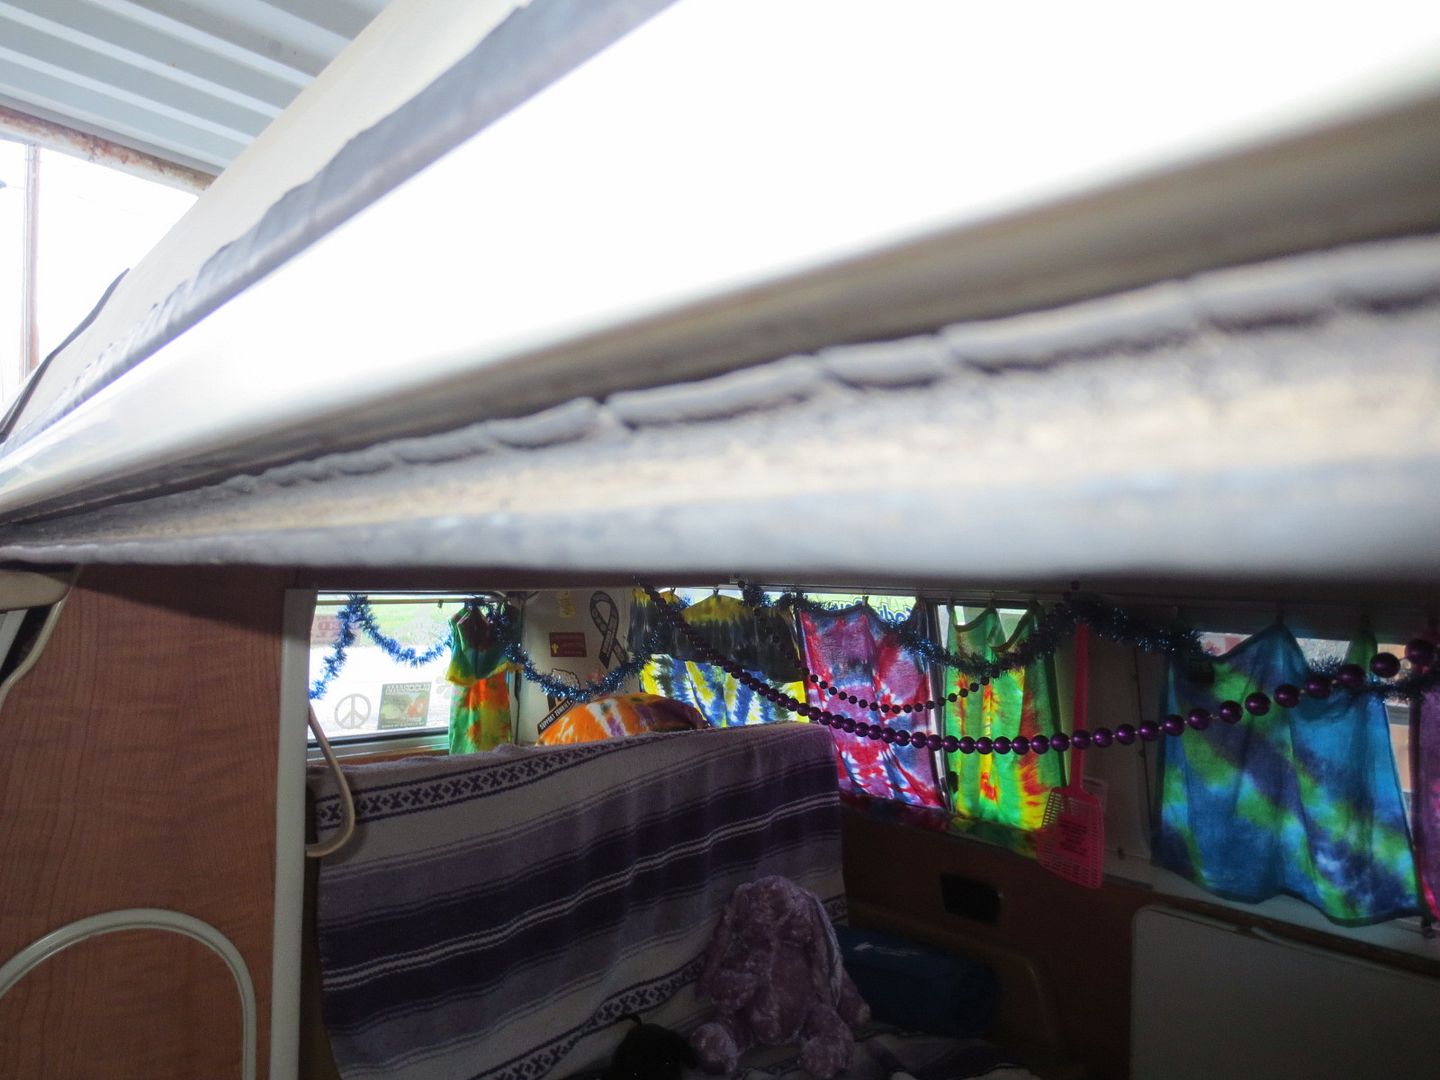 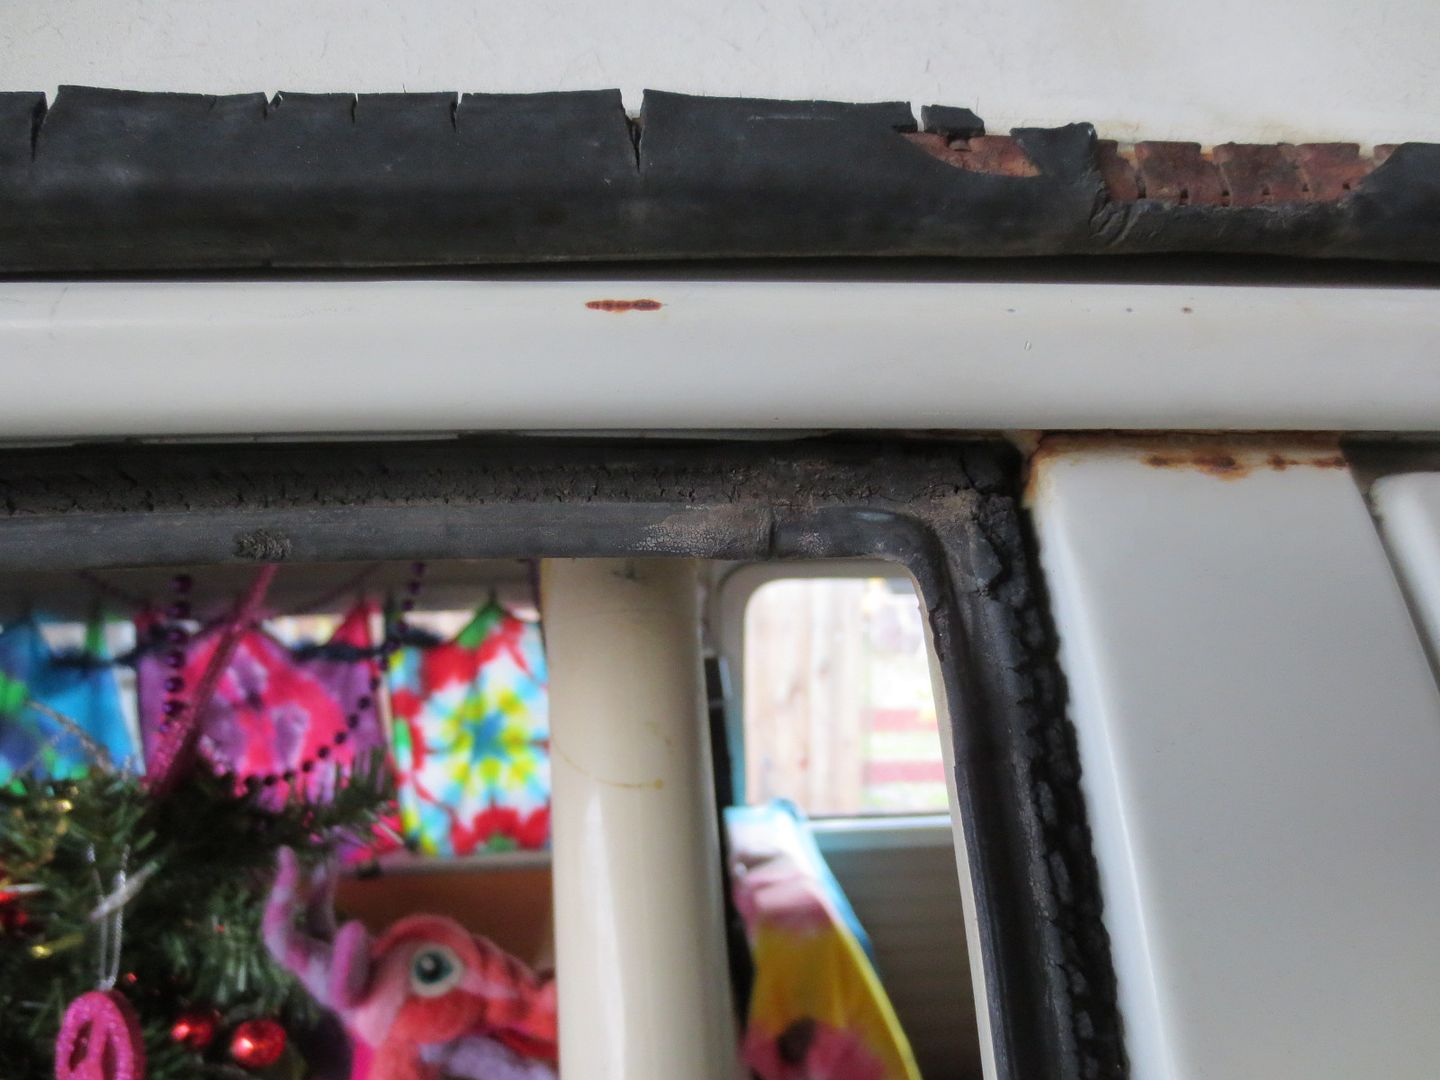 The new. Shuts great. 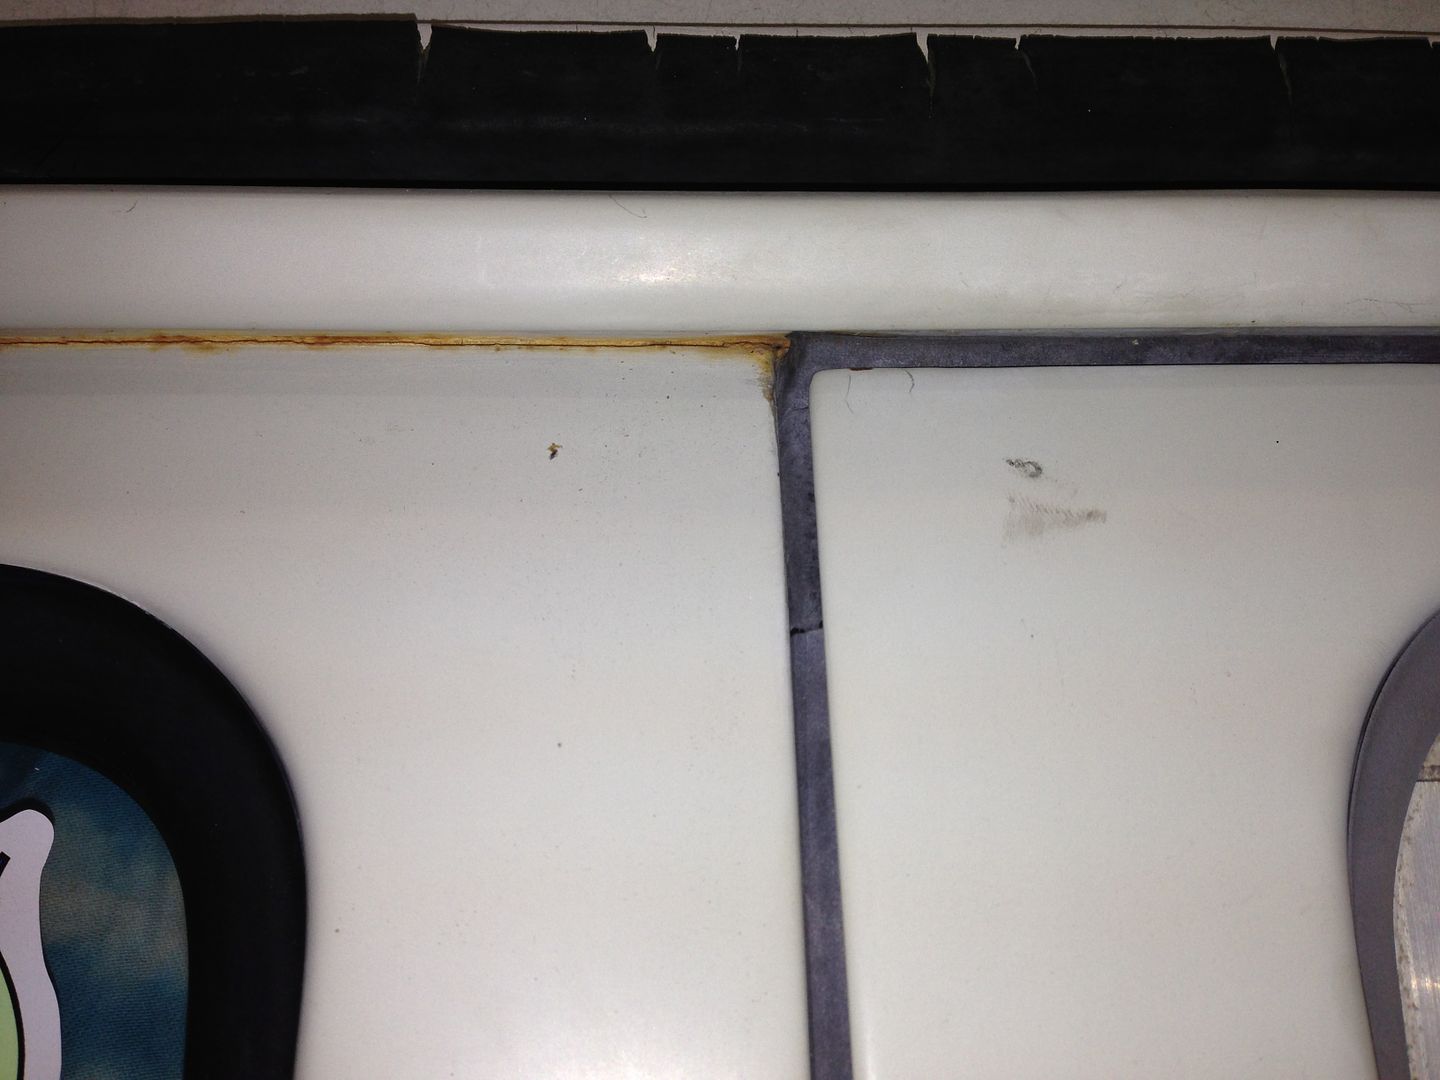 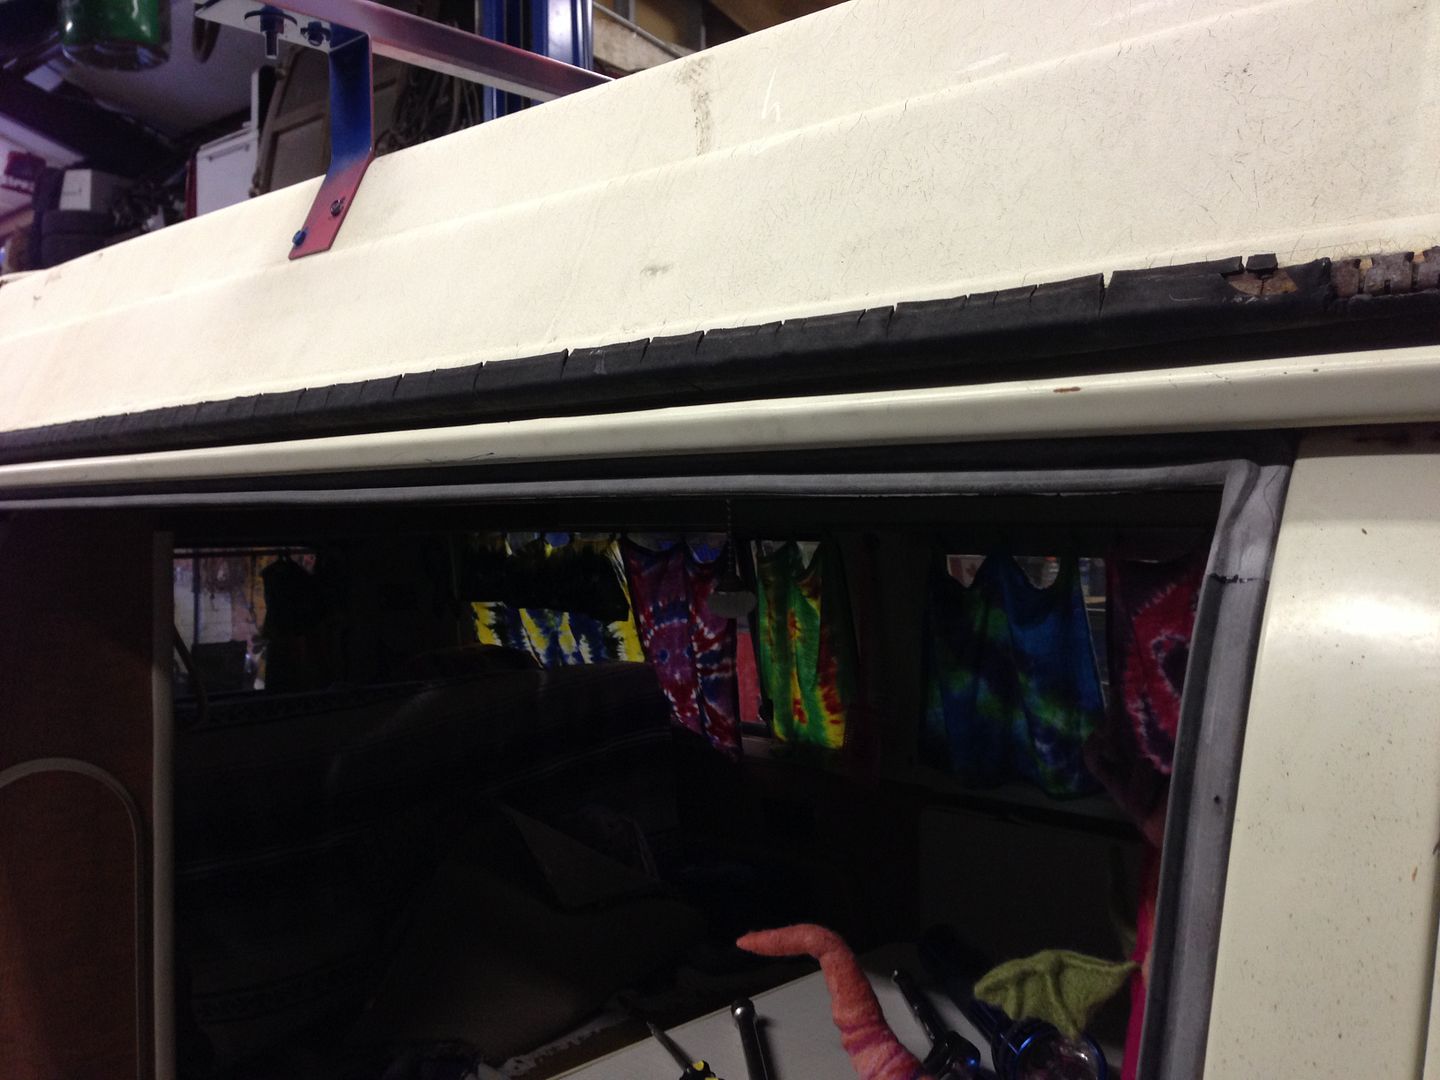 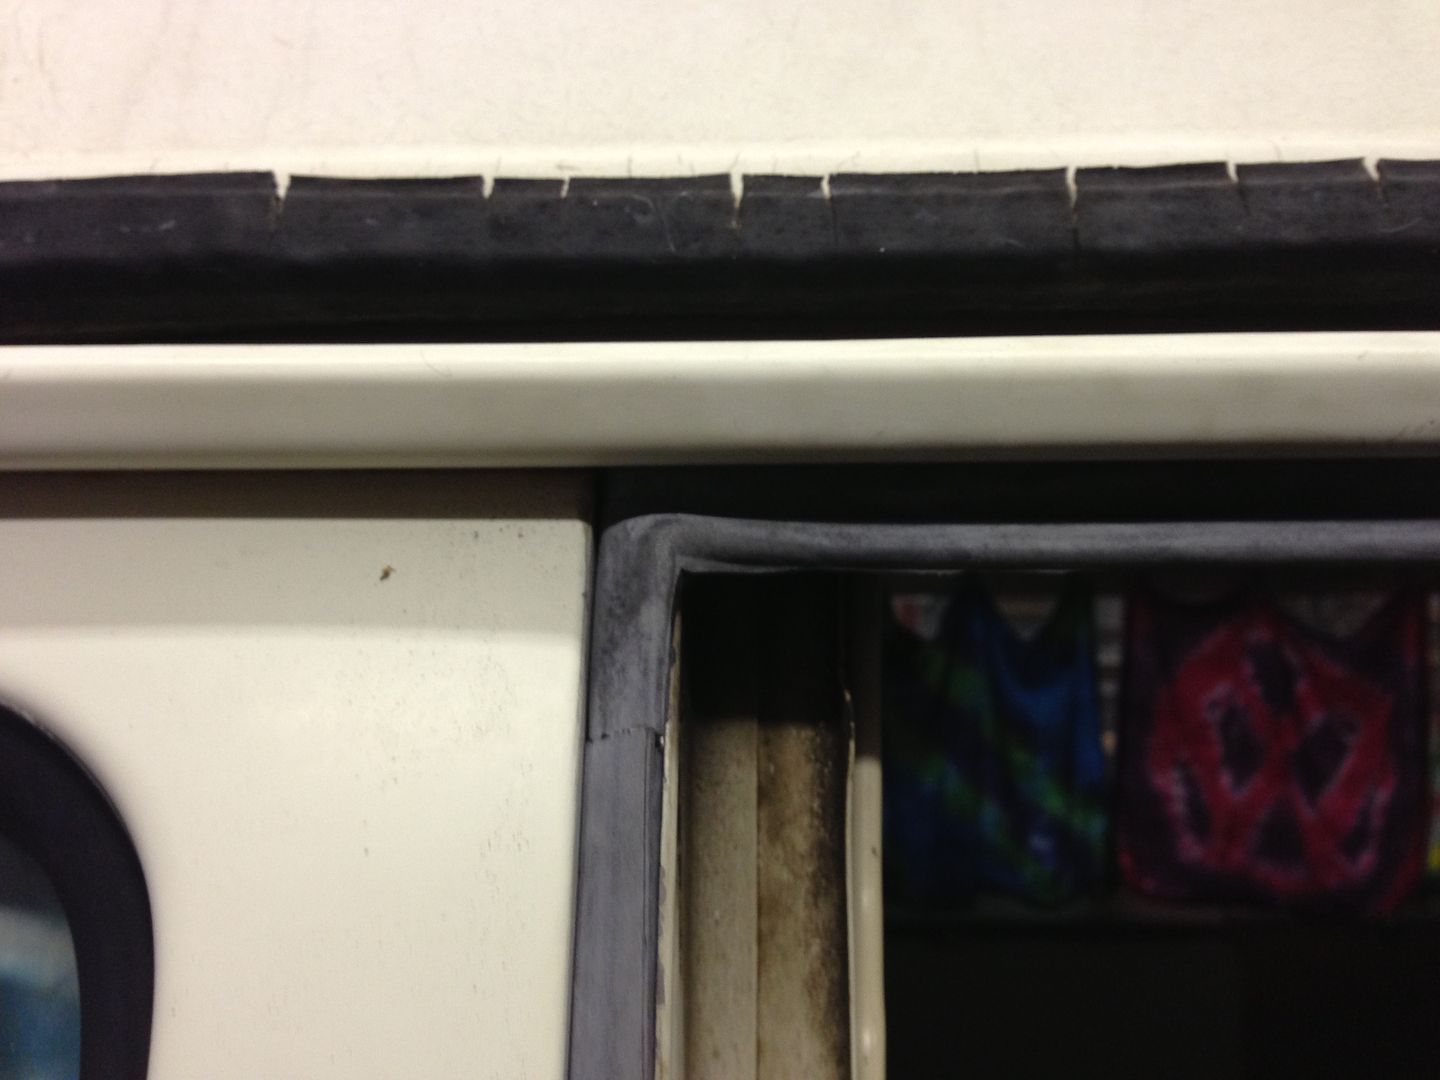 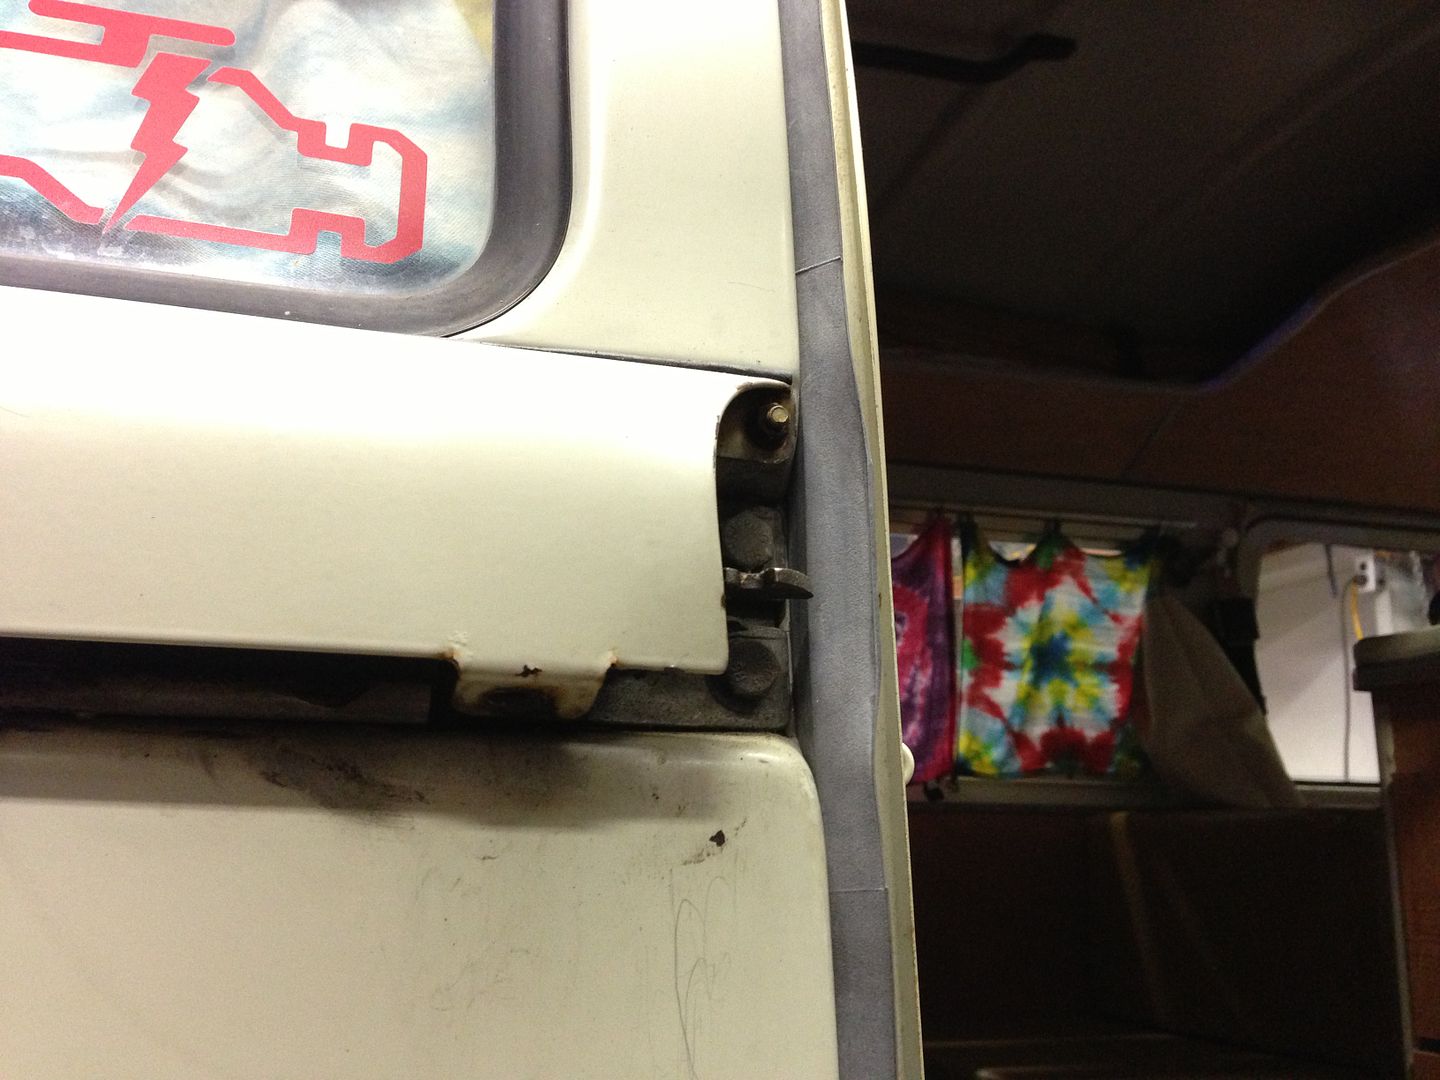 The bottom was a little harder to figure out. At first I put the bottom in like the rest of the seal, the biggest part of the flat part all the way in the groove. Making the rounded "bulb" part of the seal stick straight out. You can kind of see it in this photo. 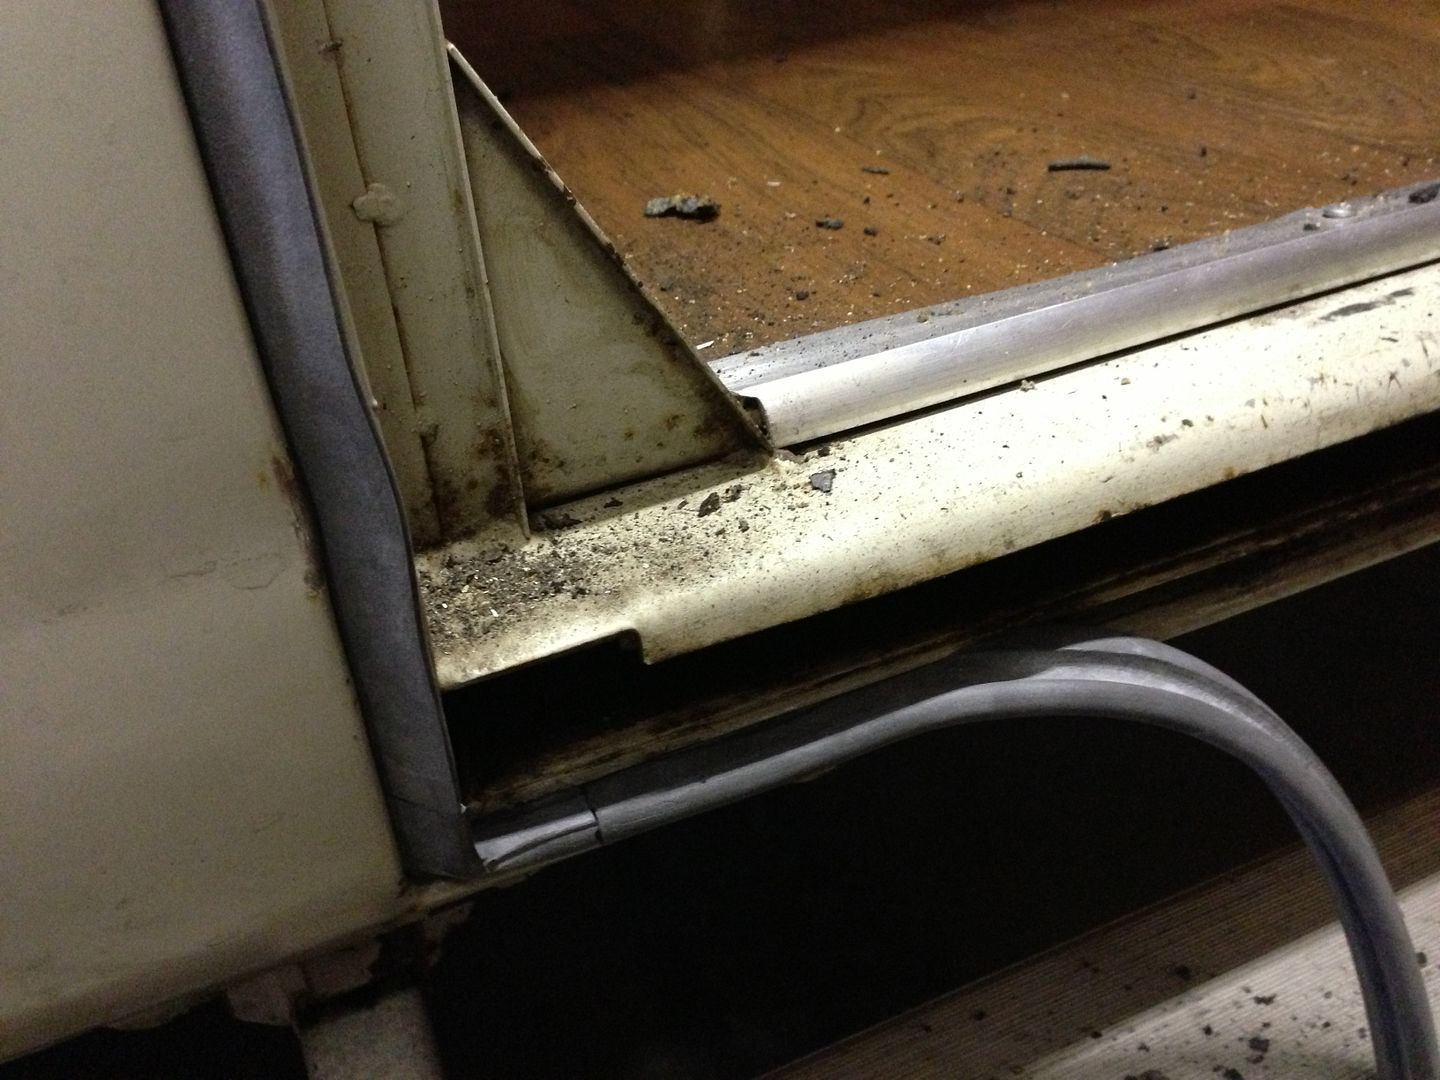  When I shut the door, the bottom rear corner was sticking out (of the door) and the seal was sticking out in several spots toward the front bottom of the door. So I took it out and reinstalled it with the bulb part of the seal almost touching the top of the door frame and the flat part (rear of seal) more at an angle instead of straight in. The result looks like this. 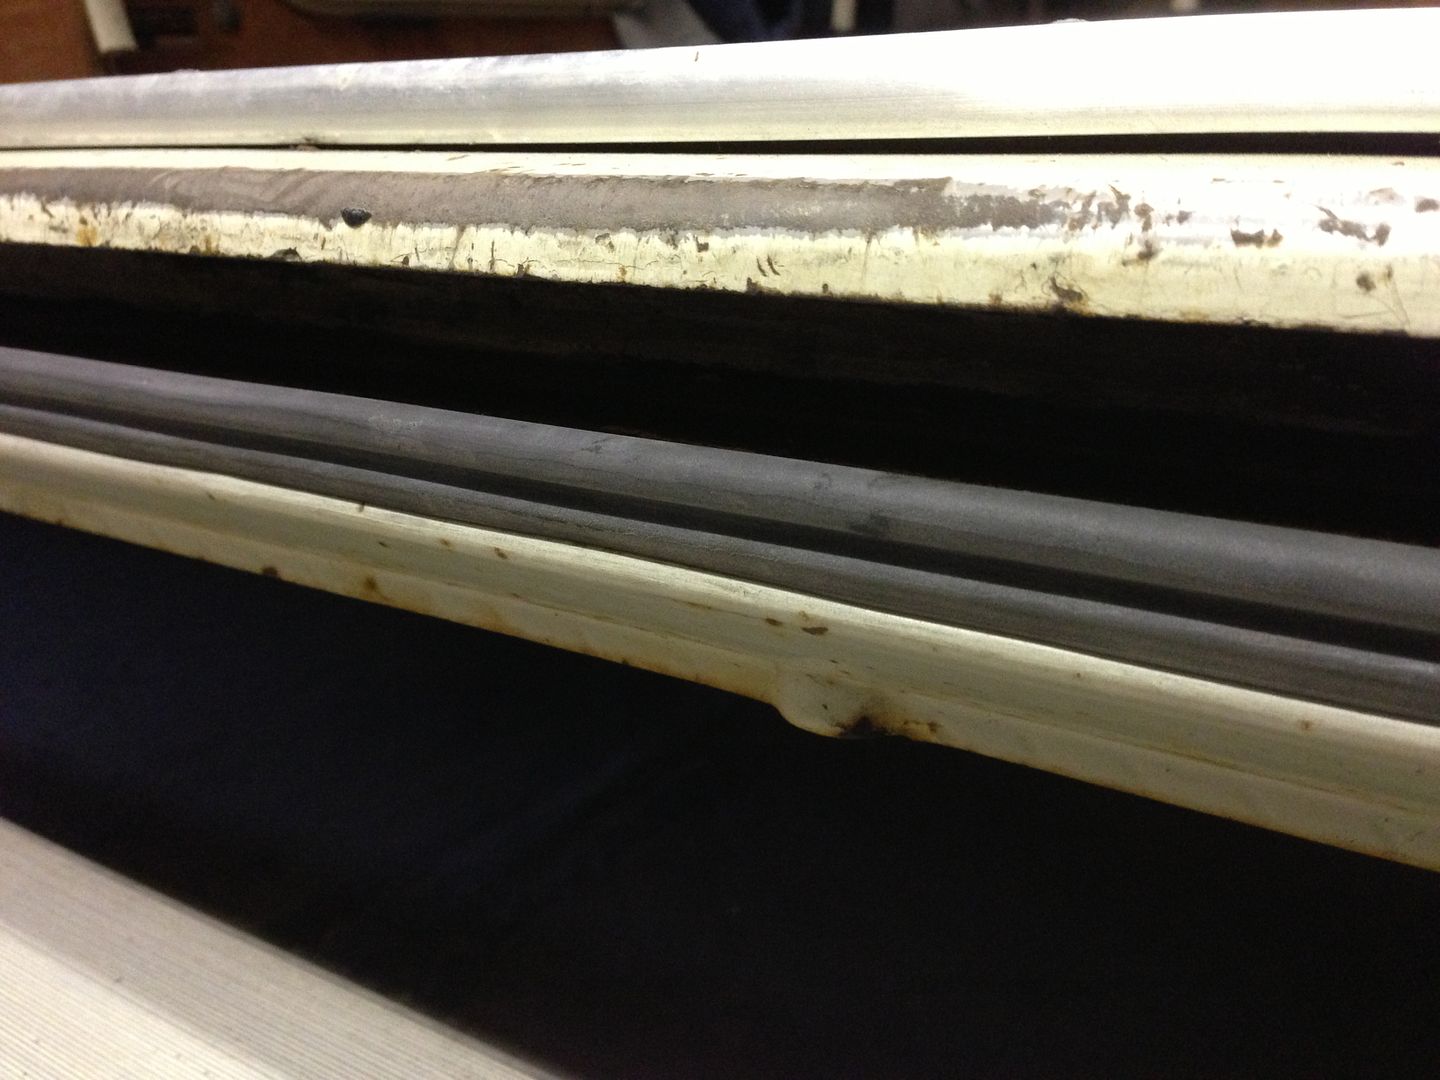 It fit much tighter the other way, but this way the door shuts just like it did before. I didn't use any type of glue anywhere, but I going to keep an eye on the bottom and also the part that is kind of indented by the rear latch. If they look like they need some extra hold I will pull it out a bit and glue it. I also got a great Christmas present. I just can't share it all yet. LOL My husband is getting my seat reupholstered. They are at the shop right now. Can't wait to get them back!! I know I put this in the What did you do thread, but wanted to add it here too. Here is how my hubby gave me the present. 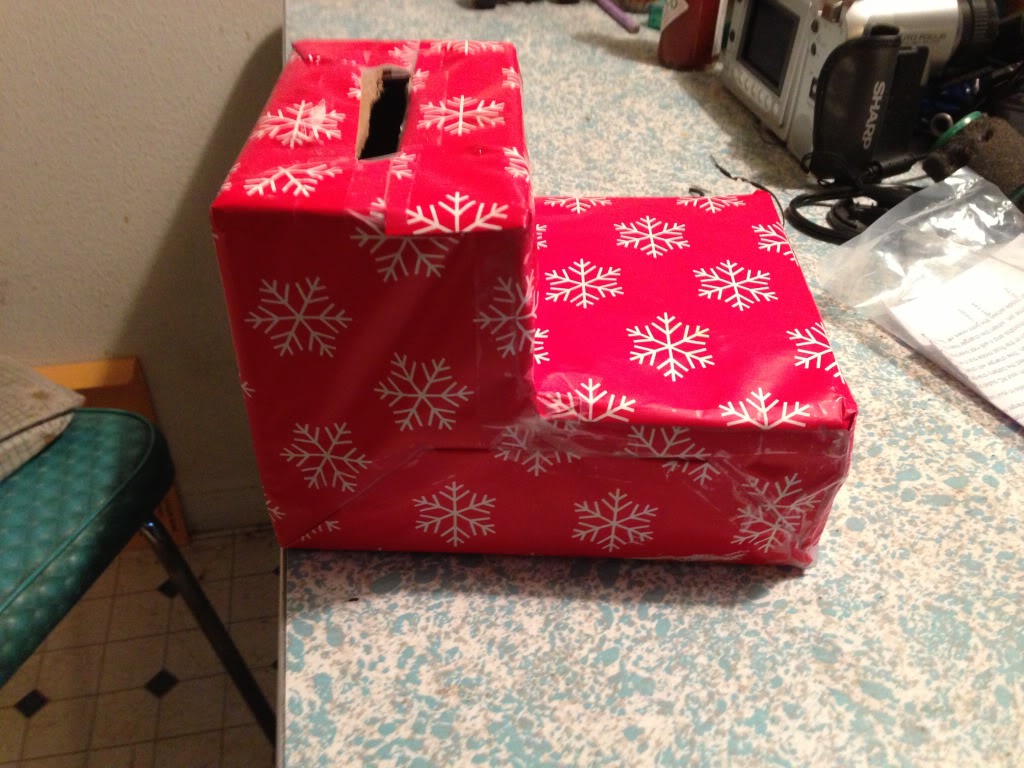 That box had a tab taped to the top and it was wrapped in another box. I had to try to guess what the red box with the tab was. When I pulled the tab out, this is what was connected to it.  I didn't really figure it out. I told him it kind of looked like a toilet. LOL Then he told me that it was a seat and the present the money to get my seats reupholstered. He couldn't take them out and have them done with out me knowing because I am always driving the bus! LOL I dropped them off the day after Christmas and the guy had to take them home to do them, so I'm not sure how long it will take him. He took them home because they are booked till February at his shop. I'm hoping to get them back sometime next week. Can't wait to share. I had him ad a special touch to them!!! Will update once I get the seats back. Stay tuned!! | |
|
| | |
justcruzin
Posts : 810
Join date : 2011-07-29
Location : Sacramento CA
| | Subject: Re: My 70 Bus!! Sun Jan 13, 2013 9:59 pm | |
| Today I got my seats back from the Upholstery guy! Been biting at the bit to get them back and now that they are, I can't drive the bus. LOL Need to finish the ball joint job that we started when the seats were sent off. Hopefully that will be done maybe by Tuesday night. Here are the seats before.  After.  | |
|
| | |
Breck
Posts : 814
Join date : 2012-01-12
Age : 111
Location : Citrus Heights
| | Subject: Re: My 70 Bus!! Mon Jan 14, 2013 11:09 pm | |
| Wow......very nice.......the white scares me tho.....it would be wasted in a week with me!!!! | |
|
| | |
justcruzin
Posts : 810
Join date : 2011-07-29
Location : Sacramento CA
| | Subject: Re: My 70 Bus!! Mon Jan 14, 2013 11:44 pm | |
| - Breck wrote:
- Wow......very nice.......the white scares me tho.....it would be wasted in a week with me!!!!
Thanks Breck It's actually a tan. Pretty close to stock color! | |
|
| | |
justcruzin
Posts : 810
Join date : 2011-07-29
Location : Sacramento CA
| | Subject: Re: My 70 Bus!! Thu Jan 17, 2013 3:25 pm | |
| Got a little bit more done to the bus this week. Got my axles reinstalled, Before, 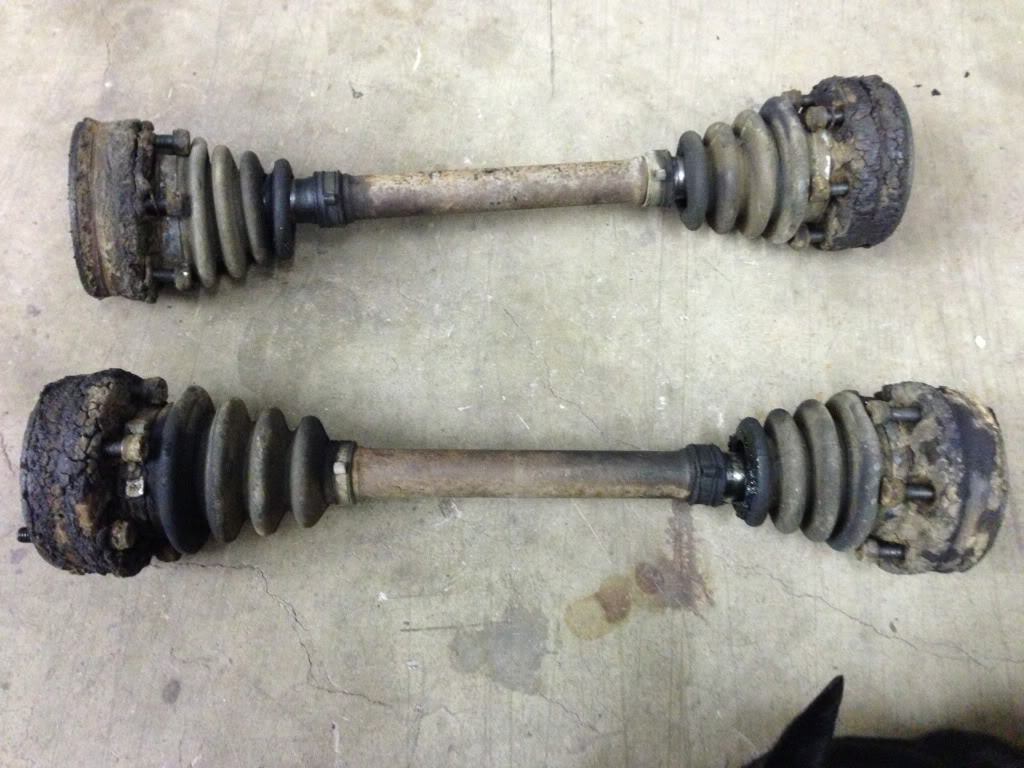 Thanks to Dewey they got nice and clean! 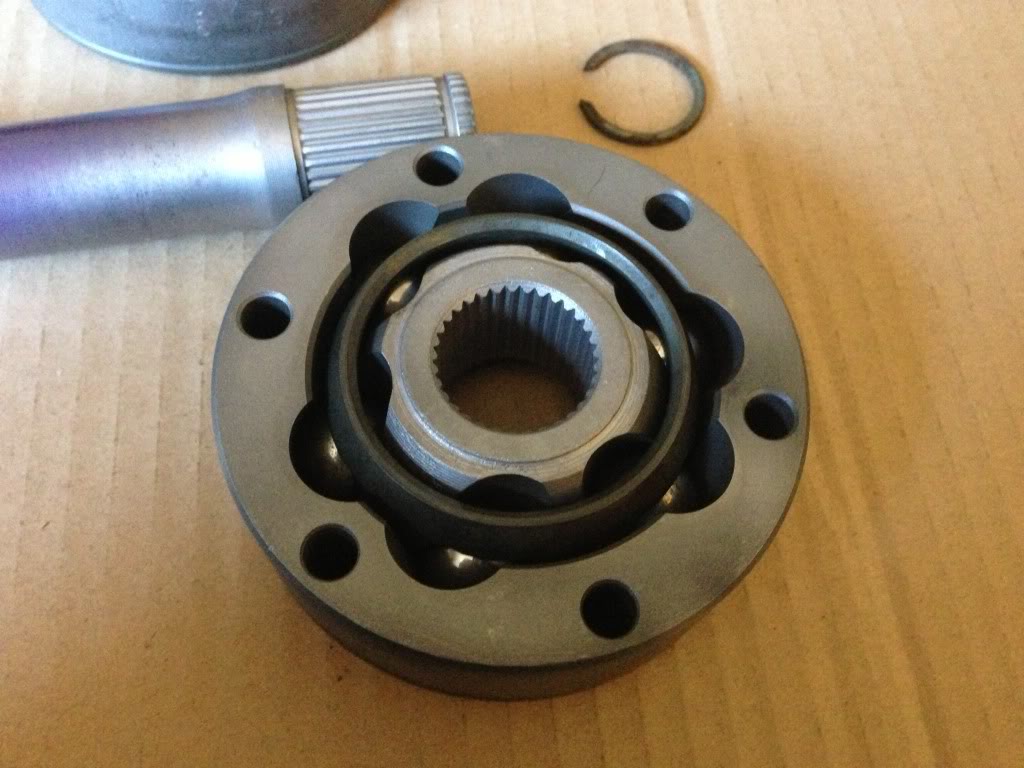 After, 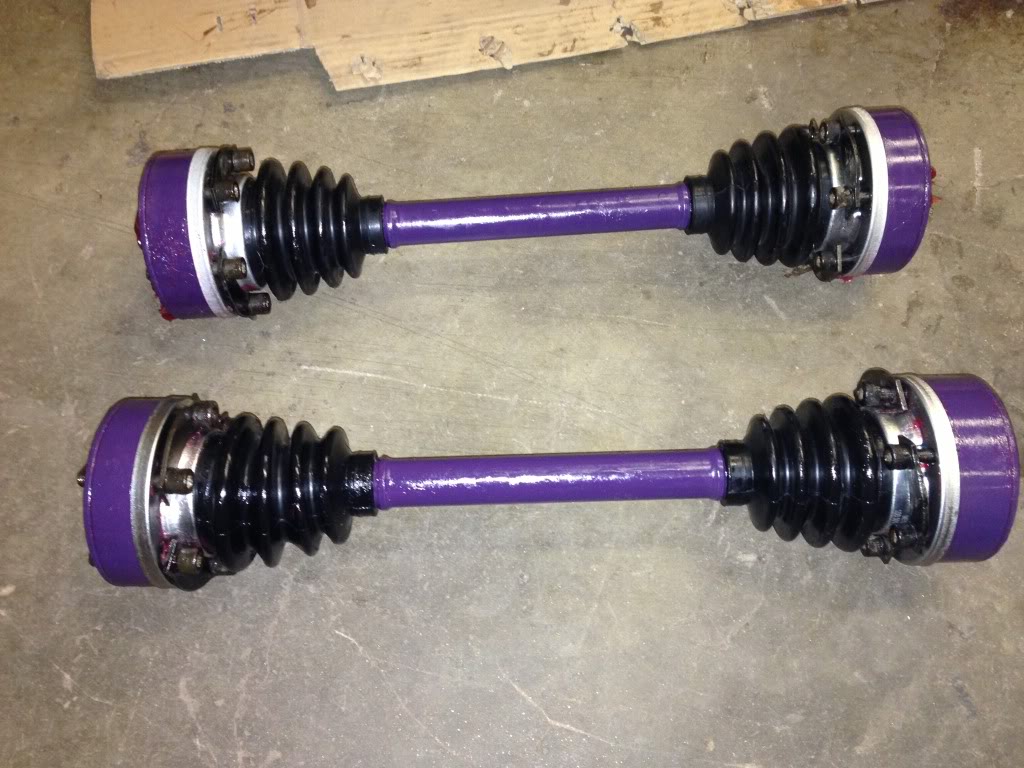 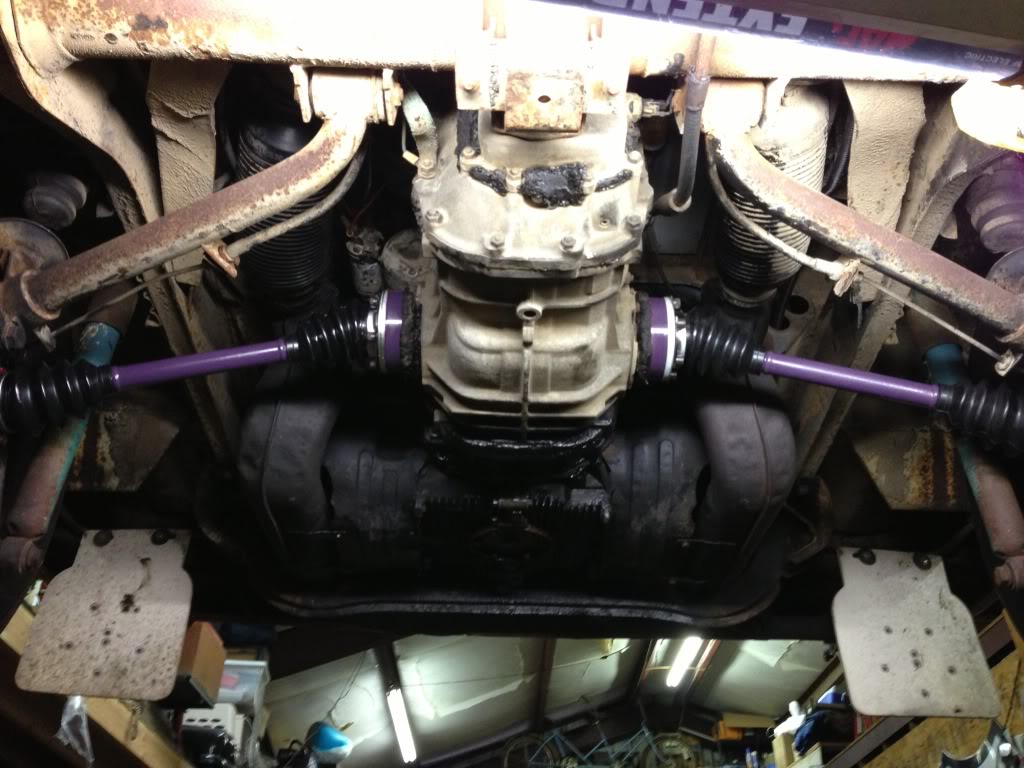 We finally got the ball joints replaced. That was not a fun job. Bob say's it is the last set he is going to do. LOL (Till I need them done to the 64, shhh don't tell him ) Before 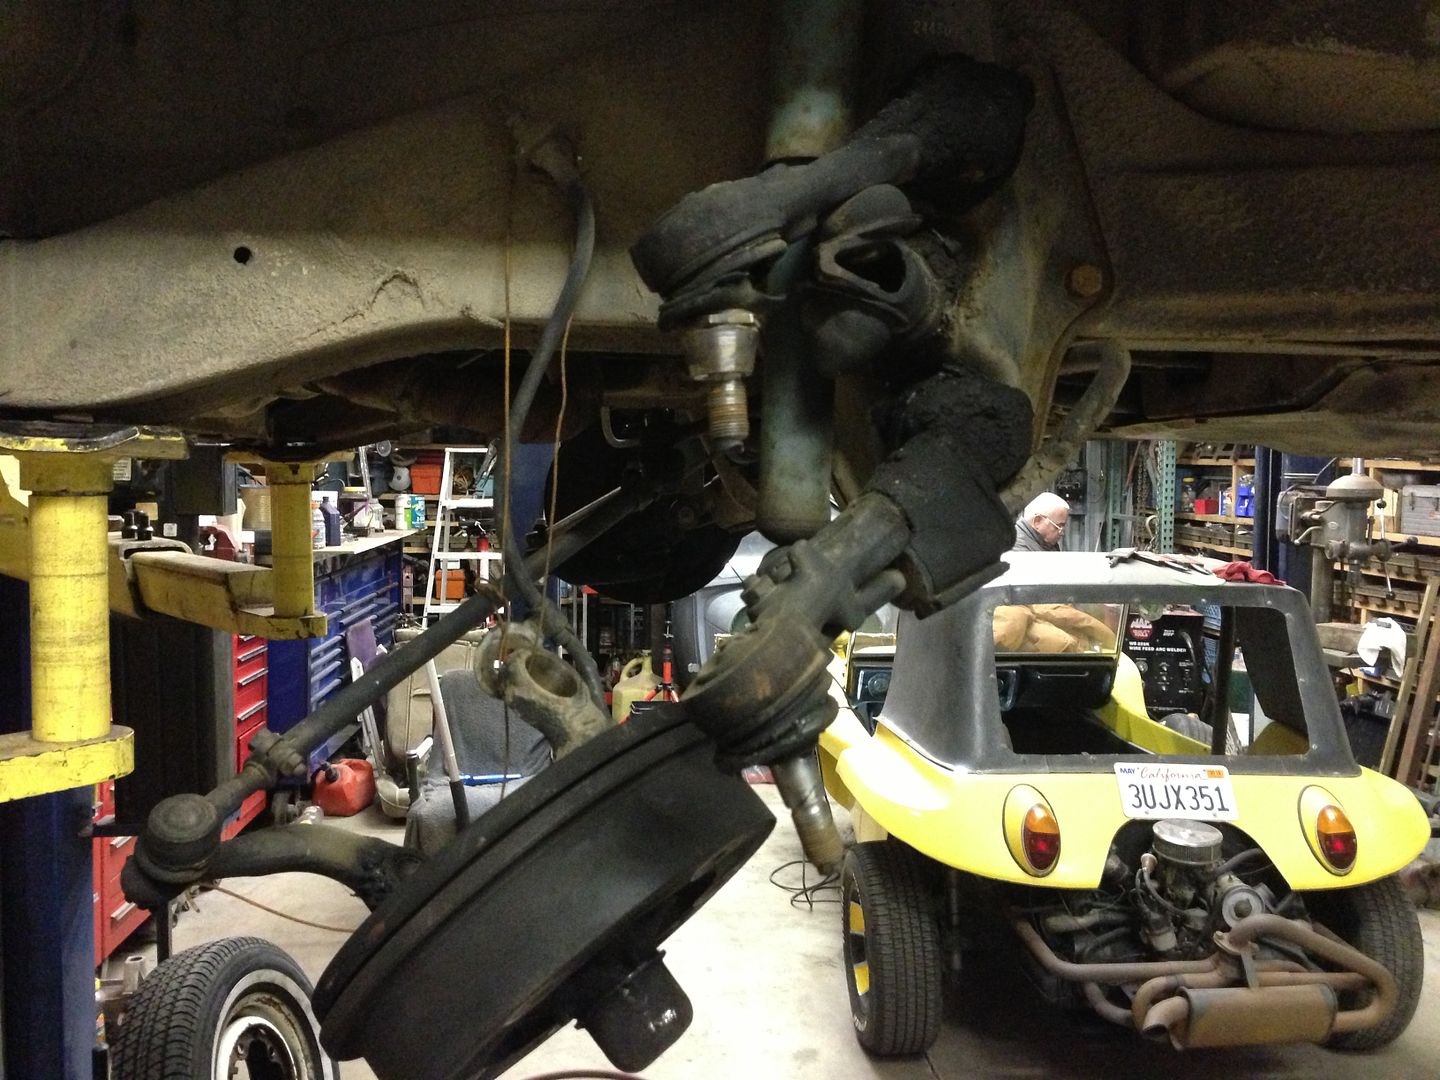 After 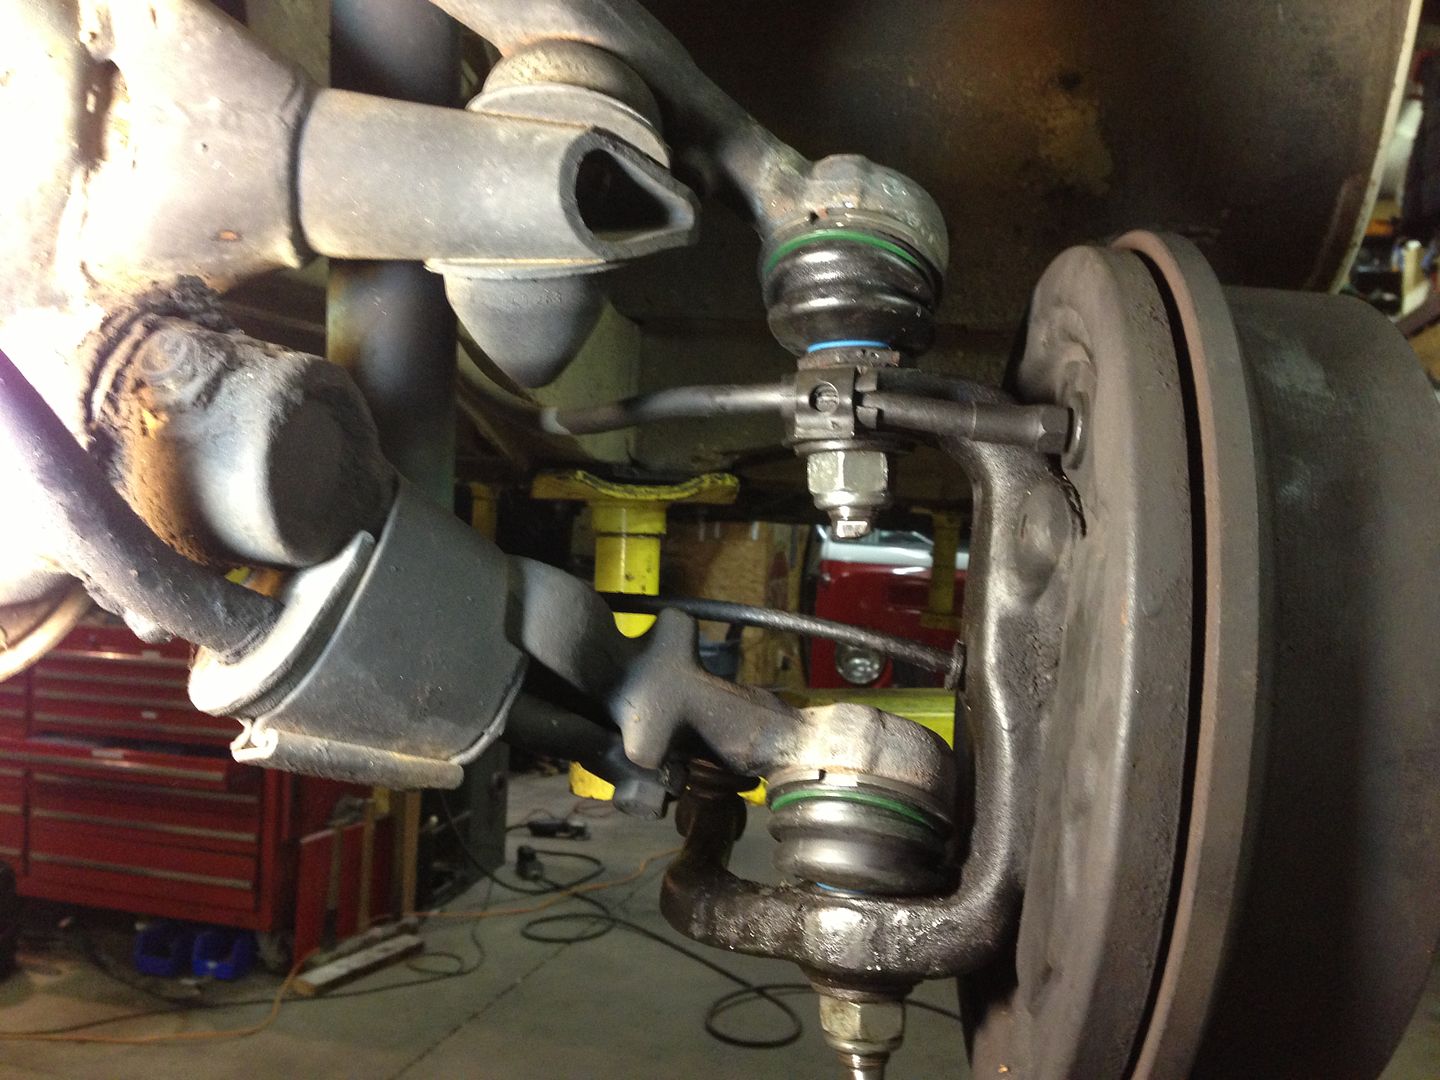 Today I got to take it for a test drive. First time driving it since last year!  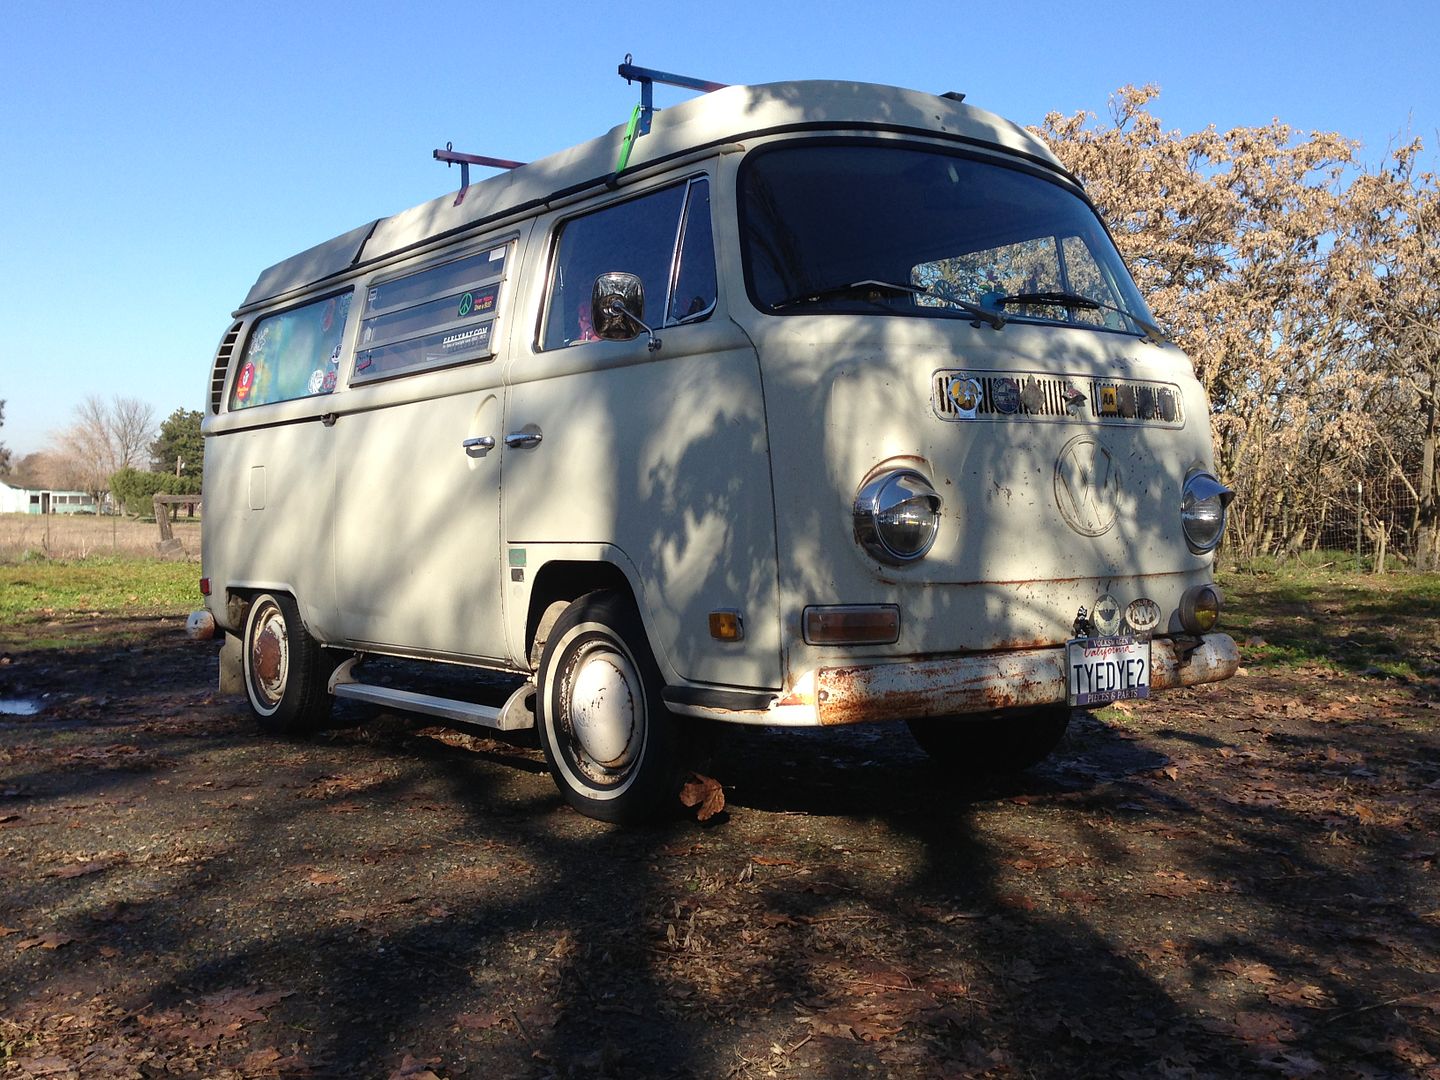  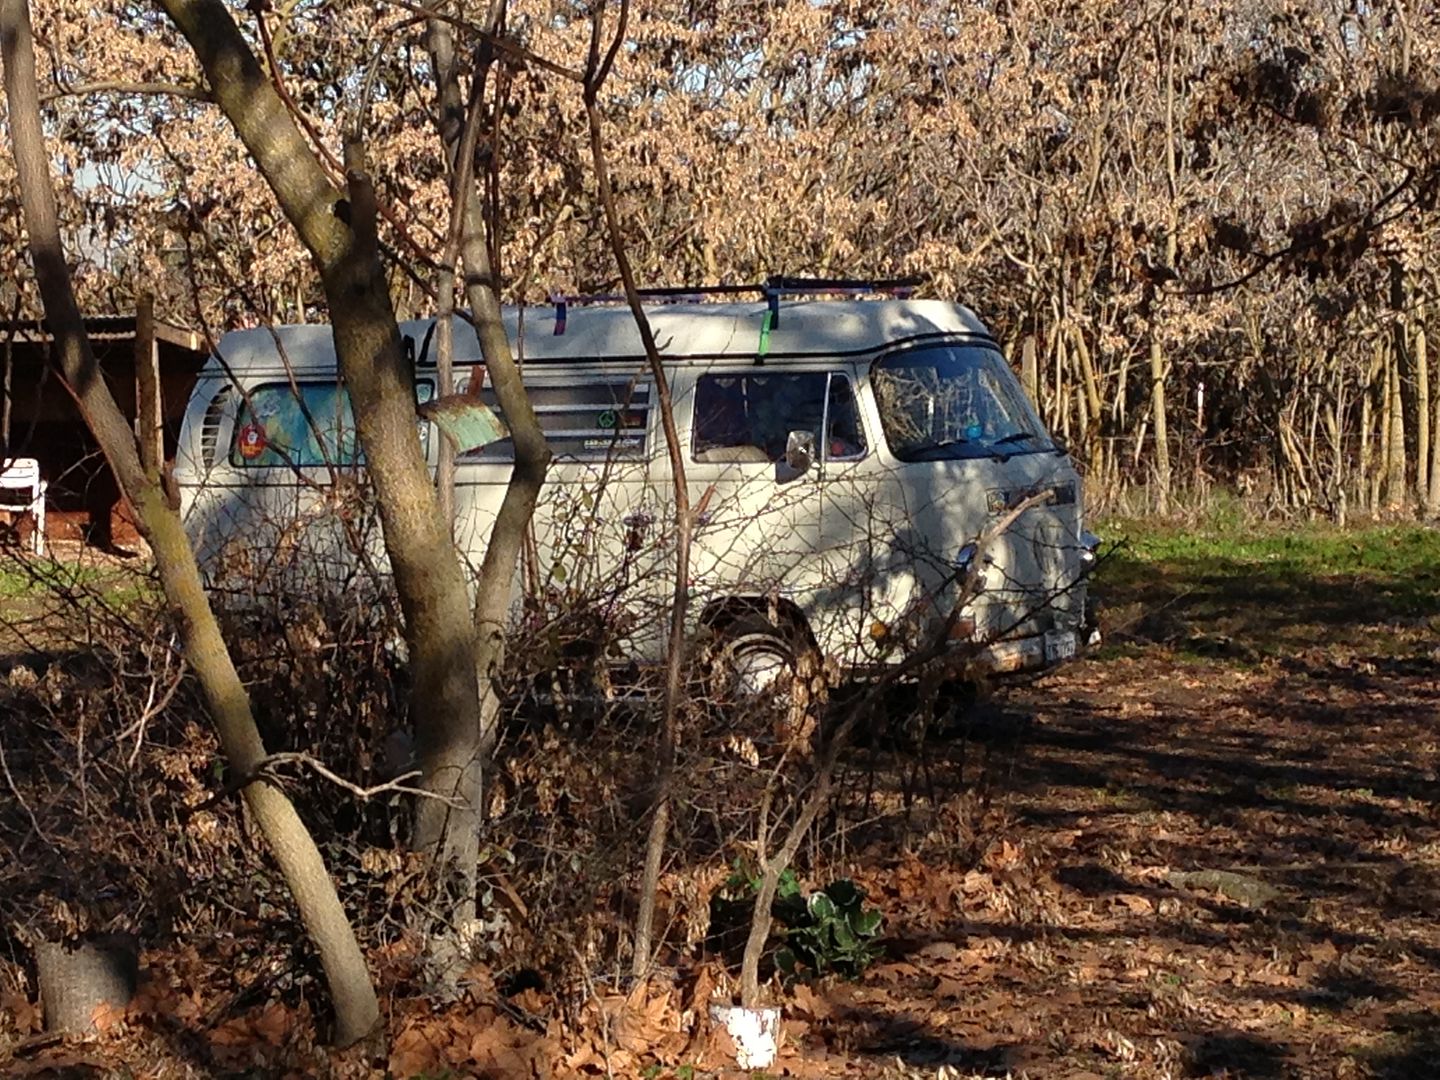 The next big job to do is the top. Going to sand it down and paint it. Then put all new seals on it. I already got the seals, just have to get in touch with the guy that is going to put the new canvas on, so we can work out a time to do it all. | |
|
| | |
justcruzin
Posts : 810
Join date : 2011-07-29
Location : Sacramento CA
| | Subject: Re: My 70 Bus!! Mon Feb 18, 2013 7:29 pm | |
| It's time for an update! I was dealing with a intermittent horn honking when turning right. Thanks to some research over at the Samba, I read about someone experiencing this and the key chain was the source of the problem. After I fixed a bad wire I discovered that my keychain was the problem too. I temporarily fixed it for now. 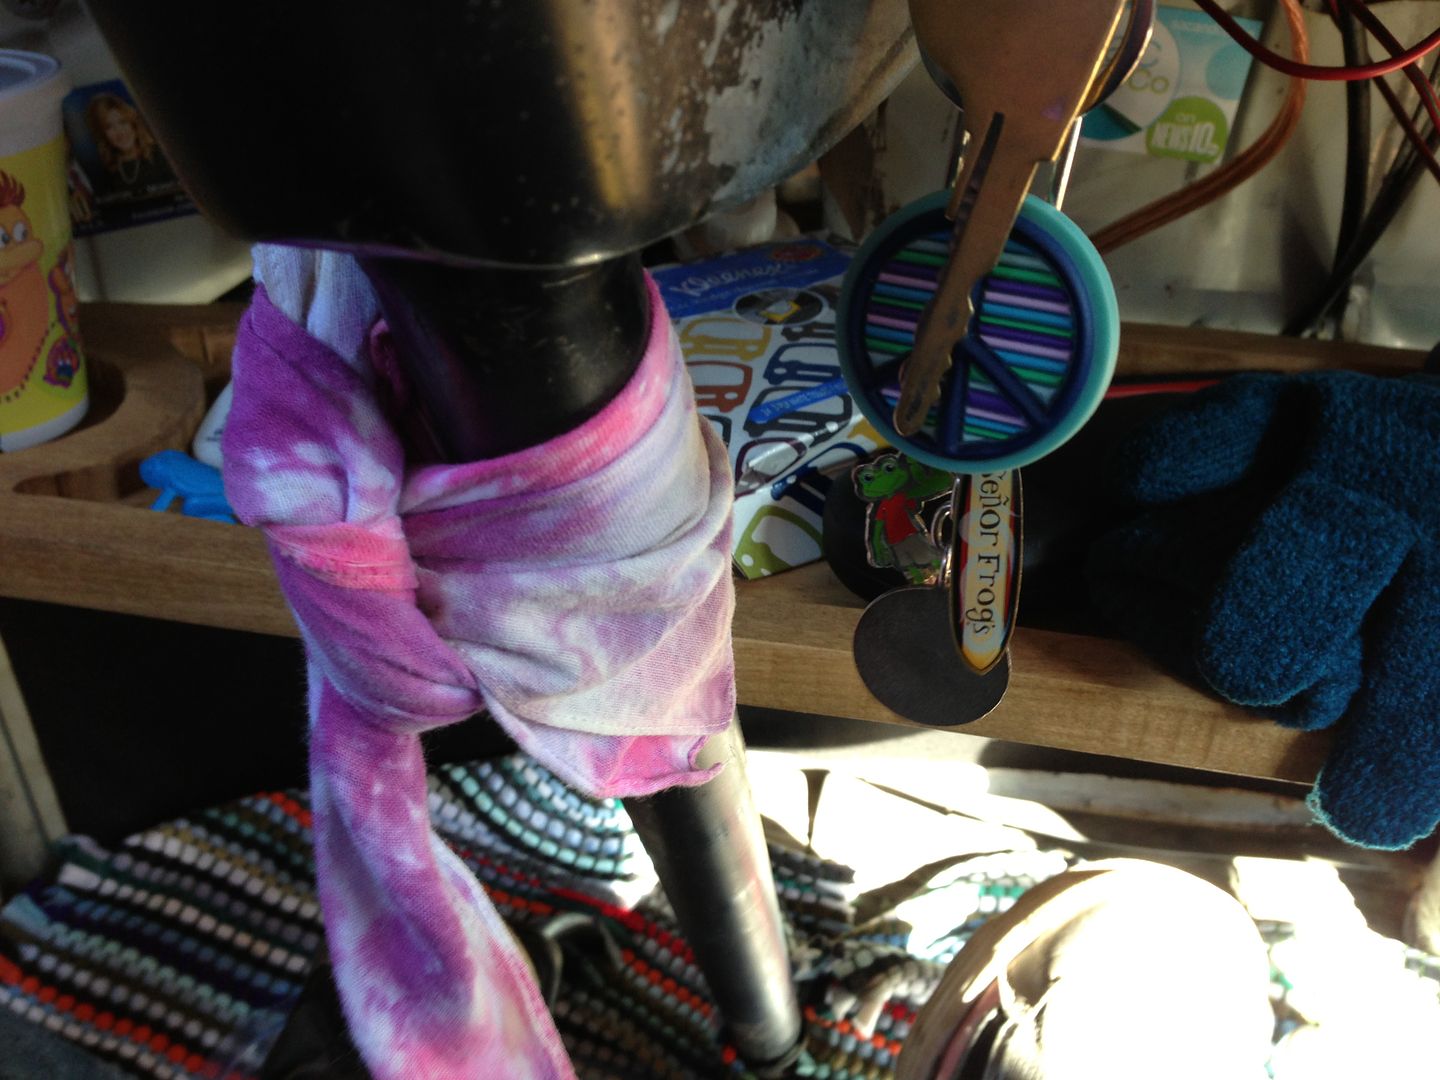 I did remove some of the keychains too. LOL I also installed a new horn. Click on the picture to here the horn. THe old horn  The new one. ( yah, it's upside down video. LOL)  I installed a Stebel Air Horn. It is made for a motorcycle but it fit perfect on the old horn mount on the bus. I also gave my pop top a new paint job. It was starting to mold and also the fiberglass was slowly flaking off. I kept getting particles of it in my arms when ever I did anything around the top. Before. If you look close you can see a spider like crack in the corner. 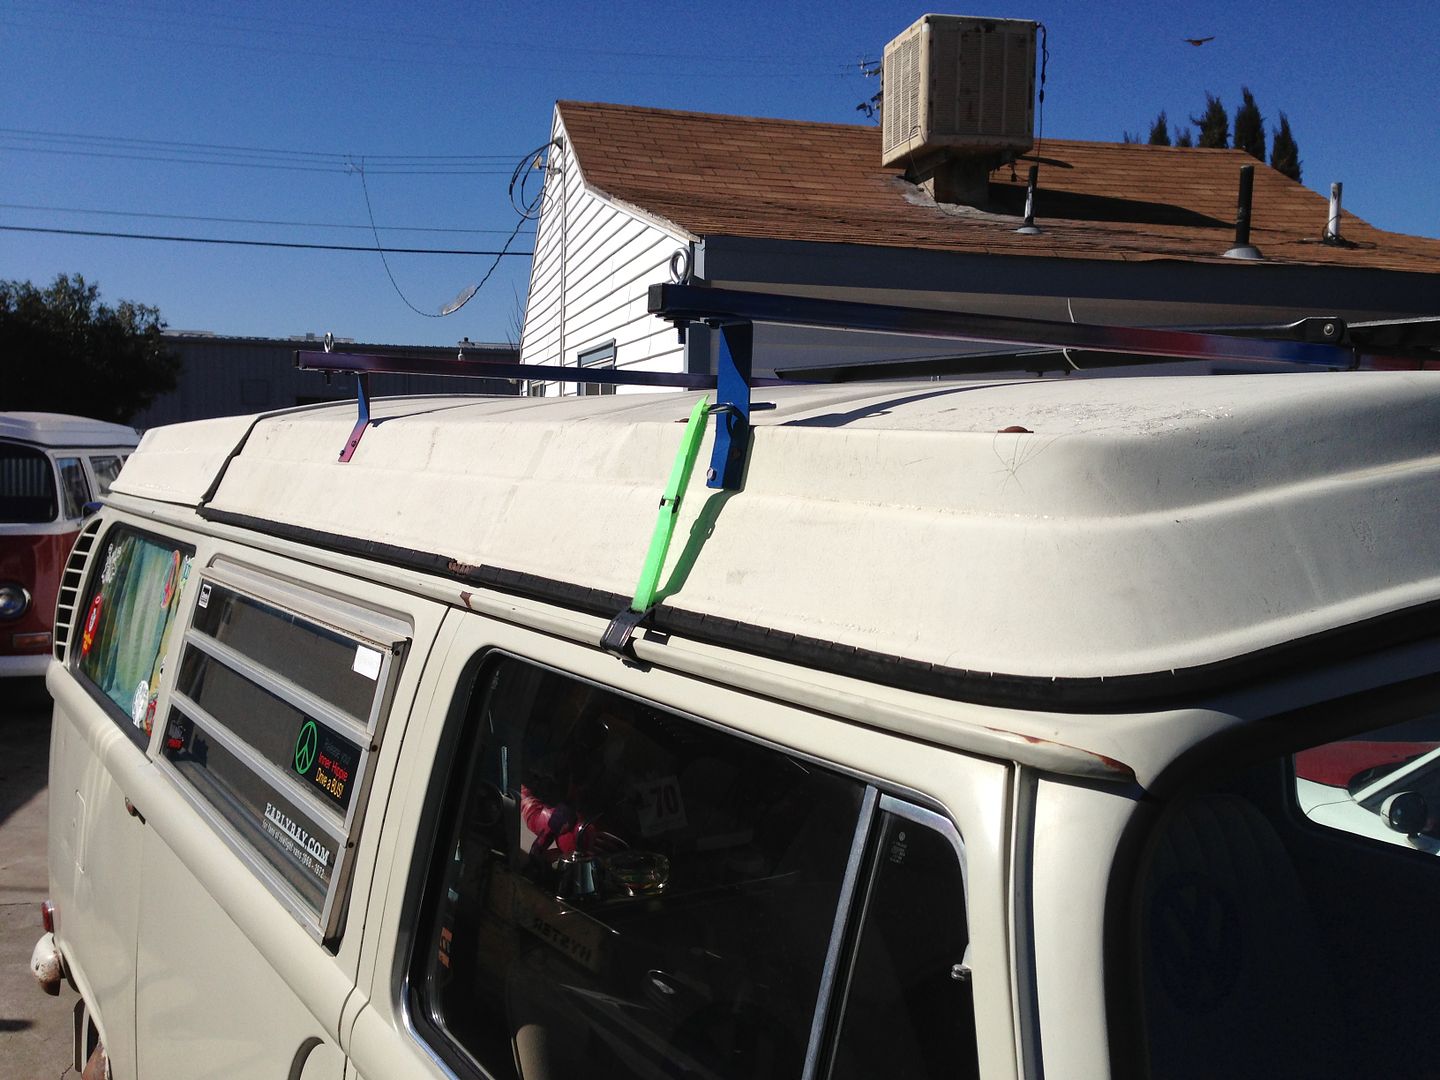 Here you can see some of the mold and also the fiberglass flaking off. 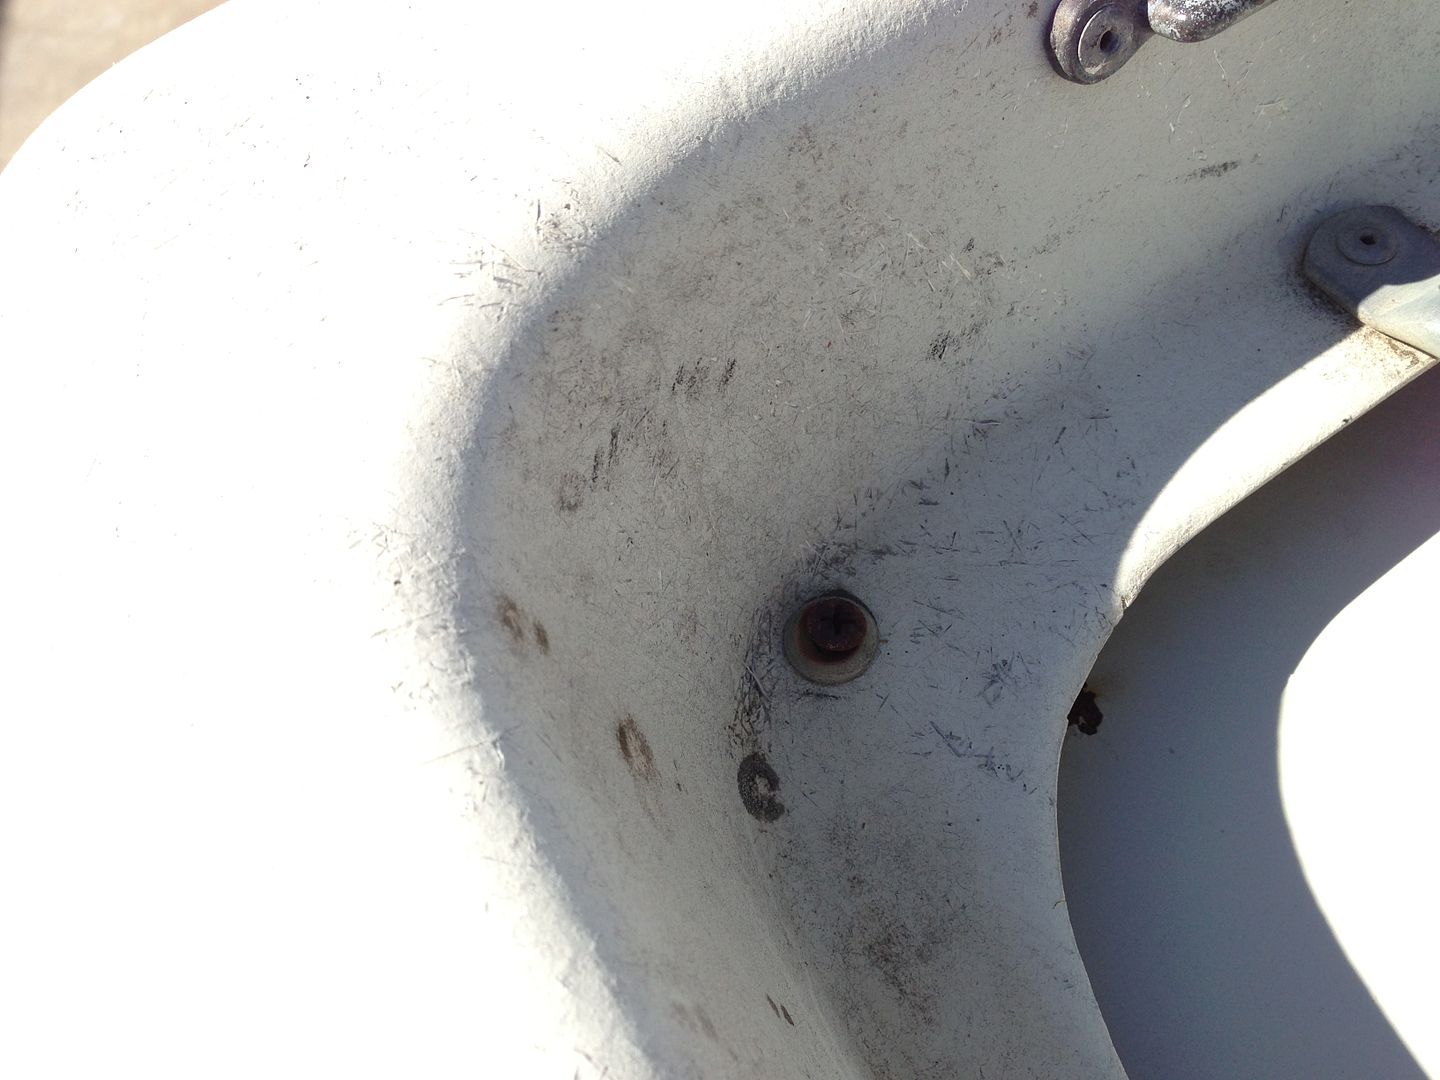 I didn't have any help so I unlisted my magnets help. It held the wrench while I went back out and used the philips screwdriver to remove the screws. (My current canvas doesn't have an opening to be able to reach threw.) 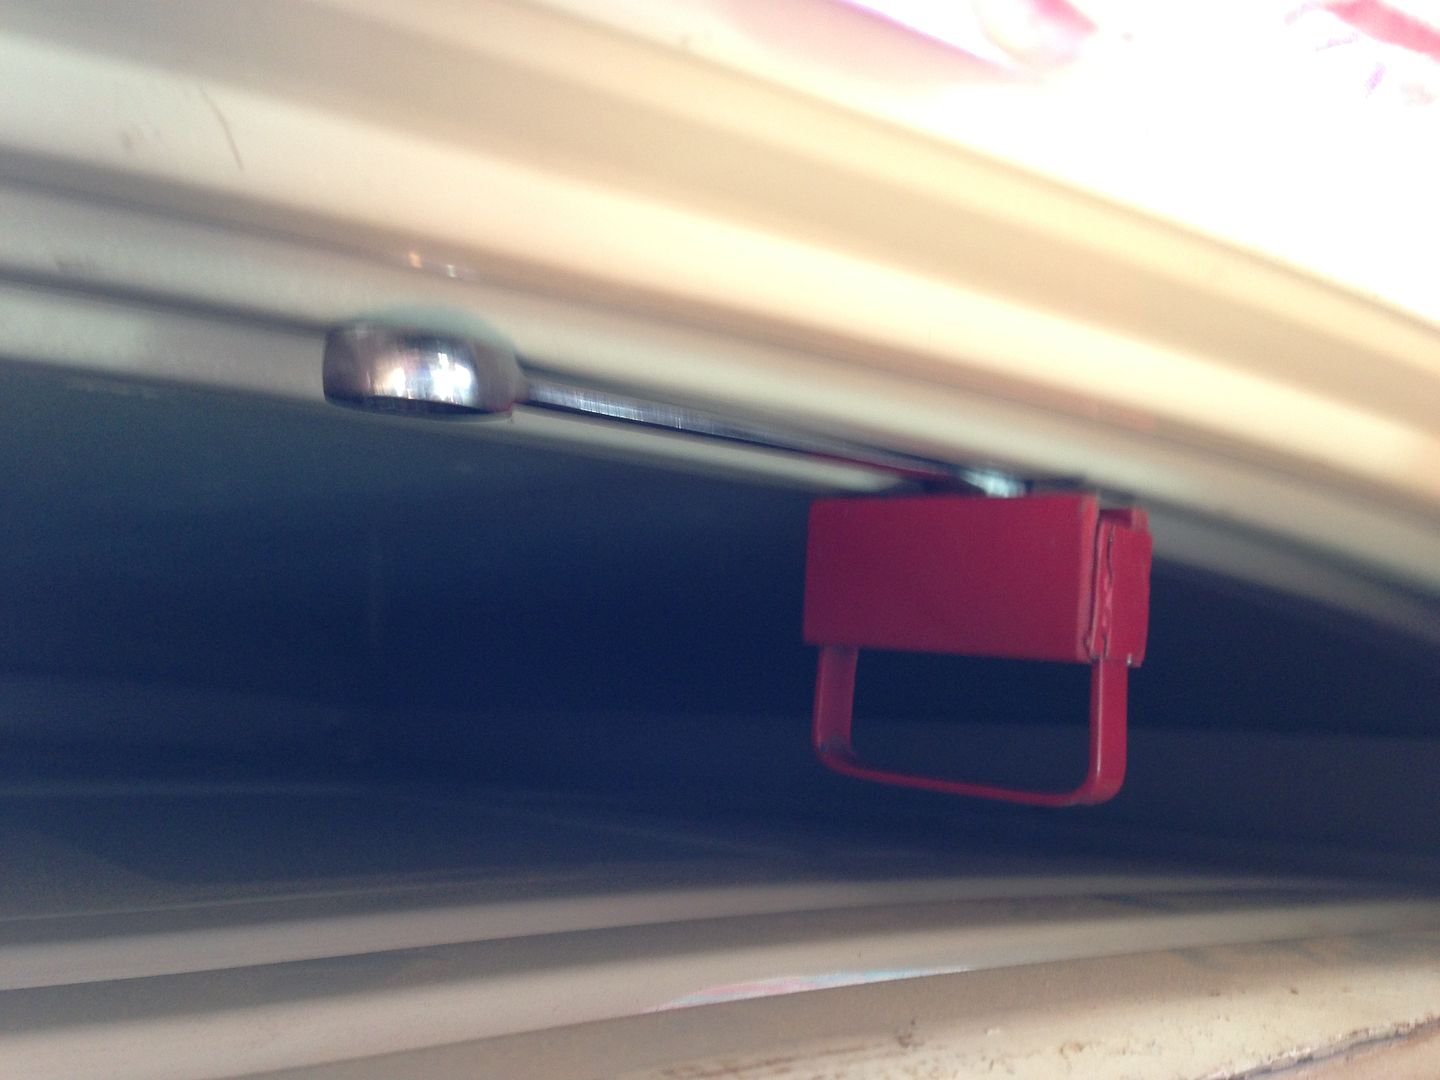 More mold.  When I took the luggage rack off, this was left on top.  Took the petrified rubber piece off and found this.  This is why my window behind the cabinet would fog up. Water was getting in.  Here's the old seal. 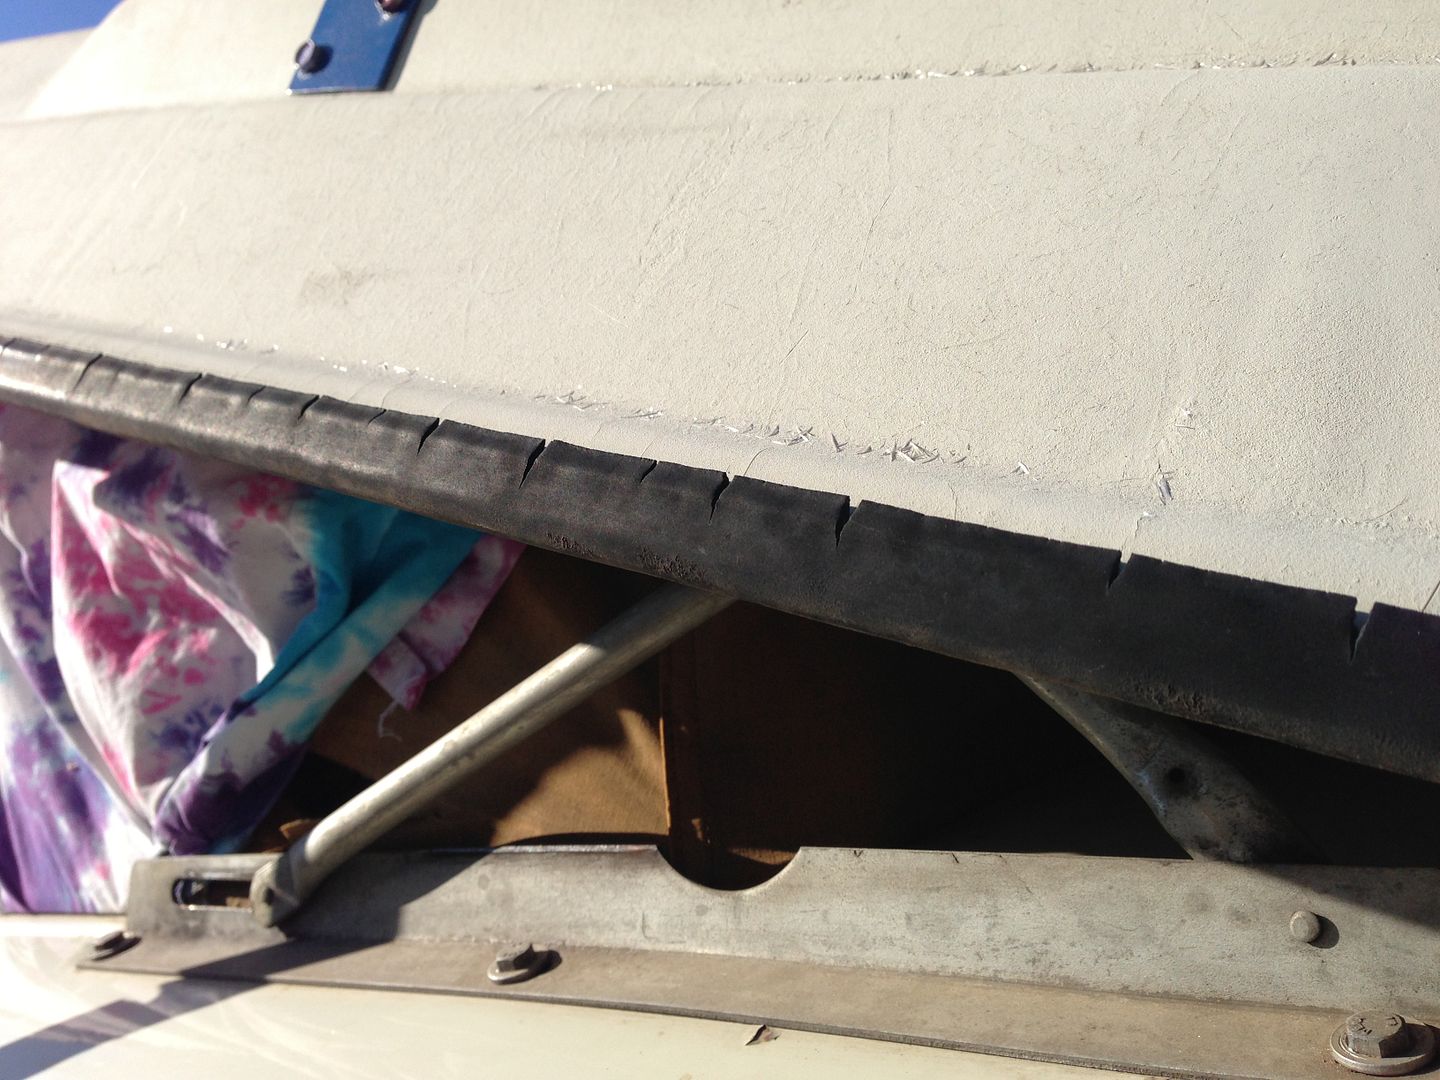  After removing the seal I used a palm sander ( manual kind) and 220 grit sand paper and went over the top and luggage rack and got as much loose fiberglass off as possible. Once I did that I used some spot putty and filled some of the bigger cracks.  I didn't pay attention to the instructions on the putty bottle (well, kind of did lol) and I put it on a bit to thick. It was a pain to sand back down. LOL I did get it down though and then I proceeded to put a coat of primer on. I used Rustoleum White primer. I would wait a day, then sand it all down with 600 grit sand paper and reapply another coat of primer. I put on 3 coats of primer. Here you can see some of the flaws still in the top. I wasn't going for a "new" look, I just wanted the fiberglass to stop flaking off. That and get the mold under control. 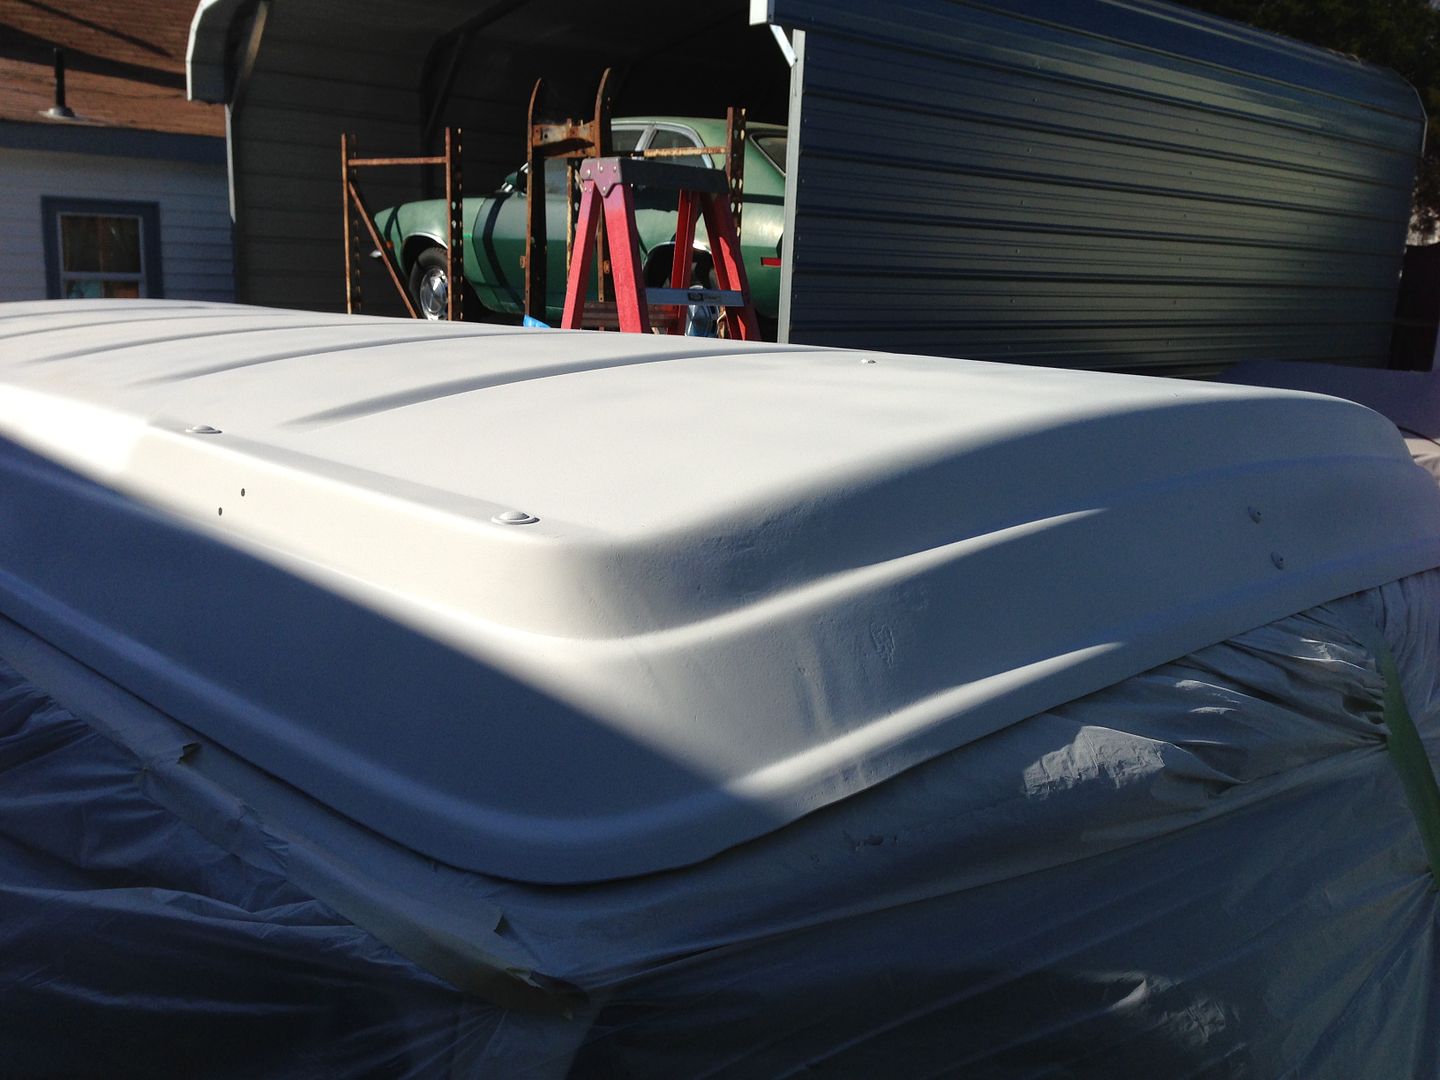 The final paint. I mixed 1 pint of Rustoleum gloss almond with about half to 3/4s pint of gloss white. I didn't like the almond because it was just to tan and the white was to white. 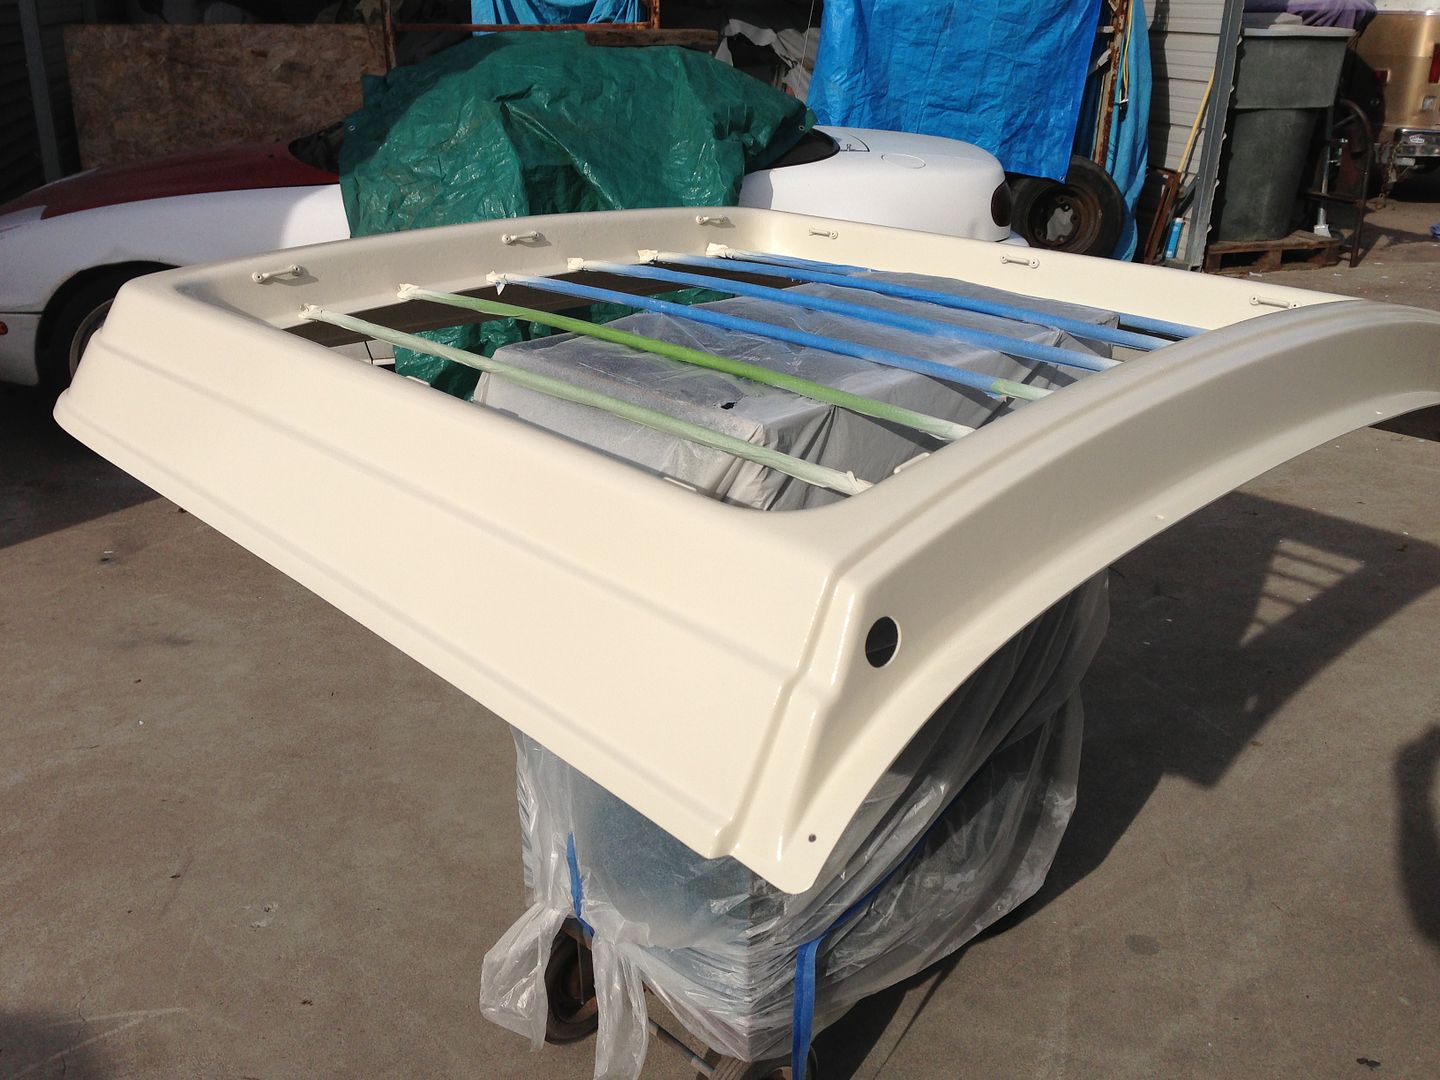 Yes, I painted the tie downs. I didn't want to drill the pop rivets and masking them off was to much of a pain. Can't see them to much from the ground anyway! Look, no more crack in the corner! 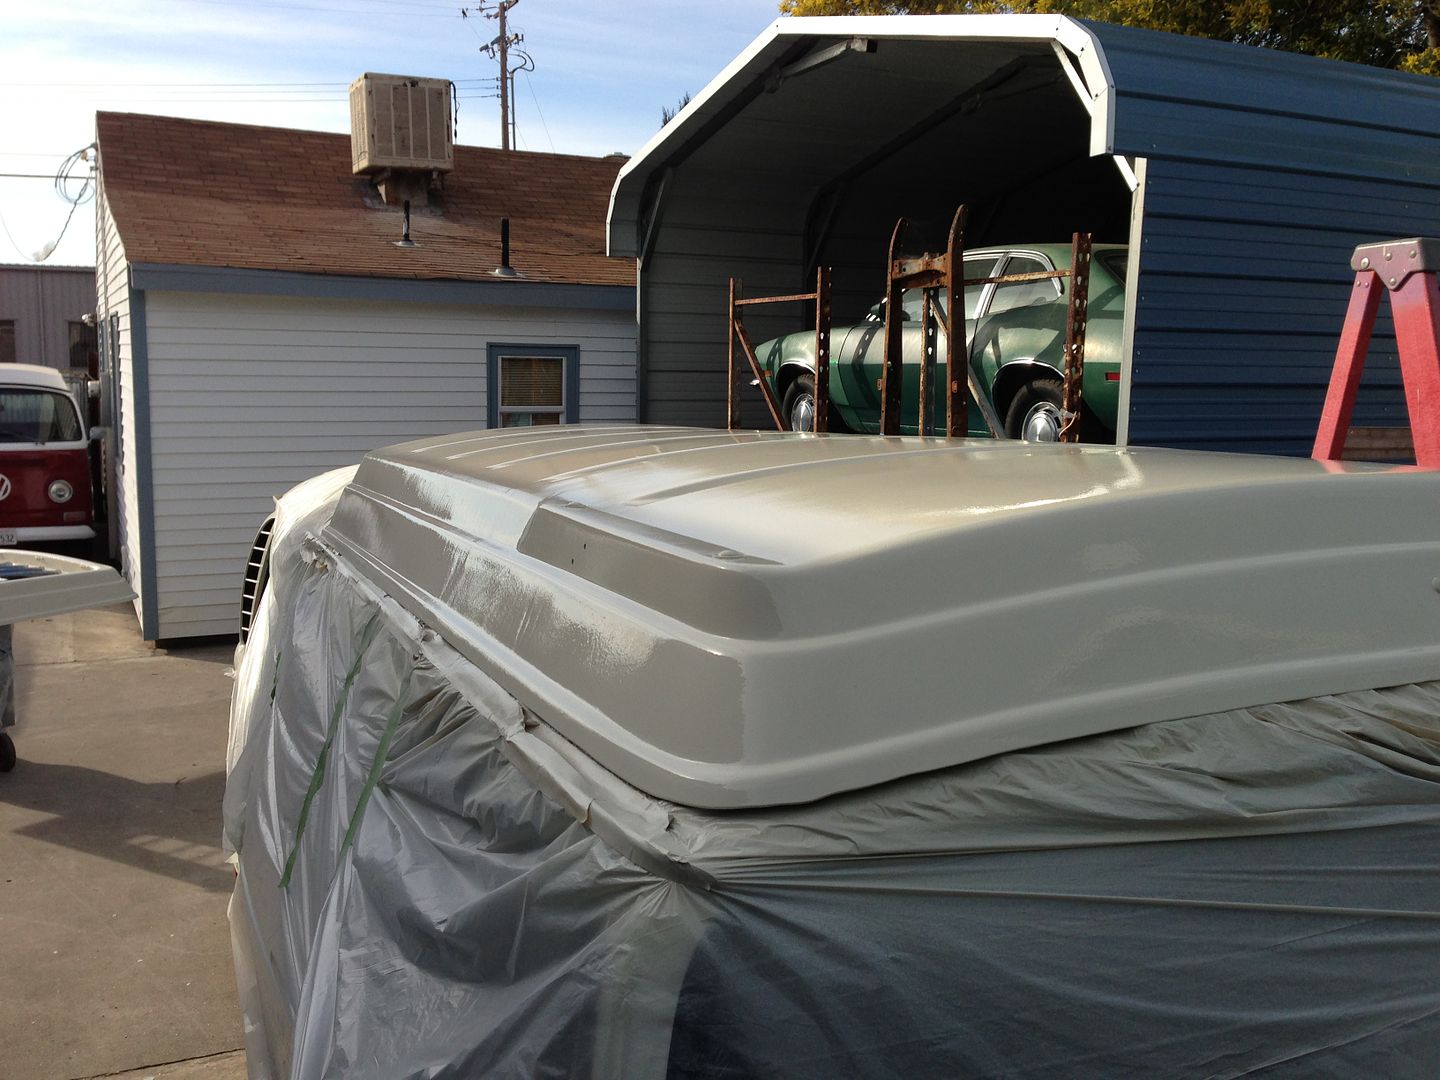 After 2 days of drying it was time to put the new seals on. Not to keen on how the flat seal fits, but I'm hoping it will form to the top eventually.  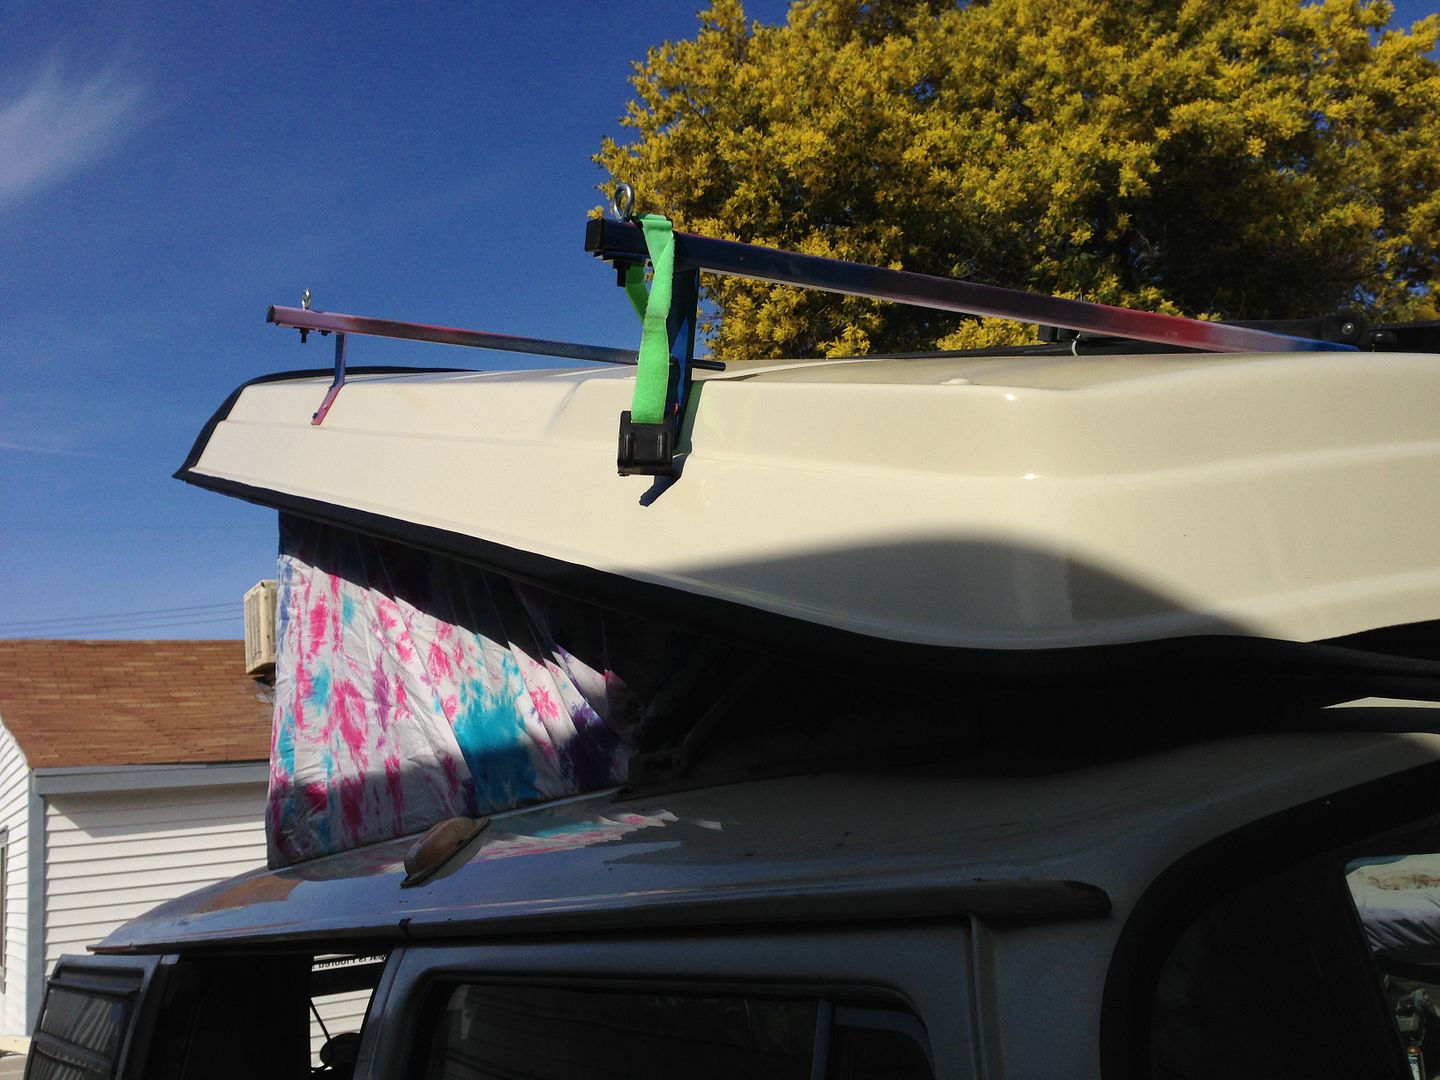 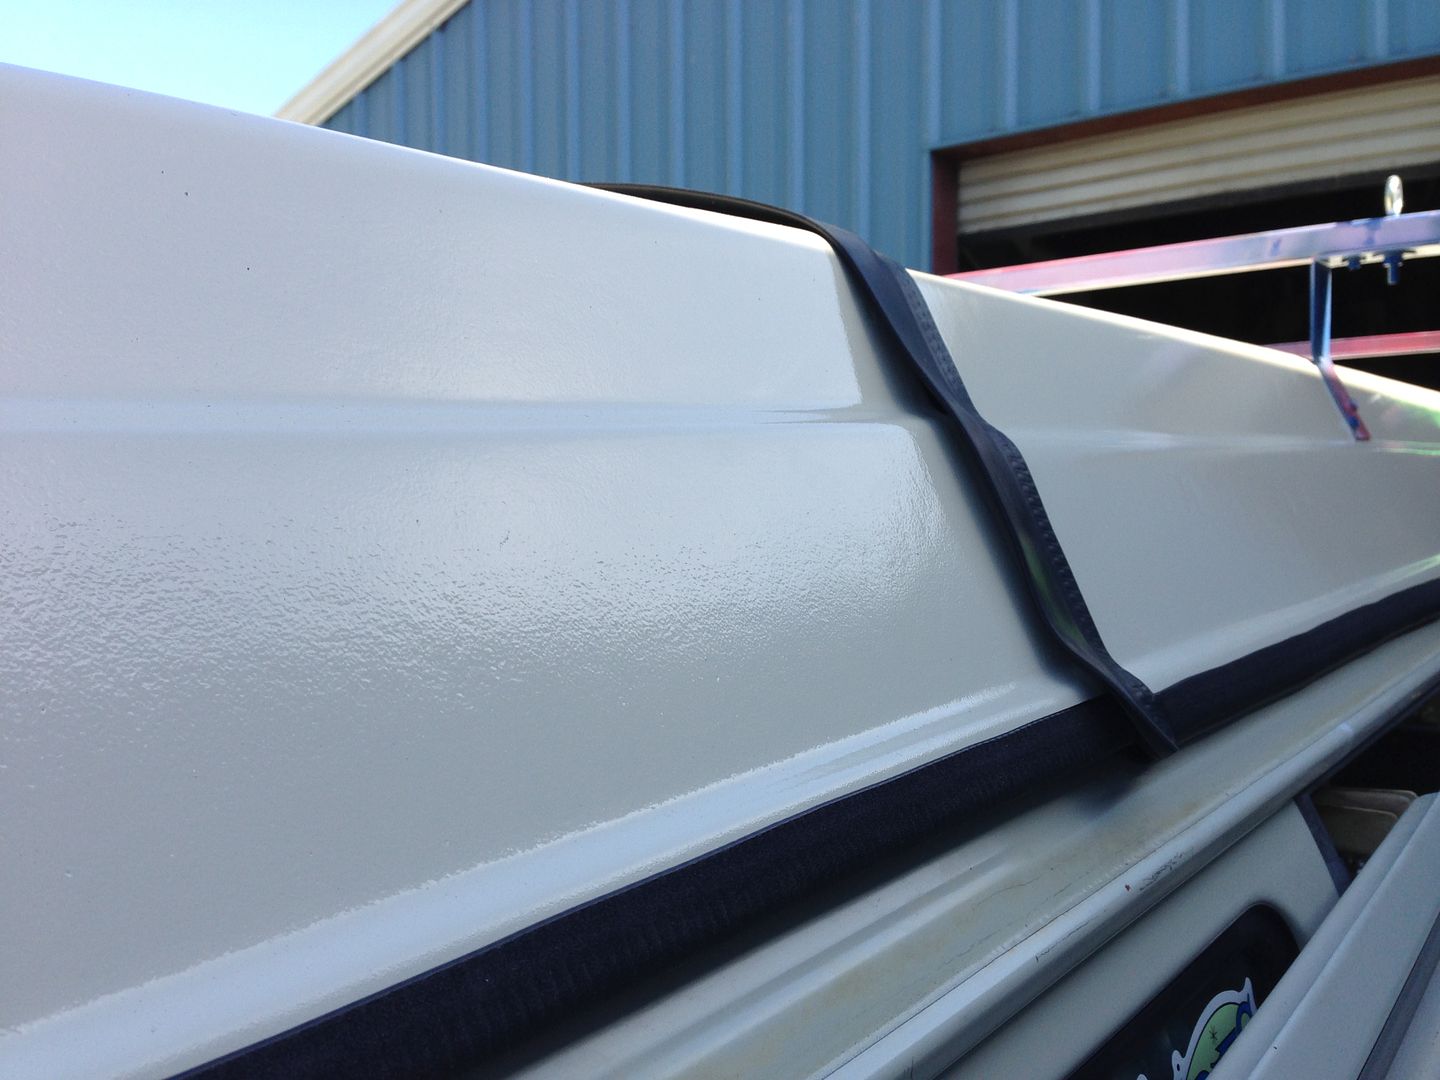 Seals all on. I don't think my year bus was supposed to have the luggage rack molding, but I liked the looks of it so I put it on. 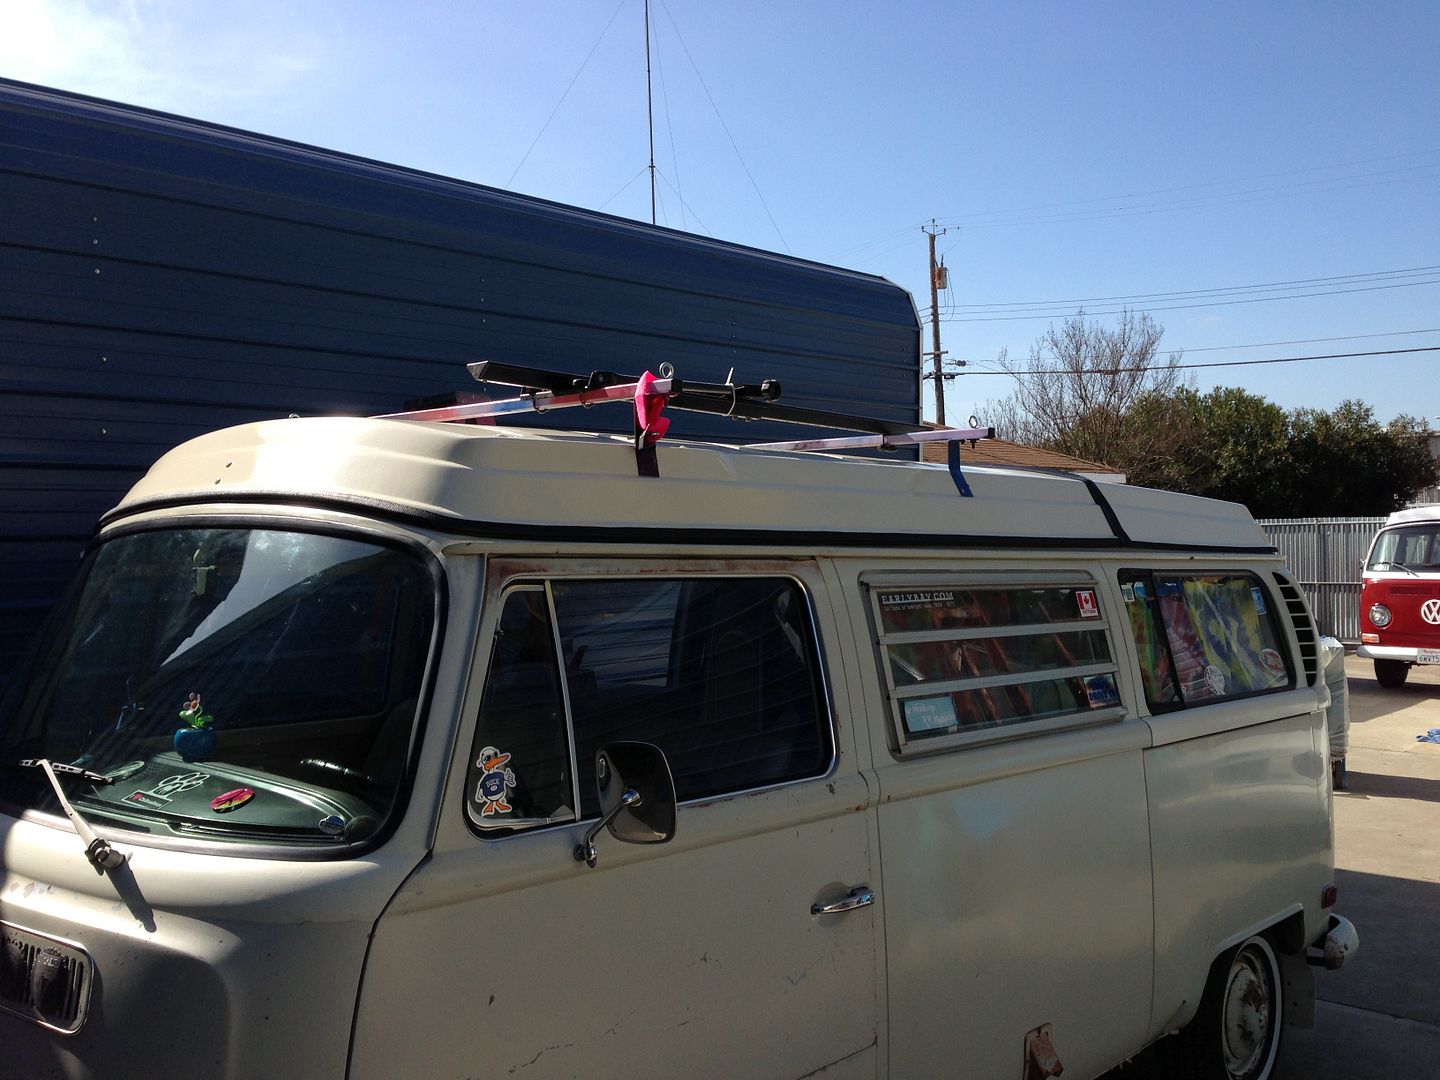 Out in the sun. 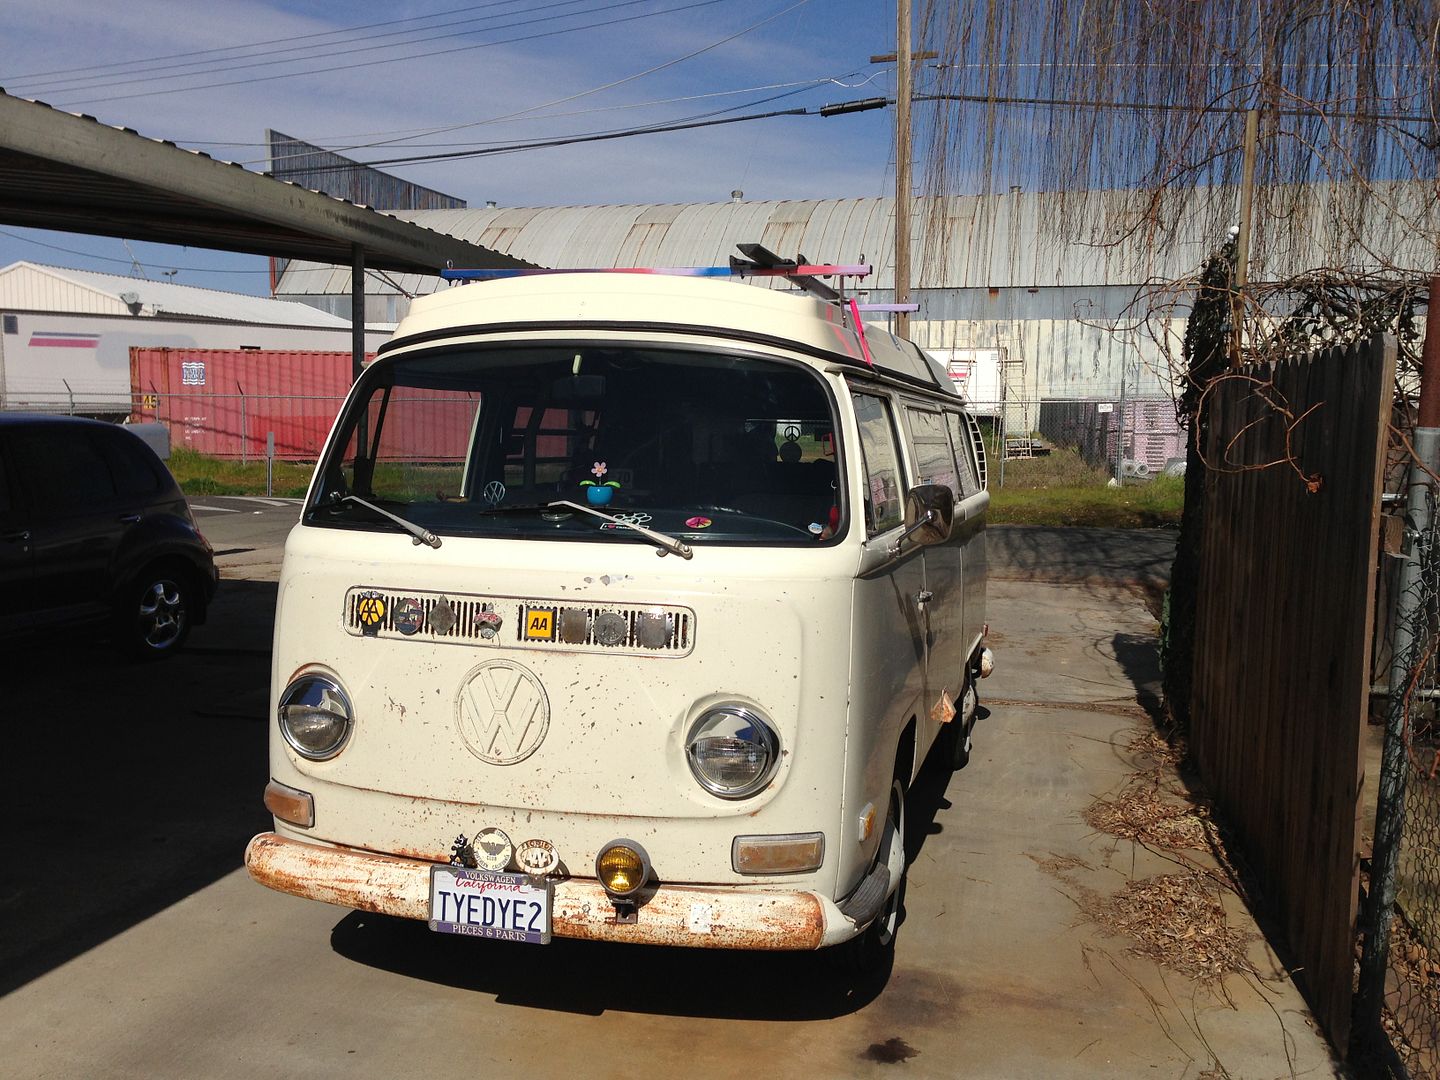 Ok, here is a before and after shot of the bus in it's parking spot.  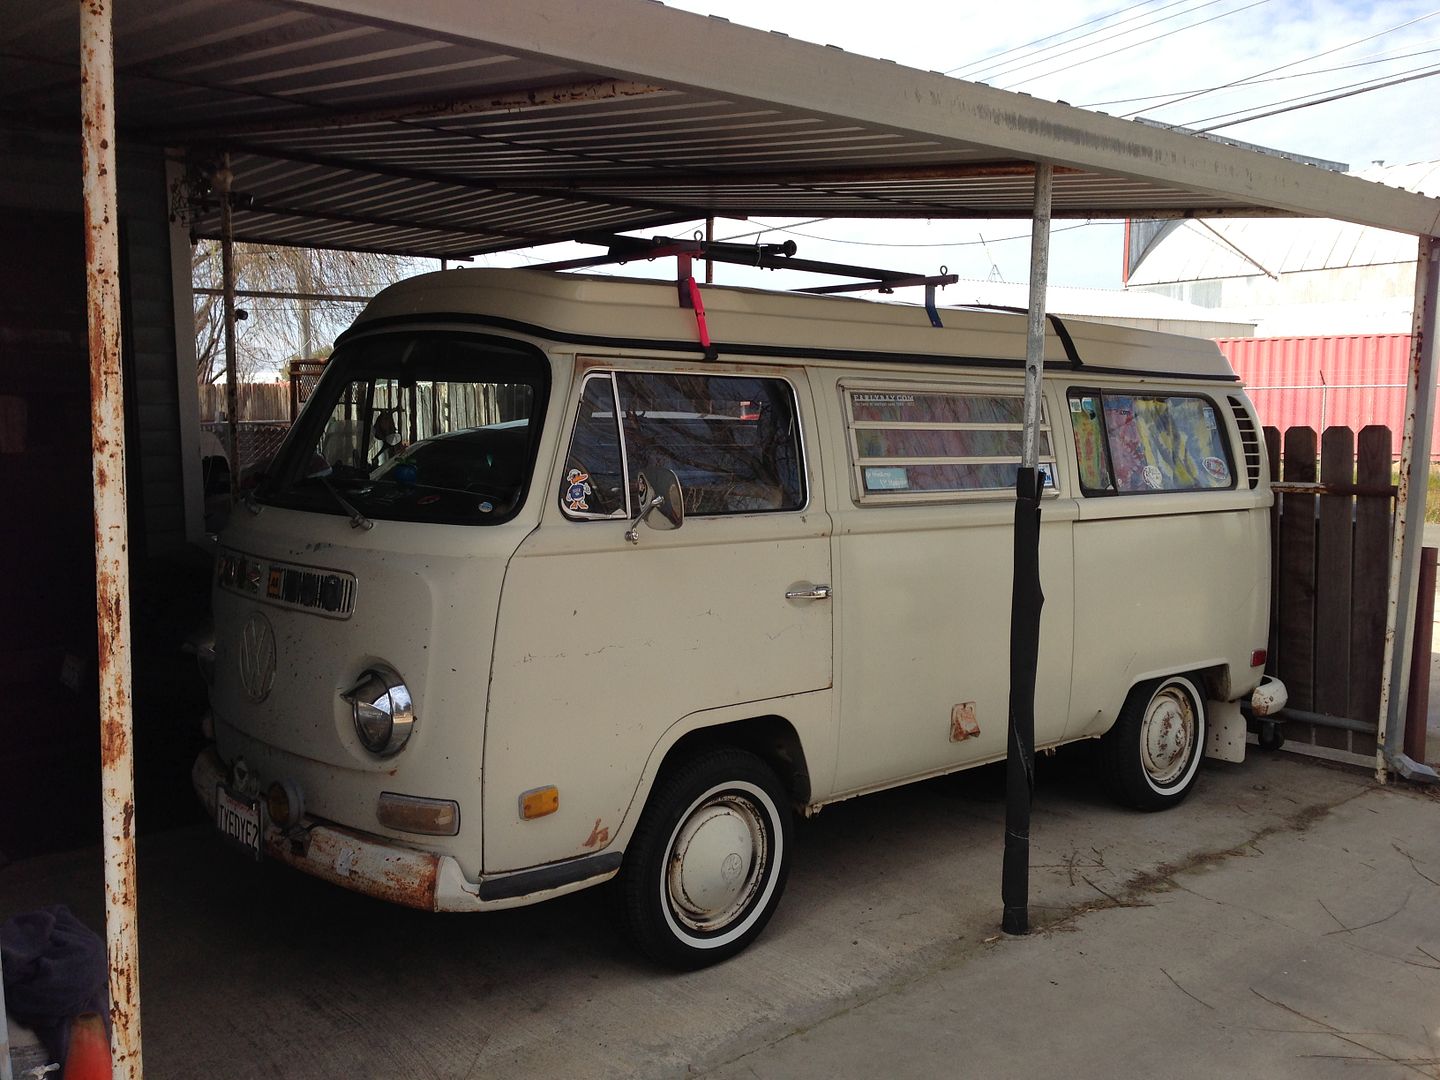 I don't think it came out to bad. I know my arms will be happier the next time I load something on top. No more fiberglass particles getting into them. Should make it really easy to wash now too. Oh, and I fixed that hole in the top with some Marglas. I then drilled a new hole in the luggage rack and the metal top moving the new hole over to a more solid piece of metal. I used the same petrified rubber pieces but lathered on silicone to help seal the holes. | |
|
| | |
Sponsored content
| | Subject: Re: My 70 Bus!! | |
| |
|
| | |
| | My 70 Bus!! | |
|